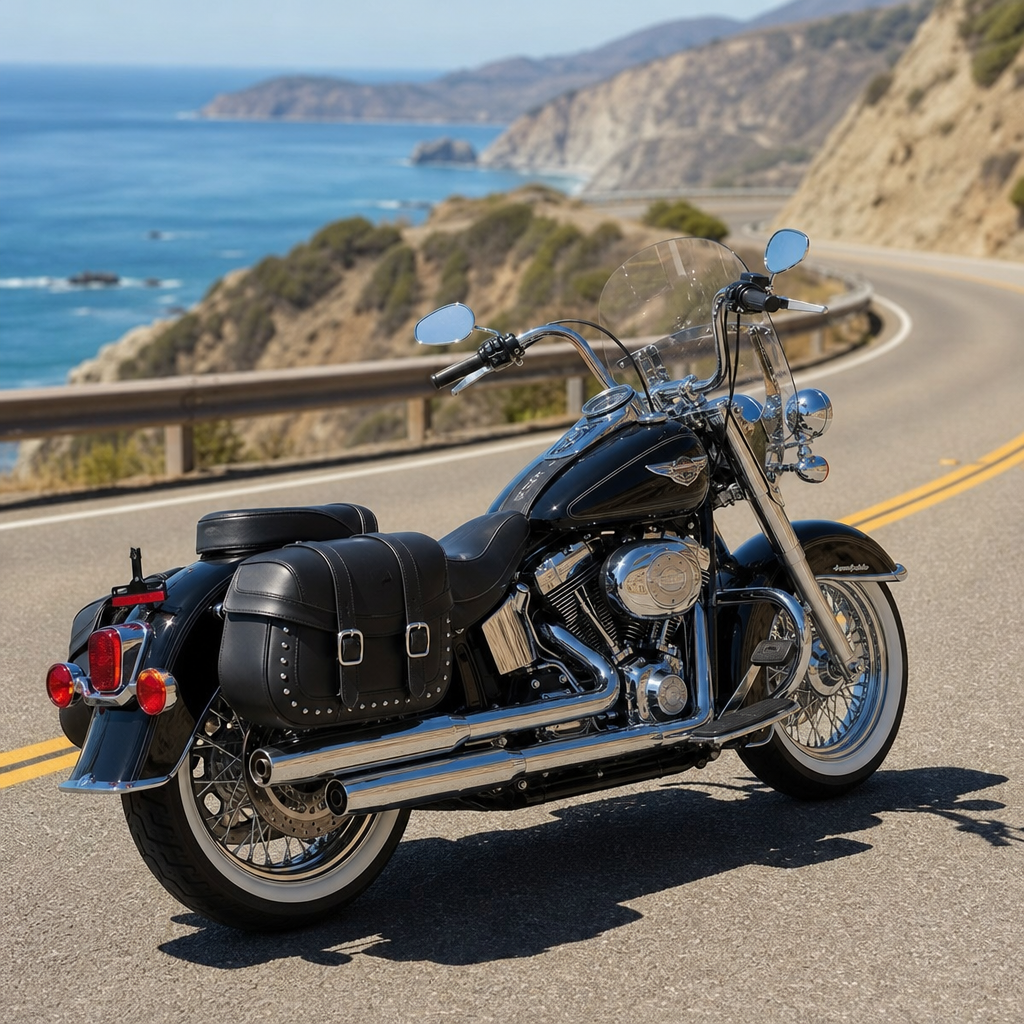
The 2027 Low Rider ST fairing bracket sits at the center of any custom quarter fairing conversion, because it controls wind protection, gauge sightlines, steering clearance, headlight position, and the vibration behavior of every part mounted ahead of the bars. Riders often start this project for style, but the bracket determines whether the bike feels cleaner and lighter on the road or becomes noisy, cramped, and fatiguing. In practical terms, modifying for custom quarter fairings means adapting the stock frame-mounted or semi-mounted support architecture so a smaller fairing can fit correctly without compromising ergonomics, handling, or service access. On the 2027 Harley-Davidson Low Rider ST, those concerns matter even more because the model blends touring intent with aggressive performance geometry, making cockpit layout and aerodynamic load especially sensitive to small hardware changes.
When I build around a Low Rider ST platform, I treat the fairing bracket as both a structural component and an ergonomic tuning device. A quarter fairing is not just a smaller shell; it changes pressure on the rider’s chest, airflow at the helmet, and visual mass over the front wheel. If the bracket moves the fairing too high, shorter riders lose sight of the road close in and may fight buffeting at eye level. If it sits too low or too close to the forks, taller riders can get turbulent air around the collarbone and wrist interference at full lock. Because this article is the hub for model-specific ergonomics and performance recipes, it covers the bracket itself, fitment strategy, rider-position effects, handling considerations, fabrication methods, and the upgrade paths that make related articles worth exploring next.
Understanding the 2027 Low Rider ST Fairing Bracket Platform
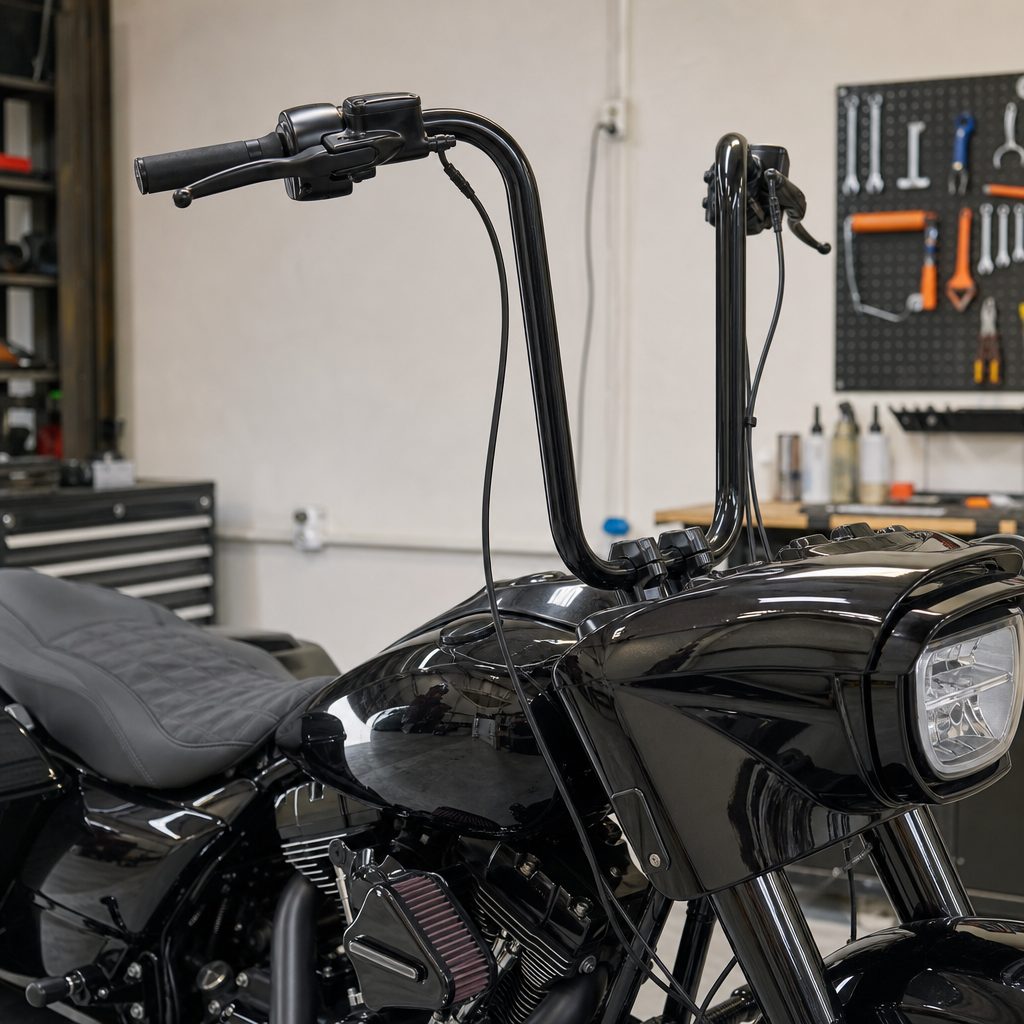
The Low Rider ST uses a performance-cruiser chassis with a rigid frame, inverted front suspension, and a stock fairing arrangement designed around stability at highway speeds. Any custom quarter fairing conversion must begin with a close reading of three reference points: steering head location, fork travel arc, and instrument cluster placement. On this bike, the bracket has to respect full suspension compression and bar sweep while preserving the clean relationship between the headlight nacelle, upper triple clamp, and rider eye line. That is why universal quarter fairings rarely bolt on cleanly without bracket work, even when the shell appears to match width and style.
The key dimensions are offset, rise, setback, and lateral spread between mounting ears. Offset determines how far forward the fairing sits from the steering axis. Rise affects the top edge relative to the rider’s chin and nose. Setback influences gauge visibility and ignition access. Lateral spread governs how the fairing shoulders align with fork tubes and turn-signal stalks. On the 2027 ST, a bracket that looks acceptable in the garage can still fail dynamically if its unsupported span is too long. I have seen thin plate designs resonate around 3,000 to 3,500 rpm, causing headlight shake and cracked mounting holes after a few thousand miles. The cure is usually triangulation, not simply thicker steel.
Material choice matters. Mild steel is easy to fabricate and weld, and it tolerates iterative changes well. 6061-T6 aluminum saves weight, but unless section thickness and gusseting are increased, it can transmit vibration and fatigue at stress risers near bends. Stainless resists corrosion but adds cost and can be harder to tune once built. For most custom quarter fairing projects on this platform, laser-cut steel side plates with welded cross bracing strike the best balance between stiffness, repairability, and finish quality. Powder coating helps, but edge prep and captive nut alignment matter more than color when the bike sees rain and frequent service.
Ergonomics: Building Around Rider Size, Reach, and Wind Pocket
Model-specific ergonomics are what separate a custom bike that photographs well from one that can cover 300 miles without punishment. On the Low Rider ST, the quarter fairing bracket changes rider comfort through airflow management and cockpit space. A rider with a 28-inch inseam and mid controls experiences the fairing differently than a rider with a 34-inch inseam, tall risers, and a stepped seat. The bracket dictates where the fairing’s trailing edge intersects the air stream, which directly affects helmet noise and upper-body fatigue.
I map rider fit by measuring seated eye height above the tank, shoulder width, arm angle at neutral grip, and preferred torso lean. A practical target for quarter fairings is to direct the main air stream either below the sternum for naked-bike feel or cleanly to the upper helmet zone with minimal turbulence. The worst outcome is a bracket position that sends chaotic air at mouth or visor height. On this Harley-Davidson platform, a change as small as 12 to 15 millimeters in fairing rise can turn an intolerable buffet into usable touring airflow. That is why slotted adjustment points are valuable during mock-up.
Bar choice also changes the recipe. Tall risers and moto-style bends can pull the rider upright, increasing chest exposure and requiring more fairing angle to maintain comfort. Lower bars move the torso into cleaner air but tighten the visual space between gauges and fairing edge. Seat shape compounds the issue. A taller saddle effectively lowers the fairing relative to the rider, so a bracket built around a stock seat may underperform once a performance seat is installed. Good ergonomics on the 2027 Low Rider ST depend on treating the bracket, bars, seat, and pegs as one system rather than isolated accessories.
Performance Effects: Stability, Weight Distribution, and Vibration Control
A quarter fairing is lighter than the stock setup, but lighter does not automatically mean better. The bracket influences front-end feel by shifting mass and changing aerodynamic pressure points. Reduce weight too aggressively at the far front, and steering can feel more reactive over rough pavement. Add a heavy bracket with poor load paths, and the fork may not care much statically, but the rider will notice extra shake in mirrors and instruments. The goal is controlled stiffness with modest mass close to the frame.
At highway speed, the fairing creates rearward drag and downward or upward moments depending on angle. If the bracket flexes, the fairing effectively changes pitch in the wind, which can produce inconsistent buffeting and vague feel during passing maneuvers. I tune brackets so the shell has minimal visible movement when the throttle is blipped in neutral and no flutter in crosswinds at 75 mph. Rubber isolation can help protect electronics and reduce high-frequency buzz, but too much isolation lets the fairing oscillate. Use isolation at accessory interfaces, not as a substitute for a properly engineered main bracket.
Handling tradeoffs are real. A smaller quarter fairing can reduce sail area and make the bike feel more athletic in gusty weather, but it also removes some weather protection that supports endurance. Riders who prioritize canyon roads usually accept more chest pressure in exchange for a lighter visual and physical front end. Riders who regularly commute or cover interstate miles often prefer a slightly taller quarter fairing on a bracket that keeps the top edge stable and centered. The best performance recipe depends on intended speed range, local wind conditions, and rider height, not fashion alone.
Common Bracket Modification Recipes for Custom Quarter Fairings
Most successful builds on the Low Rider ST fall into a few repeatable bracket recipes. The first is the adapter-plate method, where the stock mounting points remain and a precision-cut plate translates them to the quarter fairing’s bolt pattern. This is the fastest route when you want reversibility and clean serviceability. The limitation is packaging; if the shell needs significant setback or angle change, stacked adapters can become inelegant and add leverage to the mounts.
The second recipe is a hybrid bracket with new side arms and a retained central crossmember. This approach allows revised rise, offset, and fairing width while keeping some stock geometry. It works well when adapting quarter fairings inspired by FXR, T-Sport, or club-style silhouettes because it creates room for modern headlights, compact signal units, and relocated instrumentation. In my experience, this is the strongest option for riders who want daily reliability without a complete one-off front structure.
The third recipe is a full custom cradle. Fabricators choose this when integrating a nonstandard headlight, digital dash relocation, hidden wiring passages, or high-clearance bars. It offers the most freedom and the greatest risk. Unless the builder has accurate templates, the project can consume time in repeated mock-up cycles. Good cradle designs include slotted upper tabs for fairing pitch adjustment and removable side braces for maintenance access. They also account for harness routing and future windshield variations, because those are the issues that usually force rework later.
| Bracket recipe | Best use case | Main advantage | Main limitation |
|---|---|---|---|
| Adapter plate | Simple quarter fairing swap | Reversible and affordable | Limited adjustment range |
| Hybrid side-arm bracket | Performance street builds | Strong balance of fit and serviceability | Requires precise fabrication |
| Full custom cradle | Unique styling and integrated cockpit changes | Maximum flexibility | Highest design and testing burden |
Fitment Details That Prevent Expensive Mistakes
The most common errors happen before final welding. Full-lock clearance must be checked with the actual grips, levers, mirrors, and switch housings installed. The fairing can clear bare bars and still contact the brake lever blade once everything is assembled. Fork compression also needs simulation. Remove springs or use tie-down compression to verify that the tire, fender, and lower fairing edge never meet under load. On performance Harleys, even a few millimeters of missed clearance can show up the first time the bike hits a sharp dip at speed.
Headlight depth is another frequent problem. Quarter fairings often look shallow from the side, leaving limited room behind the lens for connectors, cooling fans on LED units, and aiming hardware. If the bracket pushes the shell too close to the neck, wiring bends become tight and service access suffers. I leave enough room to remove the headlight without unbolting the entire fairing whenever possible. That saves substantial labor over the life of the bike.
Instrumentation deserves equal attention. The 2027 Low Rider ST rider expects at-a-glance readability, especially if the bike is tuned for brisk back-road use. If the bracket places the fairing lip across the lower part of the speedometer or TFT display, the rider unconsciously drops the chin farther than necessary, which increases fatigue and delays road scanning. A strong mock-up process uses tape lines, cardboard templates, and actual seated checks from multiple rider positions. Digital angle finders and contour gauges help, but nothing replaces viewing the bike in natural riding posture.
Tools, Fabrication Standards, and Validation on the Road
Professional results come from disciplined fabrication. I use CAD templates when possible, but analog methods still matter: centerline marking, fixture tables, transfer punches, and repeatable bend references. For steel brackets, TIG welding offers neat control, while MIG can be perfectly acceptable for thicker sections if penetration and cleanup are right. Fasteners should be quality metric hardware with proper flange support, medium-strength threadlocker where appropriate, and torque values matched to material and insert type. Threaded rivet nuts are useful in fairing shells, but in primary load paths I prefer welded nuts, bonded inserts rated for vibration, or through-bolted joints with locknuts.
Testing starts in the shop and ends on real roads. First, inspect static symmetry relative to the front wheel and tank centerline. Second, run the engine through the usual vibration range while watching headlight beam movement against a wall. Third, road test at city speed, then at highway speed, then in crosswind conditions if available. Listen for panel buzz, watch mirror clarity, and note whether wind pressure feels consistent or pulsing. A bracket that passes a parking-lot shake test can still fail aerodynamically at 80 mph. The road reveals what fixtures cannot.
For riders building a broader Harley-Davidson performance package, this fairing bracket article connects naturally to bar setup, riser height, seat selection, suspension sag, and windshield tuning. Those adjacent topics are not separate cosmetic choices. They are linked recipes. A quarter fairing that works with low bars may underperform with 10-inch risers. A bracket optimized for solo riding may buffet badly once a taller saddle changes torso angle. The smartest path is to plan the whole front-cockpit package before powder coating anything.
The 2027 Low Rider ST fairing bracket is the foundation of a successful custom quarter fairing conversion because it governs structure, airflow, comfort, and control all at once. Modify it well, and the bike feels intentional: cleaner in the wind, sharper in appearance, and more natural at speed. Modify it casually, and problems appear everywhere from helmet buffeting to cracked mounts and obscured gauges. The difference is not luck. It is measurement, rider-specific ergonomics, sound fabrication, and disciplined testing.
As the hub for model-specific ergonomics and performance recipes, this guide should help you frame every related decision on the Harley-Davidson Low Rider ST. Start with the rider’s dimensions and use case, choose the bracket recipe that matches the fairing and desired adjustability, validate clearances under full steering and suspension movement, and then road test for vibration and wind behavior. That process produces durable results and avoids expensive rework. If you are planning your own build, map the cockpit first, mock up the bracket carefully, and use the linked subtopic articles to refine bars, seat height, suspension, and wind management as one integrated system.
Frequently Asked Questions
Why is the 2027 Low Rider ST fairing bracket so important when converting to a custom quarter fairing?
The fairing bracket is the structural foundation of the entire conversion. On the 2027 Low Rider ST, it does much more than simply hold a fairing shell in place. It sets the fairing’s height, angle, and distance from the headlight, and those three factors directly affect wind management, rider comfort, instrument visibility, steering movement, and long-term durability. A custom quarter fairing may look simple from the outside, but the bracket determines whether the finished setup feels refined or improvised.
When riders swap from the stock arrangement to a custom quarter fairing, they usually focus first on appearance. The bracket is what turns that appearance into something functional. If the bracket places the fairing too high, it can obstruct gauge sightlines and create turbulent airflow around the helmet. If it sits too low or too far back, it can crowd the bars, interfere with control cables, or limit fork and steering clearance. If the mounting points are not strong or well-supported, the fairing can vibrate at speed, which often leads to buzzing noises, cracked mounting tabs, blurred mirrors, and premature hardware failure.
On this bike in particular, the bracket also influences headlight location and alignment. Many custom quarter fairing conversions require adapting around the existing lighting package, gauge cluster, and front-end geometry. That means the bracket must be designed or modified to maintain proper headlight centering, preserve enough room for suspension travel and steering lock, and keep the fairing stable under wind load. In short, if the bracket is correct, the motorcycle feels cleaner, lighter, and more intentional on the road. If it is wrong, even a great-looking fairing can become noisy, cramped, and fatiguing over time.
What should be checked before modifying a Low Rider ST fairing bracket for a quarter fairing conversion?
Before making any cuts, drilling any holes, or fabricating adapter plates, the first step is to confirm the bike’s key dimensions and the fairing’s mounting requirements. You want to know the handlebar sweep, riser height, gauge position, headlight depth, fork clearance, and the exact width and shape of the quarter fairing’s inner mounting area. These measurements help determine whether the stock bracket can be adapted, whether spacers will be enough, or whether a partial or full custom bracket is the better route.
Steering clearance is one of the most important checks. Turn the bars fully left and fully right and identify every possible contact point: fairing edge to hand controls, fairing mount to fork tube, wiring to bracket, and brake or clutch lines to the fairing interior. A conversion that looks perfect in a straight-ahead position can quickly become unworkable if it binds at full lock. You also need to account for suspension movement and frame flex under real riding conditions, not just static garage measurements.
Gauge sightlines are another critical factor. Quarter fairings are smaller and often positioned differently than the original setup, so the bracket must place the fairing where it does not block or awkwardly frame the speedometer, warning lights, or accessory displays. Headlight fitment should be checked at the same time, especially if the custom fairing has a tighter opening or a different offset than the original front-end layout.
Finally, assess the bracket’s material, thickness, and load path. If the stock bracket was designed for a larger or differently supported fairing structure, it may not behave the same once trimmed or redrilled. Every new mounting point changes how vibration moves through the assembly. That is why careful mock-up, temporary fitting, and repeated clearance checks are essential before final welding, coating, or assembly. Good preparation prevents cracked parts, finish damage, and costly rework later.
Can the stock 2027 Low Rider ST fairing bracket be reused, or is a custom bracket usually necessary?
In many builds, the stock bracket can be reused in some form, but whether that is a good idea depends on the fairing design, the amount of repositioning required, and how much structural integrity remains after modification. If the custom quarter fairing is close in width, depth, and mounting geometry to the original arrangement, the stock bracket may accept adapter tabs, stand-offs, or reinforcement plates without major compromise. That approach can save time, preserve factory mounting relationships, and make headlight and gauge alignment easier to maintain.
However, once the conversion requires major changes in fairing height, rake angle, or mounting spread, the stock bracket can become more of a limitation than an advantage. Cutting away too much material, moving the mounting points too far from their original load path, or stacking excessive spacers can create a bracket that technically fits but performs poorly. That is where riders begin to notice shaking, harmonic vibration, misaligned headlights, or flex when riding at highway speed.
A custom bracket becomes the better choice when the quarter fairing has unique internal contours, when the bike is running different bars or risers, or when the rider wants a cleaner and more deliberate final fit. A properly designed custom bracket allows the fairing, headlight, and gauge area to work together instead of being forced into place. It also makes it easier to use the right material thickness, gusseting, and mounting point spacing for long-term stability.
The best answer is usually not purely “reuse” or purely “replace.” It is “evaluate honestly.” If the stock bracket supports the fairing with minimal compromise and strong mounting geometry, it is worth adapting. If the bracket needs extensive modification that weakens it or pushes everything out of alignment, a purpose-built bracket will usually deliver a better result in both function and appearance.
How do you reduce vibration and buffeting after installing a custom quarter fairing on the Low Rider ST?
Vibration and buffeting are two separate issues, but the bracket plays a major role in both. Vibration is typically a structural problem, while buffeting is mostly an airflow problem. To reduce vibration, start by making sure the bracket has adequate rigidity without becoming so harsh that it transfers every engine pulse directly into the fairing shell. Strong triangulation, properly placed support points, and high-quality fasteners matter more than simply using thicker metal. In many cases, strategic reinforcement works better than making the entire bracket overly heavy.
Hardware selection also matters. Loose tolerances, uneven spacer stacks, and poor washer support often create small movements that turn into large rattles on the road. Using the correct bolt grade, proper thread engagement, locking hardware, and evenly loaded mounting surfaces helps keep the fairing stable. Rubber isolation can help in some applications, but it needs to be used carefully. Too much isolation can allow the fairing to oscillate, while too little can transmit vibration directly into the shell and mounting tabs.
Buffeting usually comes from the fairing’s angle, height, and distance from the rider rather than from the fairing bracket alone. Still, the bracket determines all of those positions. A quarter fairing that sits too upright can throw turbulent air directly at the helmet. One that sits too low may reduce chest pressure but create noisy airflow around the neck and shoulders. Small changes in tilt and spacing can make a dramatic difference, which is why test fitting and road testing are so valuable.
The most effective approach is to tune the setup in stages. First, confirm structural stability with all hardware torqued properly and the fairing mounted evenly. Then evaluate airflow at different speeds, paying attention to helmet turbulence, shoulder pressure, and any side-to-side instability. If needed, adjust the bracket angle, fairing height, or headlight-to-fairing relationship incrementally instead of making large changes all at once. A well-executed setup should feel planted, visually aligned, and noticeably less fatiguing on longer rides.
What are the most common mistakes riders make when modifying a fairing bracket for a custom quarter fairing?
The most common mistake is treating the bracket like a simple accessory mount instead of a structural component. Riders often focus on getting the fairing attached and visually centered, but overlook the fact that the bracket must also control vibration, maintain clearance at full steering lock, support the headlight correctly, and preserve comfortable sightlines to the gauges. A bracket that looks fine in the garage can reveal major flaws once wind pressure and road vibration are added.
Another frequent mistake is removing too much material from the stock bracket without adding reinforcement. Cutting for clearance, trimming unused tabs, or redrilling mounting locations can be perfectly reasonable, but every change affects stiffness and load distribution. Without gussets, backing plates, or a revised support layout, the modified bracket may flex more than expected. That flex shows up as rattling, cracked fairing tabs, shifting headlight aim, or a generally unsettled feel at speed.
Poor mock-up practices are also a major source of problems. Some builders test fit the fairing with the bars straight ahead and stop there. A proper mock-up includes full steering sweep, cable and wiring movement, suspension compression awareness, and careful checking of hand control clearance. You also want to evaluate rider position, because a fairing that technically clears everything may still sit in a way that blocks instruments or directs air poorly toward the rider.
Finally, many riders underestimate finishing details. Misaligned holes