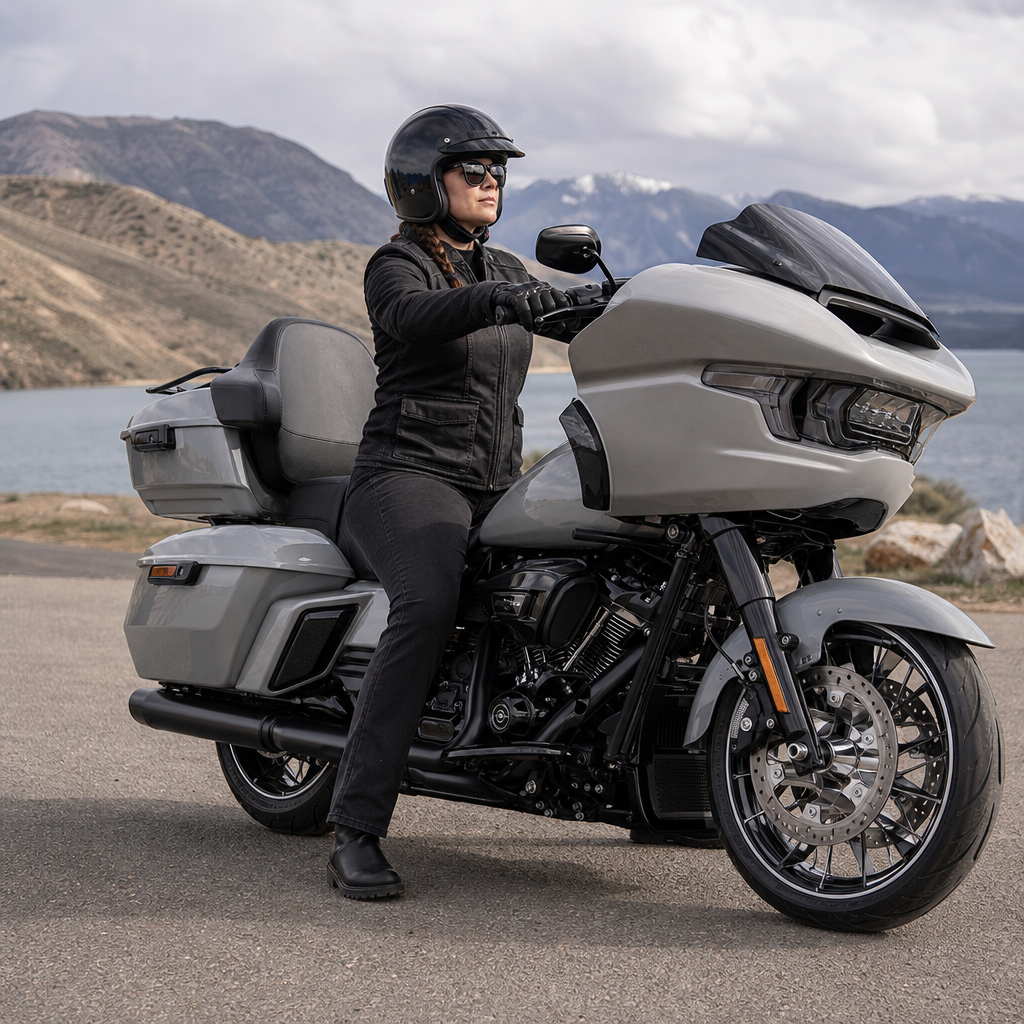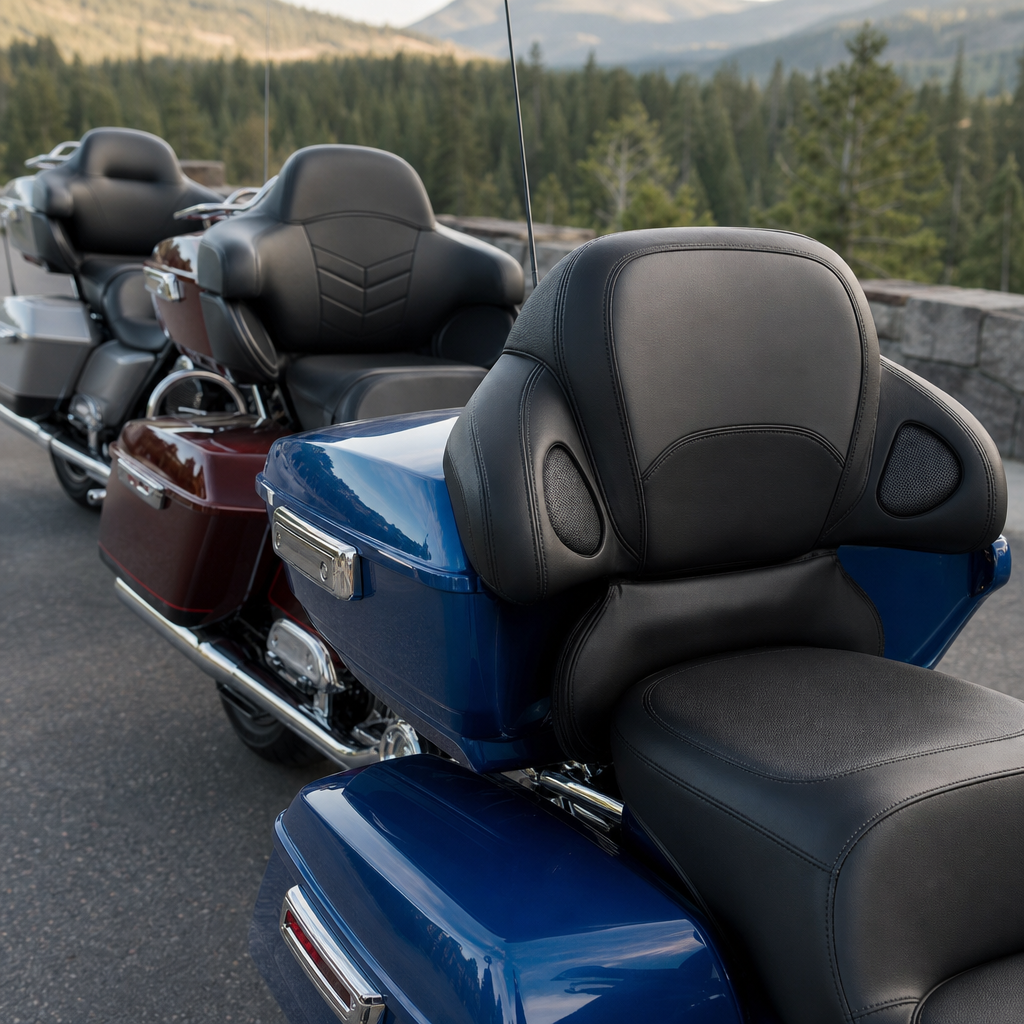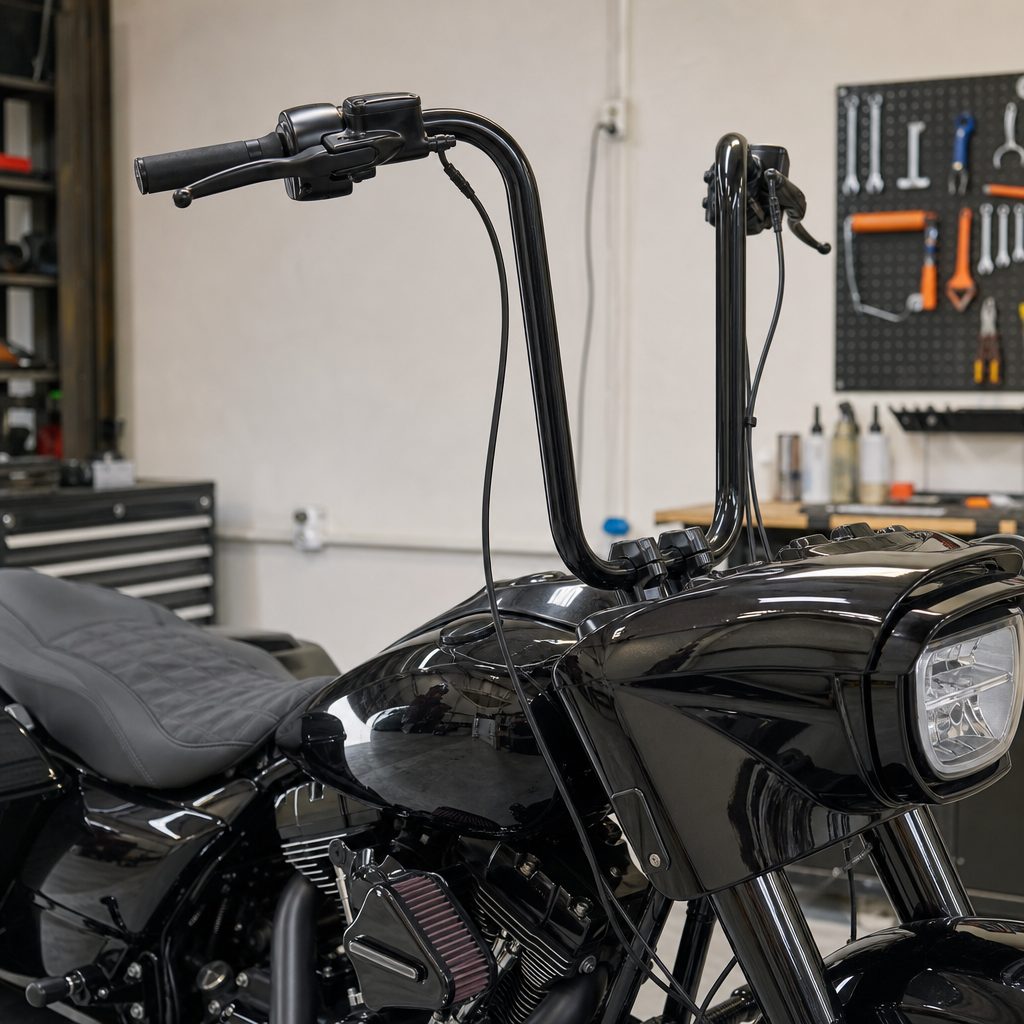
Installing 14-inch ape hangers on the 2027 Street Glide changes far more than appearance. It alters rider posture, steering leverage, cable routing, brake hydraulic requirements, switch wiring length, and the way the bike feels at highway speed. In this guide, I am treating the 2027 Street Glide as a model-specific ergonomics and performance platform, not just a styling exercise, because that is how successful bar conversions are planned in the shop. Riders searching for 14-inch ape hangers on the 2027 Street Glide usually want three answers: what parts are required, how to extend wiring and brake lines correctly, and whether the result improves comfort without compromising control.
Ape hangers are handlebars with a pronounced rise that place the grips higher than stock. On a touring Harley-Davidson, a 14-inch version generally means the total rise measures around 14 inches from the bar centerline to the grip section, though exact geometry varies by manufacturer. Street Glide fitment depends on rise, pullback, width, and the angle of the control mounting area. Wiring extension refers to lengthening the switch harnesses, throttle-by-wire leads, heated grip circuits if equipped, and any accessory wiring routed through or along the bars. Brake line extension means replacing the stock front hydraulic line assembly with one long enough to maintain correct routing, steering sweep, and suspension travel without tension or chafing.
This matters because the 2027 Street Glide is a heavy, fully faired touring motorcycle whose ergonomics are tightly linked to rider endurance and low-speed confidence. A bar that looks right but forces overextended shoulders, cramped wrists, or stretched cables can create numb hands, vague steering input, and long-term reliability problems. I have seen clean-looking installs come back with pinched harnesses at the neck, ABS lines rubbed thin under the nacelle area, and switch packs that intermittently fail because the wiring was pulled tight at full lock. The good news is that a properly planned 14-inch ape setup can improve upper-body posture, reduce the forward reach for many riders, and create a more neutral elbow bend than the stock arrangement.
As the hub for model-specific ergonomics and performance recipes, this article gives you the framework for choosing parts, measuring correctly, extending wiring, and replacing brake lines with touring-grade reliability. It also shows where this fitment sits within the broader Harley-Davidson setup strategy: rider triangle tuning, control placement, suspension balance, and luggage or passenger use. If you understand those relationships before ordering a single part, the finished 2027 Street Glide will feel intentionally built rather than merely modified.
How 14-inch ape hangers change ergonomics on the 2027 Street Glide
The primary ergonomic effect of 14-inch ape hangers is grip elevation combined with a change in reach. On the 2027 Street Glide, which already places the rider upright compared with many performance cruisers, this can either relieve shoulder tension or create it depending on bar bend. Rise alone does not determine comfort. Pullback, wrist angle, and grip spread are equally important. A rider with a 30-inch sleeve length may find a narrow, low-pullback 14-inch bar too high and too far forward, while a rider with broader shoulders may feel perfectly centered and relaxed.
In practical fitting terms, your hands should land at or slightly below shoulder height while seated in your normal riding posture, not while artificially sitting tall for measurement. Elbows should keep a soft bend. Wrists should remain close to neutral when resting on the grips and while covering the levers. If the wrists break outward, long-distance fatigue increases. If the elbows lock straight, steering precision suffers in parking-lot maneuvers. For touring use, especially on a batwing-faired Harley-Davidson, I favor bars that preserve leverage and bring the hands back enough to avoid loading the upper trapezius muscles.
Bar height also affects airflow and the relationship between the rider and the fairing. On a Street Glide, raising the hands changes how your torso sits behind the windscreen. Many riders unconsciously sit more upright after a 14-inch conversion, which can move the helmet into a noisier air pocket if the windshield was chosen around the stock bar position. That is why a proper ergonomics recipe often includes windshield evaluation, seat height review, and lever angle adjustment. The bar swap is central, but it is never isolated.
Parts planning: what you typically need before starting
A reliable install starts with a complete parts list. For most 2027 Street Glide builds using 14-inch ape hangers, you should expect to need the handlebars, an extended front brake line or complete upper brake line kit, wiring extensions or a complete pre-lengthened handlebar harness solution, bar-specific riser bushings if required, new cable ties, heat-shrink, grommets, and fresh brake fluid that meets Harley-Davidson specifications for the bike’s braking system. If the bike uses ABS, order a line kit explicitly labeled for ABS-equipped Street Glide touring models, because fitting lengths and junction points differ from non-ABS layouts.
Throttle-by-wire simplifies some older cable issues because you do not need longer throttle cables, but it adds sensitivity to wiring integrity. Damaging the electronic throttle wiring during internal bar routing can produce fault codes and limp-home behavior. Heated grips, audio controls, and accessory switches add more complexity. Before disassembly, document every connector location with photos. Touring Harleys often hide connectors under the outer fairing, in nacelle-adjacent cavities, and along the frame backbone. Having that visual record saves time when routing the new harness path.
Do not assume every 14-inch bar requires the same extension length. Manufacturer dimensions vary, and some bars achieve height with more pullback while others gain height through straighter uprights. Compare the stock bar path to the proposed path, including internal bends. In my experience, buying a kit matched to the exact bike, bar rise range, and whether wiring is internal or external prevents the most common ordering mistake: a brake line that technically fits on the lift but goes taut when the fork extends or the bars reach full left lock.
Measuring wiring and brake line extension length correctly
The correct way to measure is on the motorcycle, with the new bar mocked into place before final assembly. Use flexible tubing, heavy string, or old wire to simulate each route from connector to control and from master cylinder to junction or ABS distribution point. Turn the bars fully left and right. Compress and extend the front suspension if possible, or at minimum account for full fork extension while the bike is lifted. The target is enough length for free movement without loops that can snag, rub, or look untidy.
For wiring, add modest service slack near connection points, especially inside the fairing where future maintenance may require unplugging controls without immediately pulling the harness tight. Avoid sharp bend radii at bar exits and control housings. For brake lines, follow the intended path exactly, including clamps and guides. Hydraulic lines should arc naturally, not kink around the fairing bracket or neck. Stainless braided lines with clear or black coating are common because they resist expansion better than old-style rubber lines, improving lever feel while meeting touring durability expectations.
| Component | What to Measure | Common Mistake | Best Practice |
|---|---|---|---|
| Switch wiring | Connector to control housing through exact bar route | Measuring outside the bar when routing internally | Mock the internal path and add small service slack |
| Throttle-by-wire lead | Module to throttle housing with full steering sweep | Twisting or pinching at the throttle side bend | Protect with sleeve and verify free throttle return |
| Front brake line | Master cylinder to ABS or junction block along clamps | Ordering by rise only | Measure the actual route at full lock and fork extension |
| Clutch side wiring | Main harness connector to left switch pod | Ignoring heated grip and accessory branches | Account for every circuit in the loom |
A simple rule helps: if a line or harness becomes the steering stop, it is too short. If it can contact hot engine parts, sharp edges, or moving fork components, it is routed incorrectly. The 2027 Street Glide deserves measurements made around its actual chassis, fairing structure, and selected bars, not estimates borrowed from another touring model.
Internal wiring versus external wiring on ape hangers
Most riders prefer internal wiring because it produces a cleaner look, especially on a premium touring build. However, internal wiring is slower, more delicate, and completely dependent on the quality of the handlebar’s dimpled and drilled provisions. Burrs inside the bar can cut insulation during installation. Before pulling any harness through, inspect every opening with a light, deburr if necessary, and use a pull cord plus wire lubricant approved for electrical work. I also sleeve vulnerable sections with braided loom or heat-shrink in areas where the harness passes through metal openings.
External wiring is easier to service and often simpler when using bars with complex bends. On a performance-oriented touring bike that sees frequent changes, external routing can be rational, but it needs disciplined fastening and abrasion protection to look professional. Whether internal or external, the key standard is strain relief. Connectors should not carry the weight or movement load of the harness. Secure the loom so vibration is distributed along the route, not concentrated at one crimp or one terminal.
If you are installing aftermarket switch extensions rather than complete replacement harnesses, soldered and sealed joints remain the benchmark for longevity when done correctly, though many high-quality crimp systems from Delphi or Deutsch-style ecosystems perform extremely well if the correct tooling is used. The weak point is never the method alone; it is poor execution. Mis-crimped terminals, unsealed splices, and unsupported junctions are what fail on touring bikes ridden in rain and heat.
Brake line replacement, bleeding, and safety checks
Brake line extension is the step where shortcuts become dangerous. Use a kit from a recognized Harley-Davidson touring supplier that specifies 2027 Street Glide compatibility, ABS status, bar height range, and fitting orientation. Banjo angle matters. A line with the wrong fitting clocking can twist under installation or force an unnatural path that eventually stresses the hose. Replace sealing washers where required and torque fittings to specification from the service literature, not internet guesswork.
After installation, bleeding must be complete and methodical. ABS-equipped touring bikes can trap air in ways that make the lever feel acceptable on the stand but vague on the road. Pressure bleeding, vacuum bleeding, or the manufacturer’s recommended sequence may all be appropriate depending on the exact system design, and scan-tool-assisted ABS cycling is sometimes necessary if air entered the modulator. Use only fresh fluid from a sealed container and protect painted surfaces immediately, because brake fluid damages finishes fast.
Final checks are not optional. Turn the bars lock to lock while watching line behavior. Confirm no contact with the fairing bracket, no stretch at full lock, no line rub at the neck, and no interference with gauge movement or infotainment wiring behind the fairing. Squeeze the lever hard and hold pressure. A slowly sinking lever indicates a problem. Road-test at low speed first, then recheck every fastener, clamp, and hydraulic junction after the initial ride.
Performance, handling, and the broader Street Glide setup recipe
Fourteen-inch ape hangers can improve confidence when fitted to the rider, but they do affect handling feel. Higher grips increase steering leverage, which can make low-speed inputs easier on a heavy bagger. At the same time, excessive width or poor wrist angle can reduce precision during quick transitions. On the 2027 Street Glide, the best result comes from treating bars as one ingredient in a full setup recipe that includes seat shape, foot placement, suspension sag, tire condition, and windshield height.
This is why this page functions as the hub for model-specific ergonomics and performance tuning under the Harley-Davidson umbrella. Bar height influences torso angle. Torso angle influences how weight rests on the seat. Seat pocket position changes reach to the bars and floorboards. If rear suspension preload is wrong, the rider sits deeper or higher than expected, shifting the final relationship again. In real workshop practice, the cleanest 14-inch install is not the one with the hidden wires; it is the one that leaves the rider finishing a 300-mile day without neck pain and without fighting the bike in traffic.
For many riders, the ideal final recipe includes 14-inch ape hangers, lever angle adjusted slightly downward to keep wrists neutral, a seat that supports the pelvis without pushing the rider forward, and suspension set for actual rider-plus-luggage weight. Build your Street Glide around use case, not trends. If the goal is touring comfort with strong control and factory-grade reliability, plan carefully, buy model-specific parts, and verify every routing path before the bike ever leaves the lift.
The main takeaway is simple: 14-inch ape hangers on the 2027 Street Glide can be an excellent upgrade when wiring and brake line extension are treated as critical systems, not afterthoughts. Measure the real routing path, match kits to the exact bike and ABS configuration, protect every electrical run, and bleed the brakes to a standard you would trust on a fully loaded touring machine. That approach delivers the benefits riders actually want: cleaner ergonomics, better long-distance comfort, confident steering leverage, and reliability that survives weather, vibration, and miles.
As the hub for Harley-Davidson model-specific ergonomics and performance recipes, this guide should help you connect the bar swap to the larger setup picture. Hand position affects posture. Posture affects fatigue. Control routing affects safety and service life. When those pieces are aligned, the 2027 Street Glide feels tailored rather than compromised. Before ordering parts, mock up your preferred riding position, list every electrical and hydraulic requirement, and compare bar geometry instead of shopping by rise alone.
If you are planning this conversion now, use this article as your checklist and build sequence. Confirm fitment, measure twice, source quality lines and harness solutions, and follow the service manual for torque and brake procedures. A well-executed 14-inch ape hanger install is not just a cosmetic win for the Street Glide. It is one of the most effective ways to personalize comfort and control on a modern Harley-Davidson touring platform. Start with accurate measurements, and the rest of the project gets much easier.
Frequently Asked Questions
Do 14-inch ape hangers on a 2027 Street Glide require longer wiring, throttle cables, and brake lines?
In most cases, yes. A 14-inch ape hanger setup on a 2027 Street Glide usually pushes the factory control wiring, hydraulic brake line routing, and cable lengths beyond what the stock bar layout was designed to handle. Even if a few components seem like they will physically reach during a mock-up, that does not automatically mean they are correct for full steering sweep, clean routing, long-term reliability, or safe operation. The key issue is not whether the parts can be stretched into place, but whether they have enough usable length to follow proper routing paths without tension, pinching, kinking, or interference.
On a Street Glide, the front brake line is one of the first items that has to be evaluated carefully. Taller bars raise the hand controls and change the angle of the master cylinder, which often means a longer upper brake line or a complete model-specific brake line kit is required. Wiring is another major consideration. The switch harnesses for the left and right controls may be too short once the bars are taller and the internal or external routing path becomes longer. Throttle-by-wire systems still need enough harness length and correct routing, even though you are not dealing with traditional throttle cables in the same way as older cable-operated bikes. Clutch line requirements depend on the specific control configuration, but the same rule applies: check for adequate length with the fork centered and at both steering stops.
The right way to approach the job is to treat the entire bar conversion as a system. Measure bar height, rise, pullback, bar width, and the actual path every wire and hydraulic line must travel. A proper extension kit designed for the 2027 Street Glide will usually account for those variables more accurately than universal components. That matters because a touring chassis with batwing fairing and internal bar wiring is less forgiving than a simple naked-bike bar swap. If you want the install to look factory-clean and function correctly at highway speeds, plan on verifying or replacing wiring and brake lines rather than hoping the stock pieces will stretch.
How do I know what brake line length I need for 14-inch ape hangers on the 2027 Street Glide?
The correct brake line length depends on more than bar height alone. Riders often assume that a 14-inch bar automatically means a standard extension amount, but on a 2027 Street Glide the actual requirement is influenced by handlebar geometry, riser setup, master cylinder position, routing behind the fairing, and whether the line follows stock-style paths or a custom route. Two handlebars that are both labeled 14-inch can create very different line-length needs because rise, wrist angle, pullback, and control mounting position vary from one design to another.
The best method is to perform a physical mock-up before ordering final-length hydraulic parts, unless you are using a bar-and-line package specifically engineered for the exact bike and bar combination. With the new bars positioned where they will actually be installed, route a flexible measuring line along the exact intended brake line path. Account for the full steering range from lock to lock and make sure the measurement reflects a natural curve, not a tight straight pull. You want enough length for smooth movement without extra slack that can rub, bow outward awkwardly, or create an untidy appearance around the fairing and triple tree area.
It is also important to think beyond raw length and consider fitting style, banjo angle, line junction locations, and ABS-related layout if applicable. Touring models can have more complex hydraulic routing than many riders expect, and that means “close enough” is not good enough. If the brake line is too short, you risk tension during steering input, which is a serious safety issue. If it is excessively long, you can end up with poor routing, chafing, or an unprofessional install. For that reason, many experienced installers prefer a model-specific extended brake line kit or a custom-measured line from a reputable supplier rather than guessing based only on the bar’s advertised rise.
Can I install 14-inch ape hangers on a 2027 Street Glide without extending the wiring by rerouting everything differently?
Sometimes limited rerouting can gain a small amount of usable length, but it is rarely the full solution for a clean, reliable 14-inch ape hanger installation on a 2027 Street Glide. Riders occasionally get optimistic after seeing that the stock wiring harness can be pulled more directly or run through a different path, but that approach usually only buys a little extra reach. It does not change the reality that taller bars create a longer travel path to the controls, especially when you factor in internal handlebar wiring, steering sweep, and the need to avoid sharp bends or strain points.
Rerouting can be helpful as part of the overall install strategy. For example, cleaning up the harness path, removing unnecessary slack from one section, or repositioning tie points may improve the fit and reduce clutter. But relying on rerouting alone can create new problems if the wires become too tight near the neck, are pinched by the fairing, or lose enough free movement that repeated steering motion fatigues the conductors over time. Electrical issues caused by stretched harnesses often show up later, not immediately, which is why experienced shops do not judge success by whether the bike powers up on day one.
If your goal is a professional result, the safer approach is to inspect each control harness individually and determine whether proper extensions are needed. That means checking wire length with the bars installed, the controls mounted, and the front end turned fully left and right. You want gentle routing, no tension at connectors, and enough serviceability that future maintenance does not become a struggle. On a modern touring bike, extending the wiring correctly is usually the better long-term decision than forcing the stock harness to barely fit through creative rerouting.
What installation mistakes cause problems after adding 14-inch ape hangers to a 2027 Street Glide?
The most common mistakes are poor measuring, ordering parts based only on bar height, and failing to test everything through full steering travel before final assembly. A lot of post-install headaches come from treating ape hangers as a cosmetic bolt-on rather than a complete control-system change. When bars go up, every connected component changes its relationship to the frame, fairing, fork, and rider. If that is not accounted for from the beginning, the result can be tight brake lines, stressed wiring, awkward hand position, or handling that feels wrong at speed.
Another frequent mistake is ignoring the difference between “reaches while the bike is on the lift” and “functions correctly on the road.” A brake line that appears fine with the wheel straight ahead can become tight at full lock. Wiring that seems acceptable before the controls are fully mounted can end up under tension once the switch housings are indexed into their final positions. Internal wiring jobs also go wrong when installers rush the process, nick insulation while pulling wires through the bars, or fail to deburr the bar openings. Those small shortcuts can cause intermittent electrical faults that are difficult to diagnose later.
Ergonomics are another area where riders sometimes make expensive mistakes. A 14-inch ape hanger should improve riding posture for the intended rider, not just raise the grips. If the pullback, wrist angle, and hand position are not matched to your torso length and seat position, the bike can feel less comfortable and less controlled, especially on long highway runs. Finally, many problems come from using generic kits instead of components designed around the Street Glide platform. Touring models demand attention to fairing clearance, control placement, and stable routing. The best installs happen when measurements, parts selection, and final testing are all handled with the same level of care.
Will 14-inch ape hangers change how the 2027 Street Glide feels on the highway, and does proper wiring and brake line setup affect that?
Yes, 14-inch ape hangers can noticeably change the way a 2027 Street Glide feels, and proper wiring and brake line setup absolutely plays a role in that outcome. The bars affect rider posture, shoulder angle, leverage at the grips, and the overall way steering input is delivered into the front end. On the highway, those changes can either make the bike feel relaxed and natural or awkward and tiring, depending on whether the handlebar geometry suits the rider and whether the controls are installed correctly. This is why experienced builders think of the Street Glide as an ergonomics and performance platform, not just a canvas for taller bars.
From a riding perspective, taller bars can place your hands in a more upright position and change how your upper body interacts with wind pressure. Some riders find that 14-inch apes reduce hunching and create a more comfortable shoulder position for long miles. Others may feel that the steering becomes slower or more exaggerated if the bar shape and pullback are not well matched to their riding style. None of that is automatically good or bad. It depends on the bar design, your body dimensions, your seat setup, and how precisely the controls are positioned during installation.
Wiring and brake line setup matters because poor routing can interfere with steering smoothness and rider confidence. A brake line that is too tight or routed awkwardly can create drag, visual clutter, or real safety concerns. Wiring that pulls at full lock can subtly affect bar movement and eventually lead to electrical failures that undermine the reliability of