
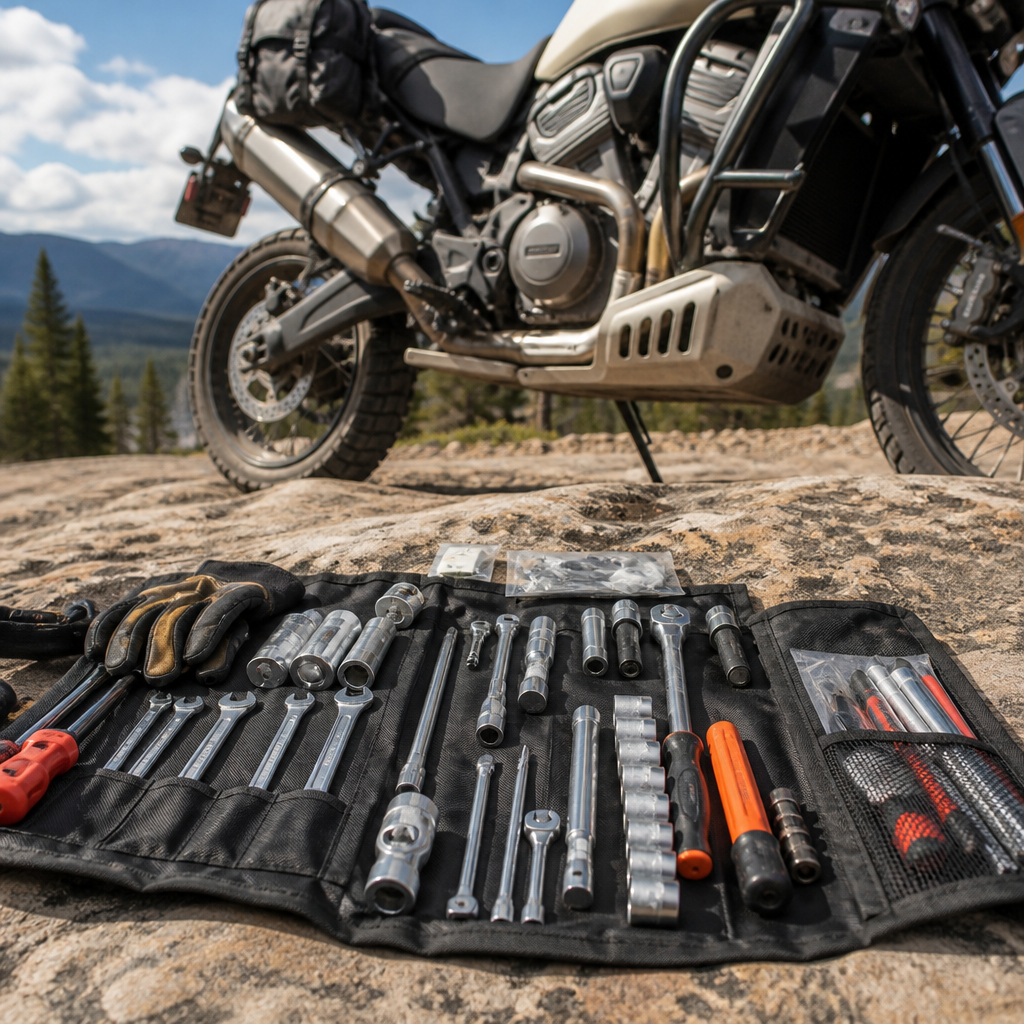
The Pan America 1250 tool kit recipe for 2026 BDR travel is not just a packing list; it is a model-specific system built around the Harley-Davidson Pan America 1250’s fasteners, electronics, tubeless wheels, weight, and likely failure points on long backcountry routes. A “recipe” in this context means a repeatable combination of tools, spares, and packing choices matched to one motorcycle and one use case, not a generic ADV toolkit tossed together the night before departure.
I have built kits for large adventure bikes that looked complete on a garage floor yet failed on the trail because one Torx bit was missing, one axle tool did not fit behind a skid plate, or one repair assumed a center stand that the bike did not have. The Pan America magnifies those mistakes. It is a capable BDR platform, but it carries a lot of technology, uses mixed fastener sizes, and asks more from a rider in remote terrain than a simple air-cooled dual sport. That is why a dedicated Pan America 1250 tool kit recipe matters.
For 2026 BDR riders, “essential spares” means the parts and consumables that solve the most probable ride-ending problems without turning your luggage into a mobile workshop. BDR, or Backcountry Discovery Routes, are multi-day off-pavement routes that combine washboard, embedded rock, mud, water crossings, and long gaps between services. On a heavy bike such as the Pan America 1250 or Pan America 1250 Special, common issues are not theoretical. Punctures, bent controls, loose hardware, cut sidewalls, battery problems, damaged levers, and chain adjustments happen in the field.
This hub article covers the logic behind a complete Pan America 1250 tool kit recipe and frames the ergonomics and performance choices that support it. The best kit is always tied to how the bike is set up: bar height, lever position, luggage layout, tire choice, skid plate access, and whether you ride solo or in a group. If one article in this subtopic explains suspension setup or standing position, this page connects that guidance to what tools and spares you actually need to carry. A stable, well-fitted bike breaks fewer parts and is easier to service trailside.
Why the Pan America 1250 Needs a Model-Specific BDR Kit
A universal adventure toolkit rarely fits the Pan America 1250 well enough. Harley-Davidson built the bike with premium components and a broad electronics package, but that also means service points are specific. You need Torx bits where another bike uses Allen keys. You need a way to deal with tubeless rim punctures, but also a backup plan for sidewall damage severe enough that a plug may not hold. You need enough leverage to loosen critical hardware, yet compact tools that fit around crash bars, bags, and skid plates.
The bike’s wet weight, roughly in the mid-500-pound range depending on trim and accessories, changes recovery planning. A puncture on a 250-pound dual sport is an inconvenience; a puncture on a loaded Pan America on a rocky grade can become a safety problem. The Revolution Max 1250 engine is powerful and generally robust, but the riding environment on a BDR places more stress on tires, chain condition, hand controls, and luggage mounts than most highway touring. In my experience, the smartest kits focus first on mobility: tires, controls, fastening, electrics, and fluids.
Another reason to go model-specific is access. Aftermarket crash protection, auxiliary lights, and luggage racks often block direct access to fasteners. Riders frequently discover in camp that the bit driver they packed cannot clear a pannier frame, or that a ratchet with a bulky head cannot reach a recessed bolt. Build the kit only after touching every critical fastener on your own motorcycle. That includes front and rear axles, chain adjusters, skid plate hardware, battery terminals, handguard mounts, shifter clamp, brake pedal pivot area, mirrors, and bodywork that might need removal to inspect a fault.
The Core Tool Kit Recipe for 2026 BDR Travel
The most effective Pan America 1250 tool kit recipe is compact, redundant only where failure is common, and tested at home. Start with quality hand tools rather than bargain multi-tools. A 1/4-inch drive setup with a small ratchet, extension, and socket selection handles most tasks efficiently. Add a bit driver with the exact Torx sizes your bike uses most often, typically including T25, T27, T30, T40, and T45, though every rider should verify hardware on the specific model year and installed accessories. Include metric hex bits, combination wrenches, and a compact adjustable wrench only if it covers a real gap.
For wheel and chain service, pack the correct axle tools, chain adjuster tools, and a way to mark alignment. If your axle requires a large hex or specialty socket, confirm fit with your skid plate and wheel design before the trip. A small breaker bar often works better than a ratchet for stubborn axle hardware. Pair that with a lightweight torque strategy: not a full shop torque wrench, but a pre-trip reference card listing critical fasteners and a disciplined feel developed during garage practice. Precision matters on brake and axle hardware, but carrying excessive steel does not.
Recovery and repair tools should include locking pliers, needle-nose pliers, side cutters, a folding knife, and a compact pick. These solve bent hardware, cotter pin removal, cable cleanup, and improvised fixes. For tire service, carry a tubeless plug kit with quality insertion tools, multiple plug types, rubber cement if your preferred system uses it, and a valve core tool with spare valve cores. Add a reliable inflator that runs from the bike’s electrical system or a direct battery lead, plus a gauge you trust. Inflation fixes are pointless if pressure readings are inaccurate.
| Category | Carry Item | Why It Matters on a Pan America 1250 BDR Build |
|---|---|---|
| Fasteners | 1/4-inch ratchet, extension, sockets, Torx bits, hex bits | Matches bodywork, controls, protection parts, and common service hardware |
| Wheel and chain | Axle tool, chain adjuster tools, breaker bar | Enables puncture response, wheel removal support, and chain correction |
| Tires | Plug kit, valve cores, inflator, pressure gauge | Solves the most common BDR mobility problem quickly |
| Electrical | Mini multimeter, fuses, jump pack, tape | Helps diagnose no-start conditions and restore power safely |
| Field repair | Zip ties, safety wire, epoxy putty, threadlocker | Stabilizes broken mounts, guards, and hardware long enough to continue |
Essential 2026 BDR Spares: What to Carry and Why
The essential 2026 BDR spares for a Pan America 1250 should cover tire failure, minor impact damage, drivetrain wear, and electrical interruption. Start with consumables and tiny parts that are hard to source in rural towns: spare fuses in the correct ratings, spare valve cores and caps, a master link if your chain type supports one, a short length of fuel-safe hose if your setup justifies it, and replacement bolts for accessories that commonly loosen. I routinely include M6 and M8 flange bolts, matching nuts, and washers because luggage racks, skid plates, and handguards often share those sizes.
Levers deserve special consideration. Some riders carry a spare brake lever and clutch lever; others rely on robust handguards. On the Pan America, full spare levers may be worth the space if your route includes rocky climbs or deep ruts where a tip-over is more likely. The shift lever is another vulnerable part. Even when it does not snap, it can bend enough to become unusable. At minimum, know whether your lever can be straightened trailside without damaging the shaft seal area. A compact length of aluminum bar stock or a purpose-built splint can save a ride when brackets crack.
Electrical spares should reflect how modern adventure bikes fail in the real world. A tiny test light or mini multimeter, spare charging cable for your GPS or phone, electrical tape, heat-shrink, and a few crimp connectors handle more faults than most riders expect. A lithium jump pack is worthwhile if you ride solo, camp in cold weather, or run accessories. The Pan America’s electronics are an advantage when everything works, but low voltage creates confusing symptoms. When screens, ride modes, or starting systems behave oddly, verifying battery condition quickly can prevent bad decisions.
Fluids and sealing products also belong in a serious BDR kit. Carry chain lube in a travel-size container, a small amount of threadlocker, epoxy putty for cases or brackets, and nitrile gloves. Depending on route length, I sometimes add a few ounces of engine oil in a secure bottle and a syringe or mini funnel. The point is not to rebuild the motorcycle on the trail. It is to address the predictable failures that would otherwise force recovery. If a spare has no realistic use case on your route, leave it at home. Weight discipline is part of the recipe.
Ergonomics, Luggage Layout, and Tool Access
Model-specific ergonomics and performance recipes begin with rider fit, because poor fit increases crashes and mechanical problems. On the Pan America 1250, bar rotation, lever angle, footpeg position, seat height, and boot clearance around the shifter all influence fatigue and control. If you stand with wrists cocked upward, you are more likely to drop the bike in technical sections. If your rear brake pedal sits too low for standing use, you may miss braking inputs on descents. Those are ergonomics issues, but they directly affect what gets broken and what tools you need most often.
Luggage layout matters just as much. Heavy tools should ride low and centered, ideally in a skid-plate-adjacent tool box, low rack bag, or near the bottom of a pannier, not at the tail where they amplify handling problems. Keep puncture tools and inflator in the fastest-access location because tire repairs are time-critical. Place rarely used spares deeper in the load. I prefer to pack the tool roll so the first layer contains wheel, tire, and control-repair tools, while diagnostic items and backup hardware sit underneath. On a rain-soaked roadside, access order matters more than elegant organization.
Every ergonomic setup change should trigger a toolkit review. Risers can alter cable routing and expose new interference points. Larger footpegs may require different shift lever positioning. Crash bars may hide service fasteners. Aftermarket skid plates can make oil drain access easier or worse depending on design. The right recipe is the one validated on your exact motorcycle, with your exact accessories, using the gloves and luggage you will ride with. If you cannot reach a bit with gloved hands while the bike is lying on uneven ground, the kit is incomplete no matter how impressive it looks online.
Pre-Trip Validation and Trailside Repair Priorities
The final step in a Pan America 1250 tool kit recipe is validation. Before any 2026 BDR departure, perform a garage drill using only the tools you will carry. Remove both wheels if your route risk and skill level justify that capability, loosen and retighten axle hardware, adjust the chain, remove key body panels, access the battery, and test your tire inflator from the bike. Time the process. You will discover missing bits, poor tool quality, and packing errors quickly. This practice also builds mechanical fluency, which is often more important than carrying one extra wrench.
Trailside priorities should follow a simple order: make the bike safe, restore mobility, then preserve components. If you crash, first assess rider condition and fuel leaks. Next, check controls, bars, levers, and wheels. A bent handguard pinching the front brake line is a bigger issue than scratched bodywork. If the bike will not start, verify kill switch position, battery connections, visible wiring damage, and fuse condition before assuming a major failure. If a tire loses pressure, find the leak, mark it, plug it correctly, reinflate, and monitor pressure over time. Good process prevents compounding mistakes.
The strongest benefit of a model-specific toolkit is confidence rooted in preparation. You carry less junk, solve problems faster, and protect the bike better because each item has a purpose. For riders exploring the broader Harley-Davidson adventure lineup and related setup guides, use this hub as the starting point for every ergonomics and performance recipe. Build your Pan America 1250 kit now, test every tool at home, and head into your 2026 BDR knowing your spares are essential, not accidental.
Frequently Asked Questions
What makes a Pan America 1250-specific BDR tool kit different from a generic adventure bike tool roll?
A Pan America 1250-specific BDR tool kit is built around the actual needs of this motorcycle rather than the fantasy of “being ready for everything.” That distinction matters. The Pan America 1250 uses its own mix of fastener sizes, electronics, wheel setup, and bodywork access points, so a universal kit almost always includes tools you will never touch while somehow omitting the one bit, socket, or repair item you actually need trailside. A proper recipe starts by identifying the exact hardware on the bike, the tasks most likely to come up on a Backcountry Discovery Route, and the failures that can realistically be addressed without a shop.
On this bike, that usually means prioritizing the tools needed to remove key panels, access the battery, tighten controls, adjust or replace damaged levers, service wheel-related issues, and manage common vibration loosening points. It also means acknowledging the Pan America’s tubeless wheel setup, higher curb weight, and electronic complexity. A 250 dual-sport kit may lean heavily toward tube repair and minimal chassis tools; a Pan America kit should place more emphasis on plug-and-inflate tire repair, compact but strong drive tools, electrical troubleshooting basics, and spares that support a heavier machine traveling farther from pavement.
The “recipe” idea also matters because repeatability is the goal. Once you know which sockets, Torx bits, hex keys, pliers, inflation tools, tire plugs, fuses, and electrical repair items have proven useful on your Pan America, you stop rebuilding your kit before every trip. Instead, you maintain a tested system. That saves weight, reduces redundancy, and improves confidence because every item in the roll has a purpose and has ideally already been used in your garage. For BDR travel, that is far better than carrying a bulky assortment of random tools that look impressive in camp but do not match the bike.
What tools are truly essential for a 2026 BDR trip on a Harley-Davidson Pan America 1250?
The essential tools are the ones that let you solve the most likely problems on the route: loose controls, bodywork access, battery access, punctures, basic electrical faults, and minor crash damage. For a Pan America 1250, that usually means a compact ratchet or T-handle system with the exact sockets and bits that fit the motorcycle’s common fasteners, especially the Torx and hex sizes used for panels, guards, controls, and accessory mounts. A small extension, a swivel if your layout requires it, and one genuinely strong driver are far more valuable than multiple low-quality multi-tools.
You also want quality pliers, not novelty pliers. A compact needle-nose or combination plier helps with clips, electrical repairs, bent brackets, and general extraction work. A small adjustable wrench can be useful if your accessory hardware varies, but many riders can eliminate it if they standardize luggage racks, GPS mounts, and aftermarket add-ons to the same fastener sizes already supported by the kit. That is one of the smartest ways to save space in a BDR loadout.
Tire service tools are non-negotiable because punctures are among the most common real-world issues on backcountry rides. Since the Pan America uses tubeless wheels, your kit should include a proven plug kit with quality insertion tools, a valve core tool, spare valve cores, and an inflation method capable of airing up a large ADV tire reliably. That usually means a compact compressor over CO2 alone, though some riders carry both for redundancy. A pressure gauge is also worth carrying if your inflator does not provide trustworthy readings.
Electrical and field-repair tools matter more on a modern adventure bike than many riders expect. A few spare fuses, electrical tape, zip ties, mechanics wire, heat-shrink or self-fusing silicone tape, and a compact test light or mini multimeter can turn a trip-ending mystery into a quick fix. Add a blade for cutting hose, tape, or zip ties; a small flashlight or headlamp; and threadlocker in a tiny sealed container. If you run chain-driven bikes, chain tools are central, but on the Pan America the focus shifts more toward fastening, access, tire repair, and keeping critical systems intact after vibration or a tip-over.
The key is that every tool should correspond to a known task on your motorcycle. If a tool has no job, it does not belong. Before the trip, physically confirm that your kit can remove the wheels if needed, reach the battery, remove the seat and necessary panels, tighten your controls and mirrors, and repair a puncture. That garage test is what turns a pile of tools into an essential kit.
Which spare parts should I carry for Pan America 1250 BDR travel, and which ones are usually unnecessary weight?
The smartest spares are small, failure-prone, and difficult to source quickly in remote areas. For a Pan America 1250 on a 2026 BDR trip, that generally includes fuses, valve cores, a few critical fasteners, spare tire plugs, and items that support electrical or fuel-range reliability depending on your setup. If you know your bike has any recurring weak points—whether from your own experience or from how you have outfitted it—those parts should move to the top of the list. For example, if your luggage system uses specialized mounting bolts, carrying replacements is far more logical than carrying hardware for stock parts you have already removed from the bike.
A clutch or brake lever can be a very smart spare if you are not using highly crash-resistant handguards or if you ride technical sections where a tip-over is likely. Likewise, spare master link-style hardware is common on chain bikes, but not relevant here in the same way, so Pan America riders should redirect that weight toward tubeless tire repair redundancy, inflation reliability, and electrical troubleshooting. A short length of fuel-safe hose, a couple of ring terminals, and a few crimp connectors can also be excellent spares if you run powered accessories or auxiliary lighting.
Bulky “what if” parts are where many kits go wrong. Full sets of random bolts, duplicate large wrenches, universal repair gadgets, and heavy metal backup parts often consume space without solving the problems you are most likely to face. Likewise, carrying major components that require significant disassembly, advanced diagnostics, or shop-level labor usually does not make sense for BDR travel. If you cannot realistically replace it trailside, it may not belong in the kit. The exception is when a part is both compact and truly trip-saving, such as a sensor or relay with a known history of failure on your specific motorcycle or build.
The best approach is to think in terms of repair categories: keep the air in the tires, keep electrical connections alive, keep controls functional, and keep critical fasteners from ending the ride. That mindset produces a lighter, more effective spares pouch than the common mistake of packing for a complete engine rebuild in the woods.
How should I pack and organize the Pan America 1250 tool kit so it is useful on the trail and not just neat in the garage?
Organization should follow urgency and frequency of use. The items you are most likely to need first—tire repair tools, inflator, basic driver, flashlight, zip ties, and a few common bits—should be easiest to reach without unpacking half the motorcycle. On a BDR, that often means a small, dedicated “rapid access” pouch stored in a pannier top section, tank bag, or other immediately available location. Less frequently used tools, such as deeper service bits or more complete electrical repair items, can live lower in the luggage system.
Weight placement matters on a large adventure bike. Dense items like sockets, ratchets, compressors, and pliers should be packed low and centered when possible. That helps preserve balance and reduces the unpleasant top-heavy feel that can make technical riding more tiring. The Pan America 1250 already carries substantial mass, so there is no benefit in making it feel heavier by stuffing steel tools high in a rear duffel. If your luggage setup allows it, keep the main tool roll in a lower pannier position or another secure low-mounted compartment.
Within the tool kit itself, divide by function. Tire repair in one pouch, electrical and field repair in another, primary hand tools in a roll, and tiny critical spares in a clearly labeled zip bag or waterproof organizer. This saves time and reduces the chance of losing small pieces in dirt or wind while troubleshooting. It also makes pre-trip inspections easier because you can quickly see whether plugs, fuses, valve cores, and consumables need replenishing.
Durability and weather resistance count. Fine dust, repeated vibration, and water crossings can ruin a loosely packed kit. Use a sturdy roll or zippered pouch that prevents tools from rattling against one another and wearing holes through soft luggage. Protect delicate items like a mini multimeter, pressure gauge, or headlamp in a padded sleeve or inner bag. If you carry small liquid containers such as threadlocker, mark them clearly and seal them well.
Most importantly, pack the kit based on how repairs actually happen in the field. Trailside work is often rushed, dirty, low-light, and stressful. A beautifully arranged tool board from the garage is useless if you have to scatter





