
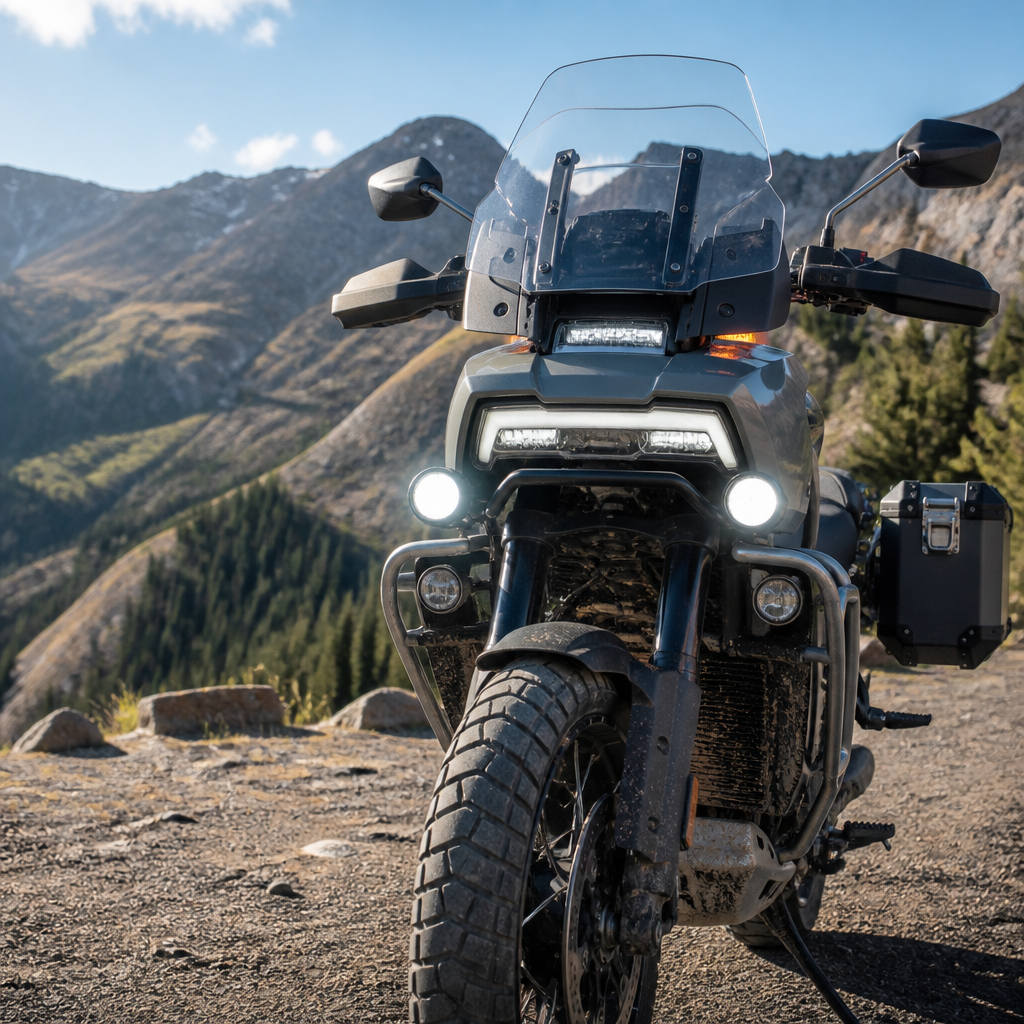
The Pan America 1250 Auxiliary Light Mount Recipe is one of the smartest upgrades you can make before a 2026 Backcountry Discovery Route ride because lighting, crash durability, wiring reliability, and rider ergonomics all intersect at the front of the bike. On the Harley-Davidson Pan America 1250 and Pan America 1250 Special, auxiliary lights do far more than add brightness. A well-planned mount recipe protects expensive lamps, preserves steering clearance, reduces fatigue during long pavement transfers, and improves hazard recognition in dust, rain, and deer-heavy backroads. When riders talk about a recipe, they mean a repeatable parts-and-setup combination: mounting point, bracket material, fastener strategy, beam pattern, wire routing, switch logic, and aiming procedure. I have installed and tested several Pan America 1250 auxiliary light combinations on mixed terrain, and the difference between a casual bolt-on and a route-ready setup is dramatic. This hub article explains the essential 2026 BDR mod through the broader lens of model-specific ergonomics and performance recipes, so you can choose mounts that work with the Pan America’s frame, fairing, suspension movement, and rider position instead of fighting them.
That model-specific approach matters because the Pan America is not a generic ADV bike. Its Revolution Max 1250 engine is a stressed member, its front bodywork is compact, the fork and beak create tight packaging around the headlight area, and many owners combine hard off-road use with highway speeds above 70 mph. A mount that looks fine in the garage can crack from vibration, block airflow, contact the fairing at full lock, or throw distracting glare off the windscreen. Good ergonomics also shape light placement. The ideal setup adds conspicuity and usable foreground-to-distance illumination without creating visual bounce in the rider’s line of sight. On BDR terrain, where you may switch from pre-dawn pavement to rocky forest roads and then roll into camp after sunset, reliable auxiliary lighting becomes both a safety system and a fatigue-management tool. As the sub-pillar hub for model-specific ergonomics and performance recipes, this guide also frames how to think about future upgrades: every effective recipe starts by respecting the motorcycle’s geometry, the rider’s body position, and the intended terrain.
Why the Pan America 1250 needs a model-specific auxiliary light mount recipe
The Pan America 1250 needs a dedicated auxiliary light mount recipe because universal solutions rarely account for its front-end movement, crash-bar options, and electronic architecture. Many riders first consider fork clamps or generic crash-bar tabs. Both can work, but both introduce tradeoffs. Fork-mounted lights add excellent corner-following behavior, yet they increase unsprung mass and expose wires to repeated flex through suspension travel. Crash-bar mounts isolate the lights from steering motion and simplify wiring, but placement can be too low, making the beam vulnerable to mud, water crossings, and impacts. On the Pan America, I have found that the best route-ready results usually come from stout upper crash-bar tabs or dedicated bracket systems tied into stable frame-adjacent structures, provided they preserve airflow and do not interfere with stock body panels.
The motorcycle’s geometry affects light behavior more than many buyers expect. Tall suspension travel means a poorly braced mount can oscillate on washboard roads, turning useful driving lights into a jittery blur. The broad handlebar and upright seating position give the rider a commanding view, but that also makes reflected glare from hand guards, screen edges, and the beak more noticeable. The Pan America’s alternator output and accessory management are adequate for modern LED lights, yet clean wiring remains critical near the radiator, steering head, and side panels. A route-ready recipe therefore balances five demands at once: mechanical strength, beam effectiveness, service access, crash survivability, and human comfort over multi-day riding. That combination is why a Pan America 1250 auxiliary light mount recipe belongs at the center of any serious 2026 BDR preparation plan.
The essential 2026 BDR light mount recipe
If you want the short answer, the essential 2026 BDR mod is this: mount compact LED auxiliary lights on reinforced upper crash-bar tabs or a purpose-built frame-stable bracket, use a spot-flood combo beam, route the harness through abrasion protection along the factory loom path, trigger through a fused relay or CAN-friendly controller, and aim conservatively to avoid glare while preserving long-range visibility. That recipe works because it supports real BDR conditions rather than showroom aesthetics. It gives the rider wider shoulder illumination for animals and washouts, enough down-road punch for safe speed management, and better daytime conspicuity in traffic and dust.
In practice, I recommend lights in the roughly 2,000 to 4,500 effective-lumen range per pair from established brands such as Baja Designs, Denali, Clearwater, or Diode Dynamics, depending on budget and beam preference. More output is not automatically better. Excessive foreground light can flatten depth perception off-road and create eye fatigue. A mixed lens strategy often performs best: one wider driving or flood optic and one narrower distance optic, provided both lights sit symmetrically and can be aimed independently. For hardware, stainless fasteners with threadlocker, serrated flange nuts where appropriate, and isolating washers in vibration-prone assemblies are worth the effort. For riders using OEM or aftermarket crash bars from companies like Outback Motortek, SW-Motech, Hepco & Becker, or AltRider, test steering lock and body-panel clearance before final torque. The best recipe is the one that stays invisible while you ride and obvious only when it saves your night vision or helps another driver see you sooner.
Mount locations, tradeoffs, and fitment priorities
Choosing the mount location determines nearly every downstream result, including beam stability, survivability, and maintenance access. On the Pan America, there are four common positions: upper crash bars, lower crash bars, fork legs, and a bracket near the headlight structure. Upper crash bars usually offer the best balance for BDR use because they place the beam high enough for effective reach while remaining protected by the bars in a tip-over. Lower bars are easier to access and can create a helpful triangle of light for conspicuity, but they are more exposed to rocks, ruts, and splash. Fork-leg mounts improve directional lighting in tight turns, though the additional moving mass and cable management demands make them a second-choice solution for rough backcountry travel. Headlight-adjacent brackets can deliver the cleanest beam placement, yet only if the bracket is genuinely rigid and does not transfer vibration into the lamp housing.
| Mount location | Main advantage | Main drawback | Best use case |
|---|---|---|---|
| Upper crash bar | Strong beam height and good protection | Depends on bar design and tab rigidity | Most Pan America BDR setups |
| Lower crash bar | Simple installation and daytime conspicuity | Higher impact and water exposure | Mixed road touring with mild dirt |
| Fork leg | Light follows steering input | Wire flex and added unsprung mass | Tight-road cornering emphasis |
| Headlight bracket | Clean packaging and centered beam | Can vibrate or crowd bodywork | Premium custom bracket builds |
Fitment priorities should be checked in a consistent order. First, cycle the steering from lock to lock and confirm the light body, bracket, and harness never contact the tank shrouds, windscreen supports, or brake lines. Second, compress the suspension enough to approximate full travel and verify nothing pinches near the fender or radiator. Third, sit on the bike in your normal stance and look for any reflected glare on the screen, hand guards, or front beak. Fourth, remove at least one side panel after mockup to make sure routine service remains possible. Last, evaluate crash logic: if the bike drops on uneven ground, will the bar or bracket take the hit before the lamp lens does? This process sounds basic, but it prevents most failures I see on adventure builds. Good fitment is not about making the light fit; it is about making the bike still work perfectly after the light is installed.
Wiring, switching, and aiming for long-distance usability
Electrical reliability separates a trustworthy BDR setup from a cosmetic accessory install. The Pan America can support quality LED lights, but the harness should be built as if it will live through vibration, rain, mud, and repeated panel removal. Use a dedicated fused circuit from the battery or an established power-distribution module, then trigger the lights through a relay or a controller designed for modern motorcycles. Riders who want dimming, high-beam integration, or horn strobe functions often use branded controllers from Denali or Clearwater because they simplify switching logic and reduce messy add-on wiring. Whatever system you choose, protect the harness in braided sleeve or high-temp loom where it passes near the radiator, frame edges, and steering head, and leave enough slack for full lock without creating a dangling loop.
Aiming matters as much as raw output. I set initial aim on level ground with rider sag loaded, then fine-tune after dark on both pavement and a gravel road. A useful baseline is to place the main hotspot below the height of the stock low-beam cutoff at a moderate distance, then adjust outward for shoulder coverage without wasting light into treetops. If your lights overpower the headlamp at close range, back them down or tilt them lower. Strong auxiliary lights should extend usable vision, not wash out the terrain directly in front of the tire. Daytime conspicuity also improves when the lights are aimed symmetrically and mounted far enough apart to create a recognizable triangle. For long-distance usability, weatherproof connectors, dielectric grease on appropriate terminals, proper strain relief, and a clean ground point are not optional details. They are the reason the system still works on day six of a wet route.
How this recipe fits the bigger ergonomics and performance hub
The reason this article serves as a hub for model-specific ergonomics and performance recipes is that auxiliary light mounting touches nearly every category Pan America owners care about. Ergonomically, proper lights reduce mental strain by improving contrast and hazard detection, especially when fatigue sets in late in the day. Performance-wise, the right mount avoids adding steering heaviness, preserves suspension behavior, and minimizes visual bounce over corrugations. That same recipe logic applies across the rest of the motorcycle. A seat upgrade is not just about comfort; it affects hip angle, stand-up transitions, and rearward weight shifts. Foot pegs are not just bigger platforms; they change ankle articulation and leverage when the surface gets loose. Windscreen tuning is not merely airflow preference; it influences helmet noise, posture, and how well you can scan technical terrain while standing.
For that reason, riders building a Pan America for 2026 BDR travel should think in linked recipes rather than isolated parts. A practical sequence starts with contact points and control confidence: bars, risers only if needed, pegs, seat, and lever setup. Then add protection and carrying structure: crash bars, skid plate, luggage interfaces, and tool storage. Next address visibility and electrical support: auxiliary lights, power distribution, GPS mount, and charging ports. Finally refine suspension, tires, and weight management around actual load. The auxiliary light mount recipe is essential because it delivers immediate safety benefits, but it also teaches the right method for the rest of the build: match every part to the Pan America’s specific geometry, test under realistic load, and keep only what improves the ride after ten hard hours in the saddle.
The Pan America 1250 Auxiliary Light Mount Recipe is essential for a 2026 BDR build because it solves more than darkness. It improves safety, lowers fatigue, protects expensive components, and sets the standard for how to approach every model-specific ergonomics and performance recipe on this motorcycle. The best setup is rarely the brightest or the cheapest. It is the one that mounts securely to a stable location, survives vibration and minor crashes, integrates cleanly with the bike’s electrical system, and delivers usable light without glare or distraction. On the Pan America, upper crash-bar or frame-stable mounting with a disciplined wiring plan and careful aiming consistently delivers the best balance for real backcountry use.
As you plan the rest of your Harley-Davidson Pan America build, use this same recipe mindset for seats, pegs, wind protection, luggage, and suspension. Respect the bike’s geometry, verify clearance through full motion, and judge every upgrade by how it performs on a long mixed-surface day, not by how it looks parked. When each component supports the rider’s body position and the motorcycle’s real operating demands, the result is a calmer, safer, and faster machine. Start with the auxiliary lights, document your fitment and aim, and let that disciplined process guide the rest of your 2026 BDR preparation.
Frequently Asked Questions
Why is an auxiliary light mount setup considered an essential 2026 BDR mod for the Pan America 1250?
For a Backcountry Discovery Route ride, auxiliary lights on the Harley-Davidson Pan America 1250 are not just a cosmetic add-on or a simple visibility upgrade. They affect several critical systems at once: night and low-light vision, crash survivability, wiring security, handlebar and fork clearance, and even rider comfort over long days. On a BDR, conditions change constantly. You may start on pavement in the dark, climb into dust or fog, ride through tree cover, and finish on remote two-track after sunset. A properly mounted auxiliary light system gives you a wider, more controlled beam pattern for spotting washouts, ruts, wildlife, gates, and road-edge hazards earlier.
Just as important, the mount recipe determines whether the lights stay functional after vibration, tip-overs, and repeated off-road impacts. A poor mount location can place the lamps in direct danger during a drop, interfere with suspension movement, or create unwanted glare into the rider’s line of sight. A good setup keeps the lights tucked in, stable, and protected while preserving airflow, steering lock, and access to service points. That is why experienced Pan America riders treat the mount itself as a system, not a bracket. For a 2026 BDR build, the goal is dependable performance in rough conditions, and the right auxiliary light mount recipe supports that goal better than a simple bolt-on ever could.
What makes a good Pan America 1250 auxiliary light mount recipe, and where should the lights be positioned?
A strong mount recipe starts with placement. On the Pan America 1250 and Pan America 1250 Special, the ideal location usually balances three priorities: beam usefulness, component protection, and chassis compatibility. You want the lights mounted high enough to project effectively down the road and trail, but not so high that they create distracting foreground glare or become exposed in a fall. You also want them far enough apart to improve width perception, yet not so wide that they are the first point of contact in a tip-over. That is why many riders favor mounting positions that integrate with the front support structure, crash-bar-adjacent zones, or purpose-built brackets designed specifically for the bike’s front-end geometry.
The best recipe also accounts for suspension travel, fork sweep, windscreen movement where applicable, radiator airflow, and line routing. The Pan America’s front area is busy, so blindly attaching lights anywhere there is an open bolt can lead to contact issues, vibration, or maintenance headaches later. A quality mount should resist twisting on corrugated roads, use robust hardware, and ideally include vibration-conscious design features so the beam does not scatter or shake excessively at speed. In practical terms, good positioning means the lights remain effective on rough surfaces, survive minor crashes better, and do not compromise steering clearance or the rider’s ergonomics. If you are building for a 2026 BDR ride, choose a mounting strategy that treats alignment, protection, and long-term durability as equally important.
How should the auxiliary lights be wired on a Pan America 1250 for maximum reliability on long off-road routes?
Reliable wiring is just as important as the mount itself. A BDR environment punishes weak electrical work through vibration, water, mud, dust, and repeated steering movement. The most dependable approach is a clean, fused power circuit with quality connectors, abrasion protection, and thoughtful routing that avoids pinch points, hot engine surfaces, and sharp edges. On the Pan America 1250, the front of the bike sees plenty of movement and exposure, so slack management matters. There should be enough length at steering pivots for full lock-to-lock motion, but not so much that the harness flops around or chafes against the frame and fork area.
A proper setup typically includes weather-sealed connectors, a relay or controller when needed, and wire sheathing or loom for protection. Every connection should be secure, strain-relieved, and located where it is less likely to be soaked or packed with grime. Many riders also prefer switch integration or CAN-compatible control solutions that keep operation simple and reduce clutter at the bars. The key is consistency and serviceability. If something does go wrong in the field, you want to be able to trace the circuit quickly instead of dealing with a tangle of generic add-on wiring. For a 2026 BDR build, electrical reliability is part of ride reliability. A light system that works flawlessly in the garage but fails after a few days of washboard and weather is not a finished upgrade.
Will auxiliary light mounts affect crash durability or increase the chance of damage in a tip-over?
They can, which is exactly why mount design matters so much. If the lights are mounted too far outboard, too low, or on a weak bracket, they may become sacrificial parts in even a mild drop. In addition to damaging the lamp housing, a bad impact path can bend mounting points, stress nearby bodywork, or create electrical failures from tugged wiring. On an adventure bike like the Pan America 1250, accessories should be installed with the assumption that the bike may eventually go down on uneven terrain. That does not mean the lights need to be hidden away where they are useless, but it does mean they should be positioned to reduce vulnerability and avoid becoming the first thing to hit the ground.
The smartest setups prioritize inboard protection, sturdy attachment points, and a little practical forgiveness in the system. A compact, well-supported bracket can help the lights stay aligned over rough terrain and reduce damage risk in low-speed off-road incidents. Just as important, the wiring should be routed so a jolt does not tear connectors apart or yank the harness into moving components. Many riders also choose lamps with durable housings and mounts that can hold adjustment over time. In real-world BDR use, crash durability is not about making the bike invincible. It is about building an accessory layout that keeps small incidents small. On a machine as capable and travel-oriented as the Pan America, that mindset makes auxiliary lighting far more useful and far less fragile.
How do auxiliary lights improve rider ergonomics and reduce fatigue on long pavement and mixed-surface days?
Most riders think of auxiliary lights purely in terms of brightness, but beam quality and mount placement have a direct effect on fatigue. A good lighting setup reduces visual strain by improving contrast, extending peripheral awareness, and filling in the dark zones that standard lighting can leave on backroads and remote surfaces. When the rider can identify terrain changes earlier and more clearly, there is less need for constant tension and overcorrection. That matters on a BDR, where long days often include early starts, unpredictable weather, and transitions between pavement, gravel, and more technical sections.
Mounting plays a major role here because badly positioned lights can create glare, hotspots, or excessive foreground illumination that actually makes riding more tiring. If the beam is too close to the bike, your eyes may keep adapting to the bright near field instead of reading the trail farther ahead. If the lamps vibrate or drift out of aim, the rider spends more mental energy compensating for inconsistent visibility. A well-planned auxiliary light mount recipe on the Pan America 1250 helps maintain a stable, useful beam pattern while preserving cockpit cleanliness and steering freedom. The result is a calmer, more confident riding experience, especially during long pavement transfers at dawn or dusk and extended mixed-surface sections where concentration has to stay high for hours. In that sense, the right light mount setup is not just a performance mod. It is a fatigue-management tool.





