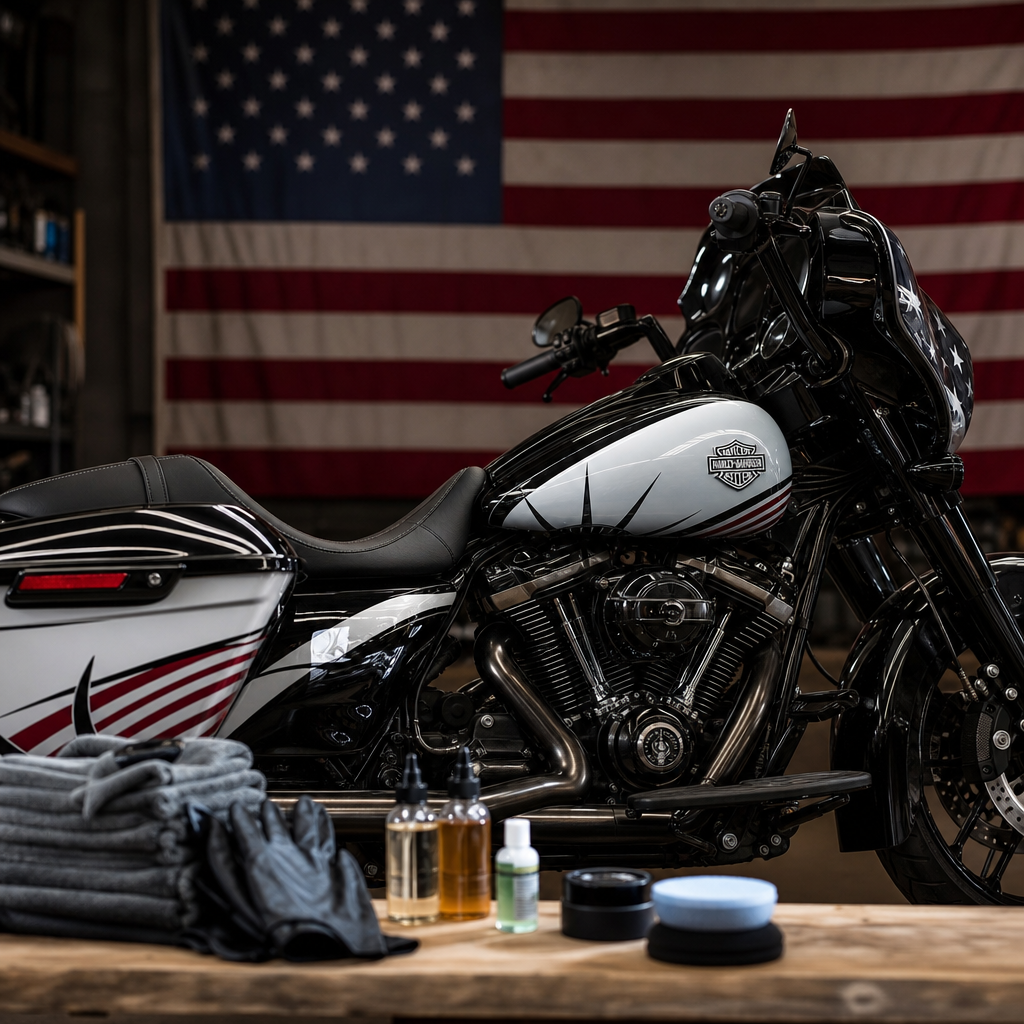
H-D Enthusiast Collection Liberty Edition paint care demands a different mindset than routine motorcycle detailing because these limited-production finishes combine collector value, layered graphics, and owner expectations that leave little room for trial and error. In this guide, “ceramic coating recipes” means a model-specific process map: the exact combination of wash chemistry, decontamination steps, polishing choices, panel temperatures, coating type, cure timing, and maintenance intervals that suit a Liberty Edition machine. Although the title centers on paint care, this hub also addresses model-specific ergonomics and performance recipes because riders rarely preserve show-level finishes in isolation; they adjust seating, bar reach, wind management, suspension support, and heat control to make the motorcycle usable without damaging premium surfaces. I have worked on heavyweight V-twins, including special-edition touring and cruiser models, and the same lesson appears every time: the best protection plan fails if it ignores how the bike is ridden, parked, cleaned, and outfitted. That is why this article connects finish preservation with fit, use, and mechanical realities. Liberty Edition owners usually ask three practical questions. Which ceramic system is safest over factory graphics and clear coat? How should preparation change between touring and cruiser platforms? And what ergonomic or performance changes help protect the motorcycle by reducing accidental contact, heat stress, and harsh washing cycles? The answers depend on substrate sensitivity, riding posture, thermal zones around the engine and exhaust, and whether the bike spends most of its life on highways, in parade conditions, or under indoor display lighting. A durable result comes from matching the recipe to the model, not from chasing the highest advertised coating hardness.
Why Liberty Edition paint needs a model-specific ceramic coating recipe
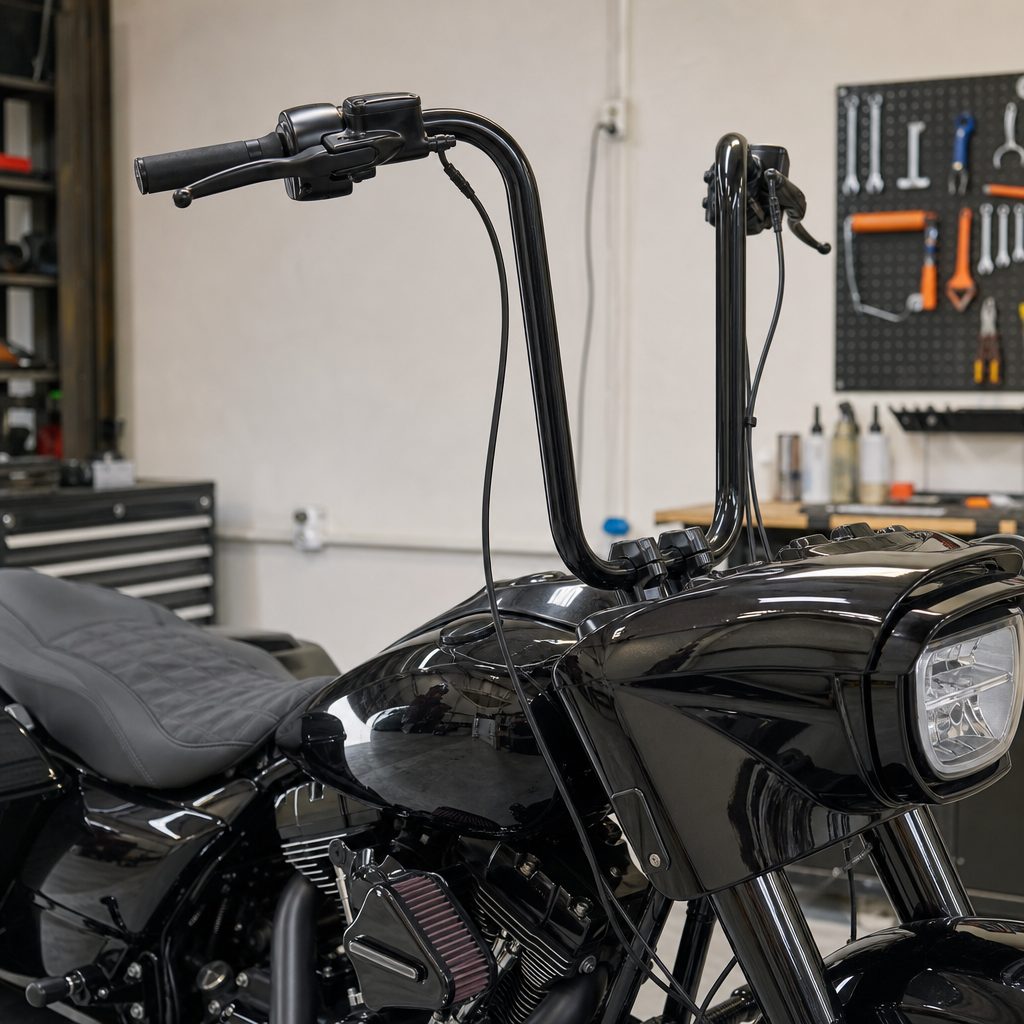
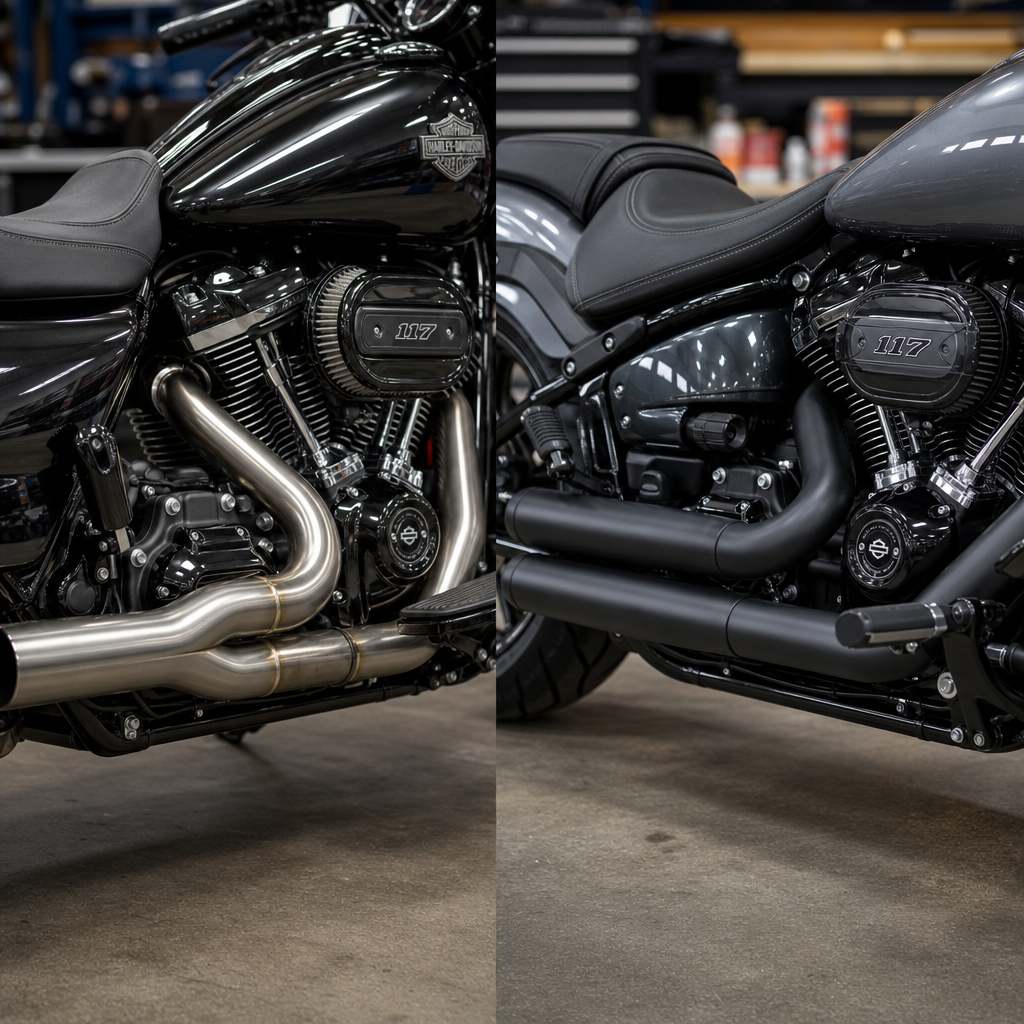
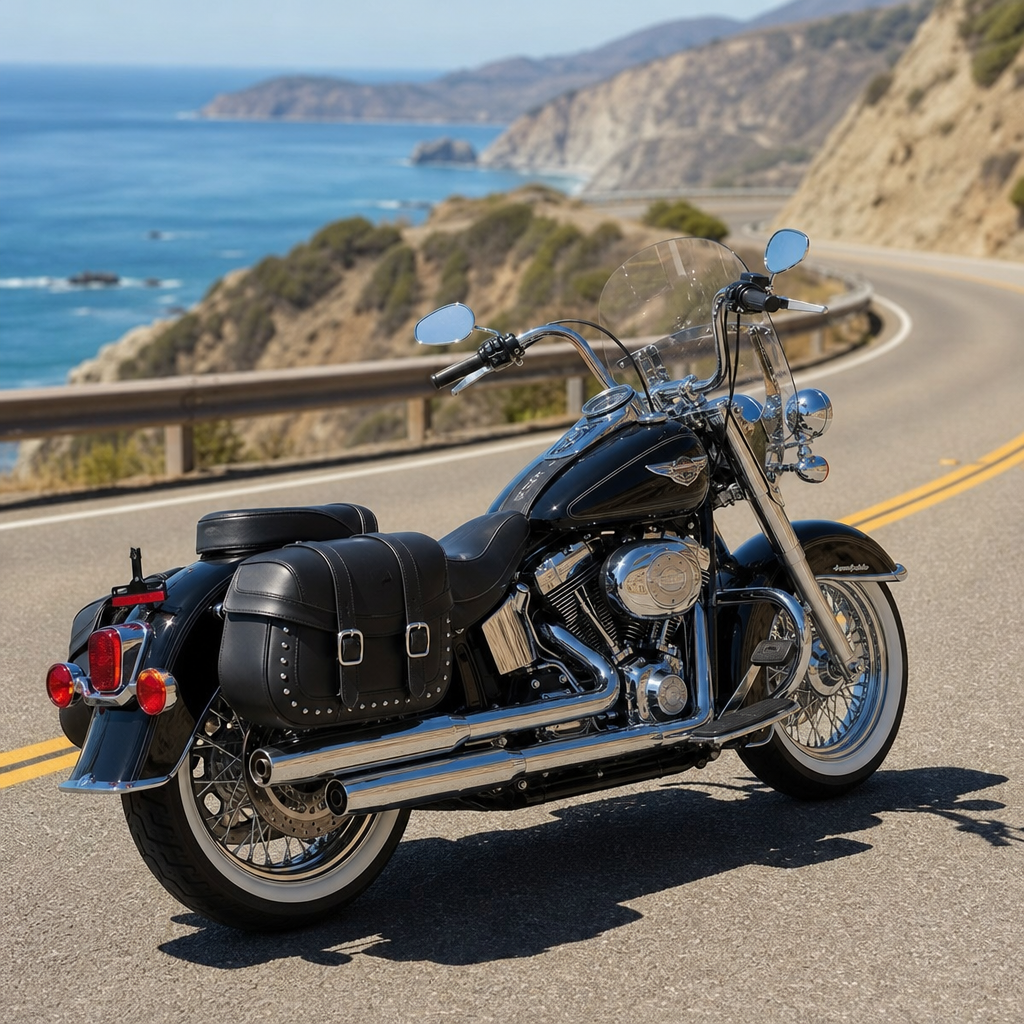
Special-edition Harley-Davidson paint is not just color under clear. It is a layered system that can include metallic basecoat, intermediate graphics, pinstriping effects, and a final clear thickness that varies slightly by production batch and panel geometry. On Liberty Edition motorcycles, the visual identity often rests in sharp linework and contrast areas, which makes polishing mistakes more visible than on solid black tanks. A model-specific ceramic coating recipe matters because a Road Glide fairing, Street Glide tank, Softail rear fender, and trike trunk lid each present different film build, contour, and heat exposure. Broad advice like “wash, clay, polish, coat” is incomplete.
Touring models typically collect more bug acids on fork lowers, fairings, and mirrors, while cruisers often suffer from boot scuffs on side covers and rider contact around the tank console. Those usage patterns change the prep stage. If a touring owner rides long interstate distances, I usually increase prewash dwell time with a pH-neutral foam and use dedicated bug-removal chemistry only on sacrificial wash media, not directly on hot paint. If a cruiser owner frequently mounts and dismounts with tall boots, I inspect lower tank edges and fender struts for micro-marring before deciding whether a single-stage finishing polish is enough.
The coating itself must also match owner behavior. A garage-kept bike that sees monthly rides can benefit from a high-gloss professional ceramic optimized for optical clarity. A machine ridden in summer heat, unexpected rain, and dense road grime may need a more chemically resistant formulation even if gloss gain is slightly lower. The correct recipe is the one that protects appearance while fitting the maintenance discipline the owner will realistically follow.
Surface preparation: the part that determines whether the coating succeeds or fails
Every durable ceramic job is won during preparation. On Harley-Davidson paint, especially on premium graphics packages, the objective is to remove contamination and defects while preserving as much clear coat as possible. I start with wheel and tire cleaning first, using separate tools to avoid brake dust transfer. Then I perform a two-bucket wash with grit guards, microfiber wash media, and deionized or softened rinse water when available. Hard water spotting is one of the most common causes of post-coating disappointment, particularly on dark patriotic color schemes where minerals stand out immediately.
Chemical decontamination should be staged. An iron remover is useful on lower panels and wheels, but I do not flood every painted area without need. Tar remover belongs only where asphalt specks are visible. Mechanical decontamination with a fine-grade clay mitt or clay bar should be done with generous lubrication and very light pressure because softer motorcycle clear can mar faster than automotive panels. After decon, paint inspection under high-CRI lighting reveals whether polishing is necessary. Many owners are surprised that a nearly new motorcycle still shows towel marring from dealership prep.
Polishing recipes vary by panel and defect. For fresh but swirled paint, a dual-action polisher with a soft finishing pad and a diminishing-abrasive polish is usually enough. On harder defects near luggage lids or saddlebag tops, a medium polish may be necessary, but I keep test spots small and measure progress conservatively. Panel edges, raised graphics boundaries, and tight areas around fuel fillers deserve hand polishing or mini-tool work only. A paint prep solvent wipe before coating must remove polishing oils without saturating seams, decals, or unpainted trim.
Ceramic coating recipes by Harley-Davidson use case
A useful ceramic coating recipe balances gloss, durability, and serviceability. Owners often think there is one best product, but the smarter approach is to match the system to the motorcycle’s duty cycle. The table below reflects the combinations I recommend most often for Liberty Edition platforms and similar premium Harley-Davidson finishes.
| Use case | Prep recipe | Coating choice | Why it works |
|---|---|---|---|
| Collector bike, climate-controlled storage | pH-neutral wash, light clay, finishing polish only | High-clarity consumer or pro ceramic with strong gloss | Maximizes visual depth, easy annual inspection, low contamination load |
| Weekend touring rider | Full decon, one-step polish, solvent wipe | Chemically resistant ceramic plus topcoat on leading edges | Handles bugs, water spotting, and repeated washing without overcomplication |
| Daily summer rider | Targeted decon, defect removal on contact areas, trim masking | Durable pro coating on paint, dedicated wheel and caliper coating | Improves cleanability around heat, brake dust, and oily road film |
| Show bike with frequent transport | Meticulous wash, spot polish, anti-static final wipe | Gloss-focused ceramic followed by silica maintenance routine | Reduces trailer dust adhesion and preserves finish under repeated handling |
For most Liberty Edition owners, the weekend touring recipe is the practical sweet spot. It gives enough resistance against bug splatter and wash chemicals without demanding an overly aggressive correction phase. If the bike has extensive chrome, I also treat brightwork separately because paint ceramic alone does not solve metal spotting. Dedicated metal coatings or sealants help reduce pitting on exhaust shields and engine covers.
Application conditions matter more than label claims. Most ceramics perform best on paint between roughly 60 and 75 degrees Fahrenheit, with controlled humidity and no direct sun. On motorcycles, panel temperature can vary widely across the same bike, so I confirm surfaces with an infrared thermometer instead of guessing. Flash times on saddlebags may differ from flash times on the tank. Level high spots immediately; they are easier to fix in minutes than after full cure.
Ergonomics recipes that protect the finish by reducing rider contact and cleaning damage
Model-specific ergonomics directly affect paint care. When rider fit is wrong, the owner grips the tank with abrasive denim seams, scuffs side covers with boots, drags jacket hardware across the tour pack, and leans heavily on the bars while maneuvering a fully dressed motorcycle in a garage. Better ergonomics reduce those contact points. That is why this hub connects Liberty Edition paint care with model-specific ergonomics and performance recipes rather than treating detailing as a separate universe.
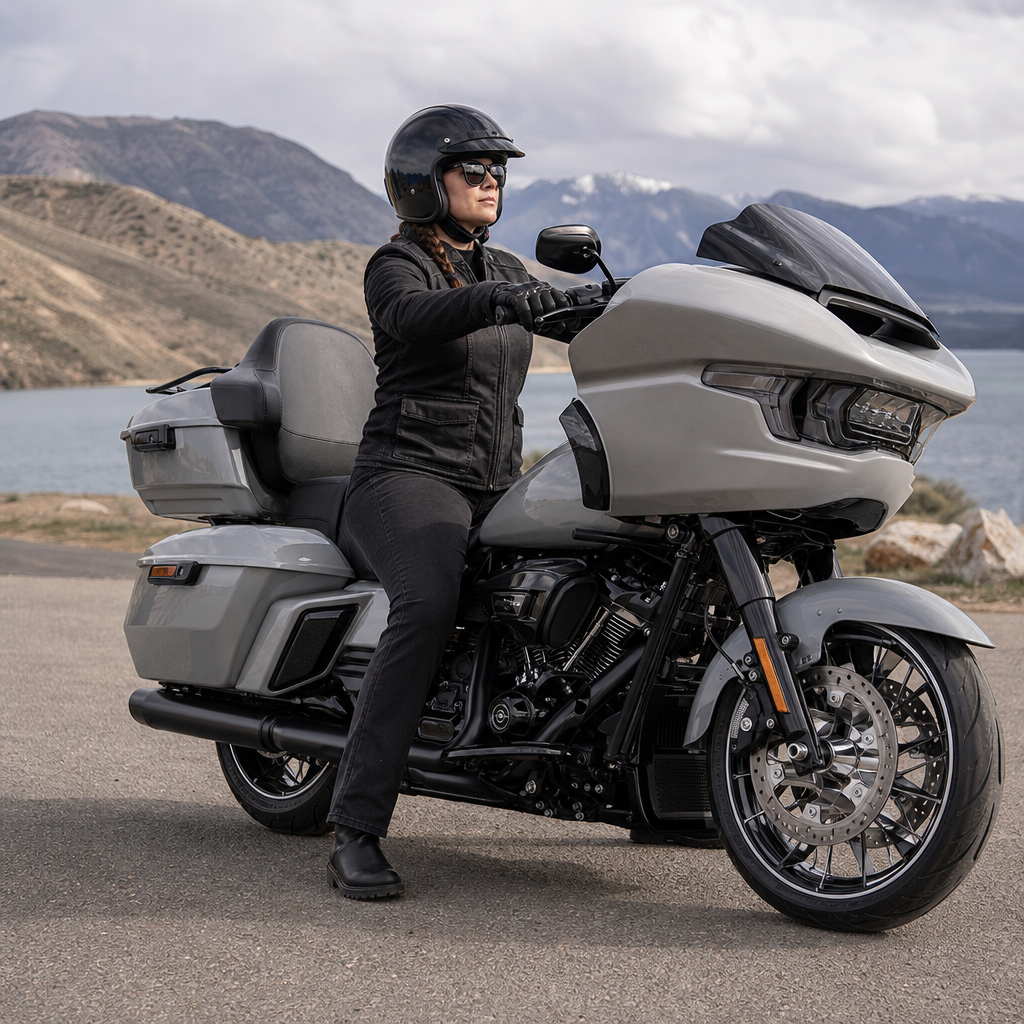
On touring Harley-Davidson models, I routinely see tank-edge wear caused by riders reaching too far forward. A modest handlebar change, riser adjustment, or seat swap can move the rider back into a neutral posture and reduce repeated paint abrasion. Low-profile seats may look sleek, but if they rotate the pelvis forward and force the rider into the tank, they increase contact damage. A correctly shaped touring seat with firmer support often does more to preserve paint than another bottle of spray sealant.
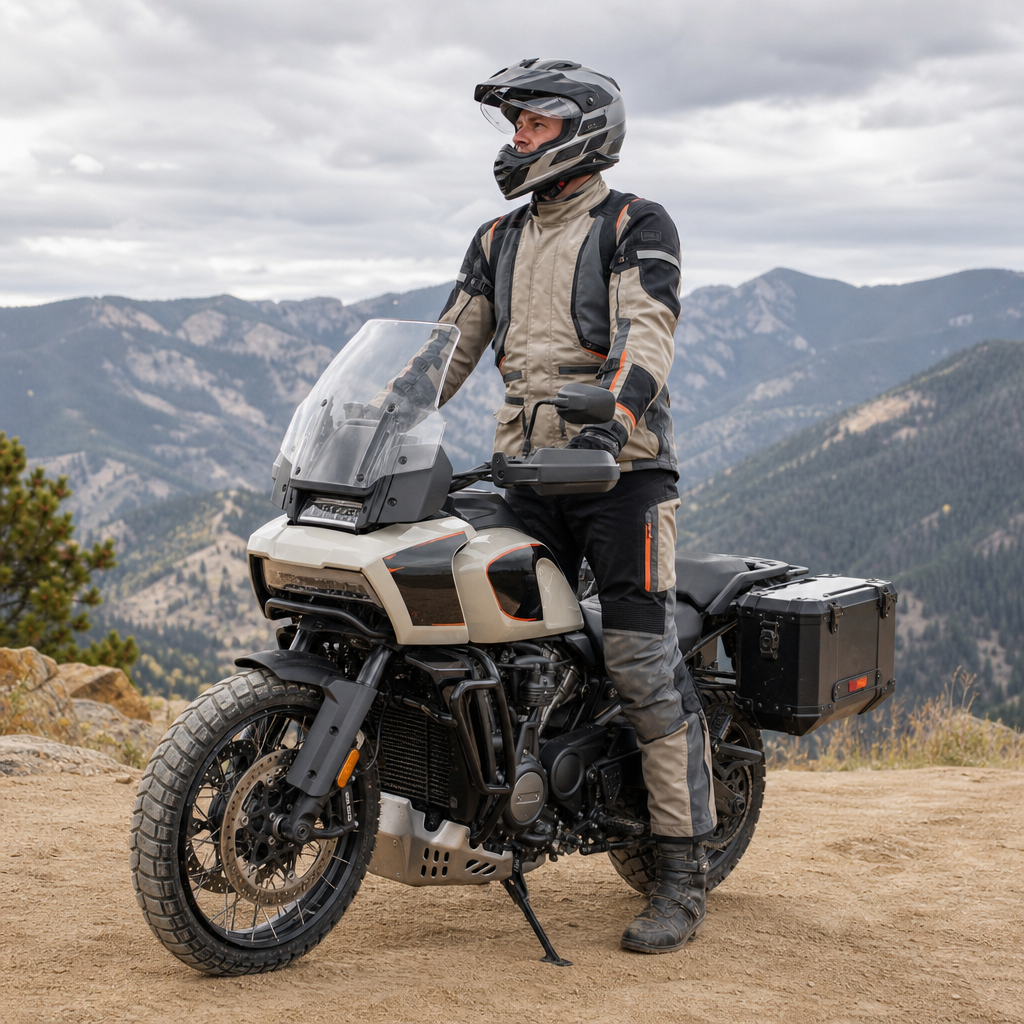
Foot control position matters as well. On Softail and cruiser platforms, riders with limited hip mobility may kick lower painted surfaces during mounting. Mid-control versus forward-control layout changes body path around the bike. If the owner struggles to clear a saddlebag lid or rear fender while getting on, the paint is at risk every single ride. Practical fixes include passenger peg relocation, docking hardware placement that avoids snag points, and side-stand habits that create a stable mounting angle.
Wind protection is another overlooked factor. A windshield or fairing setup that dumps turbulent air at the chest increases fatigue and shifts body weight during long rides, which leads to more tank bracing and more contact wear. For many owners, ergonomics tuning is not cosmetic. It is preventive paint care delivered through better human-machine fit.
Performance recipes: heat, braking, suspension, and storage variables that affect coating life
Performance setup influences ceramic coating longevity because coatings live in the real environment created by the motorcycle. Engine heat, exhaust routing, braking dust, suspension travel, and storage habits all shape what the finish must endure. Liberty Edition owners often focus on product selection, but I have seen more premature failure from unmanaged conditions than from reputable coating brands.
Heat is the first variable. Air-cooled and partially oil-cooled Harley-Davidson engines radiate substantial warmth into side panels, lower tanks, and rider-leg zones, especially in stop-and-go traffic. Ceramic coatings tolerate heat well on paint, but repeated thermal cycling combined with road film can hard-bake contamination onto surfaces. If a bike regularly idles in parade traffic, I recommend shorter wash intervals and a coating maintenance spray designed for ceramic systems. This is especially important near rear cylinder heat zones and around exhaust-adjacent bodywork.
Braking and wheel setup matter because iron particles and corrosive dust migrate onto lower painted sections. Dedicated wheel coatings simplify cleanup and reduce the chance that aggressive wheel chemicals will later be used near paint. Suspension setup matters because bottoming or excessive harshness can throw debris higher onto fenders and bags. A properly sprung and damped touring bike not only rides better but also limits abrasive dirt blast on the rear bodywork. For heavier riders or frequent two-up use, preload and damping adjustments are not optional; they are part of the protection recipe.
Storage is the last performance-related variable. Indoor parking is best, but not all covers are equal. A dusty, low-quality cover dragged over coated paint can install scratches faster than weather can. Use a clean, breathable cover only on a clean motorcycle. Battery tenders, tire cradles, and fuel stabilization get attention; paint-safe storage practices deserve equal discipline.
Maintenance intervals, common mistakes, and when to recoat
Once cured, a ceramic-coated Liberty Edition motorcycle still needs a maintenance plan. The simple version is this: wash before contamination bakes in, dry with high-quality microfiber or filtered air, top up hydrophobic behavior only with compatible products, and inspect high-contact areas often. In real ownership terms, that usually means rinsing bugs off after long rides, doing a careful contact wash every two to four weeks during riding season, and performing a decontamination inspection every six to twelve months depending on mileage.
The most common mistakes are predictable. Owners apply coating over dealership-installed swirls, then blame the product for poor gloss. They use strong alkaline cleaners on a dusty bike and induce marring during wipe-off. They assume water beading equals coating health, even when the surface is actually clogged with minerals and traffic film. They let bird droppings sit on warm paint, or they use one towel on wheels and bodywork. Each error shortens appearance life more than the coating label suggests.
Recoating is not always necessary when behavior declines. Often the finish needs decontamination and a maintenance topper, not full removal. Full recoat is appropriate when gloss is compromised by scratching, water spotting is etched beyond chemical removal, or the coating has uneven failure after years of exposure. For a premium Harley-Davidson special edition, documenting the process with dated photos, products used, and maintenance records is worthwhile. It preserves resale confidence and helps any future detailer make safe decisions.
The best Liberty Edition paint care strategy is a complete ownership recipe, not a single ceramic bottle. Start with a model-specific plan that respects graphic complexity, panel heat, riding style, and realistic maintenance habits. Prepare the surface carefully, polish only as much as needed, coat under controlled conditions, and maintain the finish with disciplined washing rather than improvised shortcuts. Then connect paint protection to ergonomics and performance: a better seat, smarter bar position, proper suspension settings, cleaner wheel management, and safe storage all reduce the stress placed on premium finishes. That broader approach is what turns ceramic coating from a cosmetic purchase into a durable preservation system.
For Harley-Davidson owners using this page as a hub for model-specific ergonomics and performance recipes, the main takeaway is clear. Fit, thermal management, contamination control, and maintenance timing are as important as coating chemistry. When those variables work together, Liberty Edition paint stays sharper, cleaning becomes easier, and the motorcycle remains both rideable and collectible. Audit your bike panel by panel, note where contact, heat, and grime are worst, and build your own ceramic coating recipe from there. If you want the finish to look exceptional next season, make the first correction today: improve the process before you buy another product.
Frequently Asked Questions
What makes Liberty Edition paint care different from normal motorcycle detailing when applying a ceramic coating?
Liberty Edition paint care is different because you are not simply protecting a daily-ridden motorcycle with standard single-stage or common basecoat-clearcoat paint. You are working with a limited-production finish that often combines special color layouts, layered graphics, sharp transition lines, commemorative badging, and a level of collector significance that raises the consequences of every step. That changes the entire approach. Instead of using a generic wash, clay, polish, and coat routine, you need a controlled ceramic coating recipe built specifically around the exact finish, the bike’s age, the amount of correction truly needed, and the owner’s goals.
On a collectible Harley-Davidson Enthusiast Collection model, the objective is usually paint preservation first, improvement second. That means minimizing unnecessary abrasion, avoiding aggressive compounding unless defects clearly justify it, and selecting chemicals that will not stain trim, weaken sensitive edges, or leave residue in pinstriping and graphic seams. A routine detailer may chase maximum gloss through heavier polishing. A Liberty Edition process should chase maximum safety, finish integrity, and repeatable results. In practical terms, that means more inspection under proper lighting, paint thickness awareness, gentler wash media, careful decontamination, lower-risk polishing pads and liquids, tighter control of panel temperature, and more disciplined coating application and curing.
The other major difference is expectation management. Owners of Liberty Edition motorcycles usually want the bike to look exceptional, but they also want originality preserved. A sound ceramic coating recipe respects that balance. It maps out the exact wash chemistry, contamination removal sequence, machine polishing plan if needed, coating choice for painted panels versus matte or textured areas, cure timing, and maintenance intervals. In short, Liberty Edition paint care is less about speed and more about precision, documentation, and preserving a finish that carries both visual appeal and long-term value.
What does a proper “ceramic coating recipe” include for an H-D Enthusiast Collection Liberty Edition motorcycle?
A proper ceramic coating recipe is a step-by-step process map tailored to the motorcycle rather than a one-size-fits-all product list. It begins with inspection. You identify the paint condition, note any repainted areas, inspect graphic edges, look for bug etching, fuel staining, prior wax or sealant buildup, and determine whether the bike has soft, medium, or hard clearcoat behavior. You also assess environmental conditions, because temperature, humidity, and airflow directly affect how coatings flash and cure. This first stage is what prevents guesswork later.
The next stage is wash chemistry. A strong recipe specifies a pH-appropriate pre-wash or foam, a safe contact wash shampoo, dedicated microfiber or wool media, and separate tools for painted panels, lower dirty sections, wheels, and exhaust-adjacent areas. Then comes decontamination. For some Liberty Edition bikes, that may mean only chemical iron removal and tar treatment with very limited or no clay contact if the paint is already delicate or near-perfect. For others, a fine-grade clay alternative with abundant lubrication may be justified. The key is to remove bonded contamination with the least possible mechanical marring.
After decontamination, the recipe defines correction strategy. That includes whether polishing is necessary at all, what machine type to use, what pad and polish combination fits the paint, how to protect graphic edges, and what finish standard is realistic without overworking the clear. On a collector-oriented motorcycle, the recipe may call for a single finishing polish pass instead of multi-step correction, simply to refine gloss while preserving film build. It should also identify wipe-down chemistry before coating so polishing oils are removed without stressing the finish.
Finally, the recipe specifies coating type and cure protocol. It should state whether the chosen ceramic coating is optimized for high gloss, chemical resistance, easier application on complex shapes, or better behavior on high-temperature painted components. It should also define ideal panel temperature, application pattern for small motorcycle sections, flash timing, leveling technique, towel rotation, indoor cure duration, first-water-contact window, and post-install maintenance intervals. A real ceramic coating recipe is not just “apply coating after polishing.” It is a controlled system that reduces risk and improves consistency on a high-value Liberty Edition finish.
How do you choose the safest wash, decontamination, and polishing steps for Liberty Edition painted surfaces and graphics?
The safest approach starts with the assumption that less aggression is better until inspection proves otherwise. For washing, that means using a lubricious, coating-safe or prep-safe shampoo depending on whether you are maintaining an existing coating or preparing for a new one. A foam pre-wash helps loosen road film before contact, which is especially useful on motorcycles because front-facing painted surfaces often collect bug residue and fine grit. The contact wash should use soft, clean wash media and gentle straight-line passes rather than pressure-heavy scrubbing. Small painted parts, tight contours, and graphic transitions deserve separate attention because trapped debris in those areas can easily cause localized marring.
Decontamination needs even more care. Chemical decontamination is usually the first choice because it removes bonded contamination with less physical friction. Iron removers can be very effective on painted tanks, fenders, and side covers, but they should not be allowed to dry and should be tested around sensitive finishes and adjacent materials. Tar removers may be needed on lower sections, but they should be used sparingly and wiped clean promptly. Mechanical decontamination, such as claying, should only happen after chemical methods have done most of the work. On a Liberty Edition finish, a fine-grade clay or synthetic clay alternative with generous lubrication is typically the safest route, and only enough passes should be used to achieve a clean surface. The goal is clean paint, not over-handling the paint.
Polishing decisions should be based on defect severity, not habit. If the paint already looks excellent and only needs better gloss and coating adhesion, a very light finishing polish or even a no-polish prep may be the safest call. If there are swirls, towel marks, or mild oxidation, start with the least aggressive pad and polish combination that can produce the desired improvement. Dual-action polishing machines are generally preferred for safety and control on these surfaces. Graphic edges, raised emblems, and tight panel curves should be taped or avoided as needed. Heat buildup must be managed carefully, because smaller motorcycle panels can warm quickly and because excessive heat near layered graphics is unnecessary risk. The best Liberty Edition correction strategy is one that leaves the paint visibly improved while preserving as much original clearcoat as possible.
What panel temperature, coating type, and cure timing matter most when coating a Liberty Edition motorcycle?
Panel temperature is one of the most overlooked variables in ceramic coating success. Motorcycle panels are small, curved, and often exposed to uneven ambient conditions, so one part of the bike can be ideal for coating while another is too warm from sunlight, shop lighting, or recent operation. In general, the paint should be cool to mildly warm, stable, and consistent across the section you are working on. If the panel is too hot, the coating may flash too quickly, making leveling difficult and increasing the chance of high spots or streaking. If it is too cold, flash behavior can become sluggish and unpredictable. A stable indoor environment gives the installer the best control, especially on detailed Liberty Edition graphics where visual uniformity matters.
Coating type matters because not every ceramic formula behaves well on a motorcycle’s mix of painted parts, trim, and high-exposure surfaces. For Liberty Edition paint, many owners benefit most from a coating that offers strong chemical resistance, crisp gloss, and forgiving application on intricate shapes rather than a product chosen solely for marketing claims about hardness. If the bike includes satin or matte accent surfaces, those areas may require a separate compatible product because traditional gloss-enhancing coatings can alter appearance. High-temperature areas also require product awareness. Not every paint coating is suitable for every heat-adjacent panel, and wheels or exhaust-related components may need dedicated formulations.
Cure timing is critical to final performance. After the coating is leveled and checked for residue, the bike should remain protected indoors for the manufacturer’s recommended initial cure period. That often means keeping it away from moisture, dust, and handling during the early hours when the coating is most vulnerable. The first 24 hours are especially important, and the first several days often determine whether the coating reaches its intended durability. During that time, avoid washing, rain exposure when possible, and unnecessary touching of coated surfaces. For a Liberty Edition motorcycle, proper cure discipline is part of the preservation mindset. The coating is only as good as the environment and timing that support it.
How should a Liberty Edition ceramic-coated finish be maintained long term to protect appearance and collector value?
Long-term maintenance should be structured, gentle, and consistent. A ceramic coating reduces how strongly contamination sticks, but it does not make the paint maintenance-free. The best plan is to wash the motorcycle before heavy grime, bug residue, water spotting, or fuel splatter has time to dwell. Frequent light cleaning is safer than infrequent aggressive cleaning. Use a pH-balanced shampoo, soft wash media, dedicated drying towels or filtered air, and separate tools for wheels and lower grime-prone areas. Avoid automatic wash methods, harsh degreasers on painted panels, and quick-detail habits that rub dust into the finish. Collector-oriented care means reducing unnecessary contact whenever possible.
Periodic