
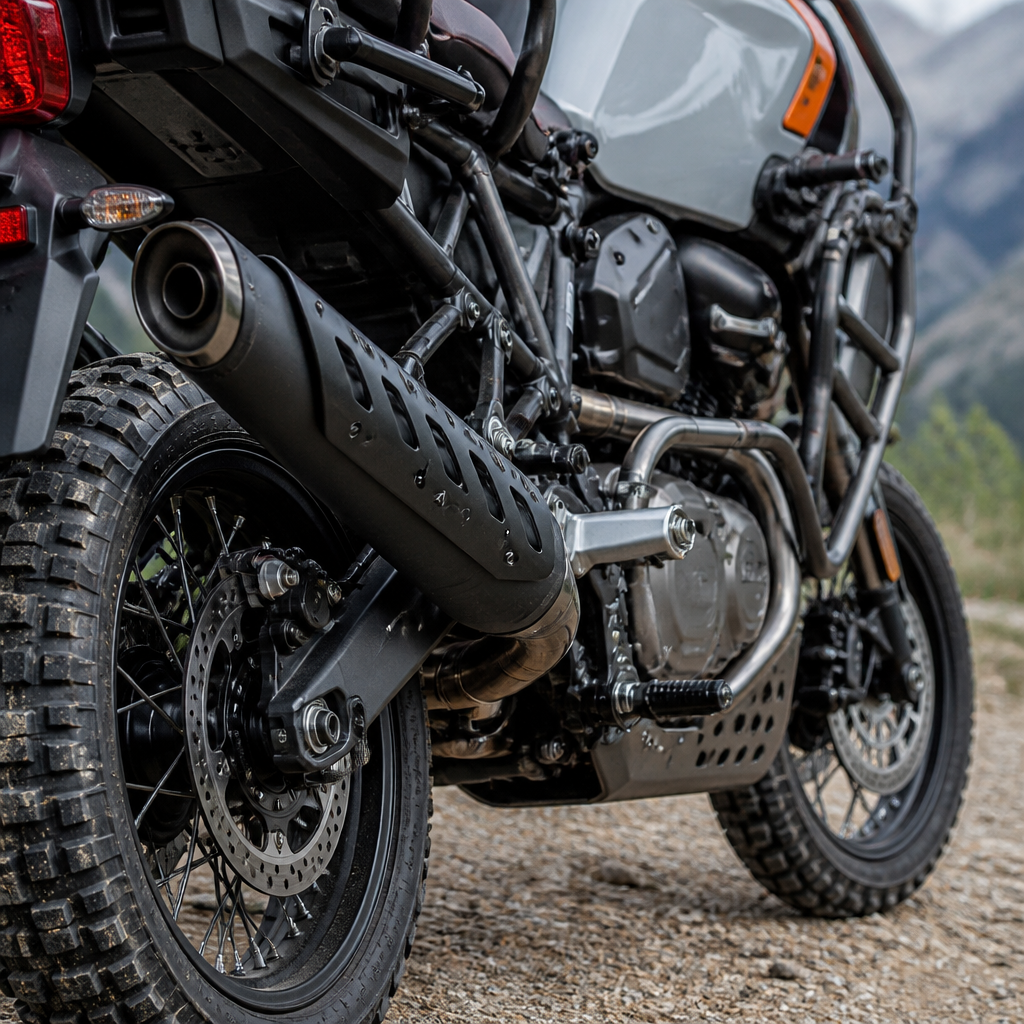
The Pan America 1250 exhaust guard recipe is the practical blueprint riders use to protect heat-sensitive components, preserve luggage clearance, and keep Harley-Davidson’s adventure platform durable in real travel conditions. In this context, a recipe means a repeatable combination of parts, fitment choices, heat management steps, and inspection habits tailored to one motorcycle rather than a generic accessory list. On the Pan America 1250 and Pan America 1250 Special, the exhaust route sits close to the rider’s right boot, passenger leg space, soft luggage, and lower bodywork, so protection is not cosmetic; it directly affects comfort, off-road survivability, and long-term reliability. I have set up several adventure bikes for mixed highway and backcountry use, and the Pan America consistently rewards model-specific planning because its Revolution Max 1250 chassis packages performance tightly. A good exhaust guard recipe reduces burn risk after slow technical riding, limits abrasion damage during tip-overs, and helps riders integrate luggage, skid plates, footpeg changes, and standing ergonomics without creating new clearance problems. As a sub-pillar hub for model-specific ergonomics and performance recipes, this guide explains what an exhaust guard should do, how to choose materials and mounting styles, what tradeoffs matter, and how this protection fits into a broader Pan America setup.
What the Pan America 1250 Exhaust Guard Must Protect
An exhaust guard on the Pan America 1250 has four jobs: shield people from heat, shield the exhaust from impact, preserve safe clearance for accessories, and do all of that without compromising vibration isolation or service access. Riders often focus only on leg burns, but on this motorcycle the real-world risk matrix is wider. The right side exhaust area is exposed when the bike drops on rocks, when a boot drags while dabbing in sand, and when throw-over bags sag under load. The stock system already includes heat shielding, but factory parts are designed around average street use, emissions packaging, and production cost. Once riders add aluminum panniers, rackless luggage, taller pegs, larger boots, or aggressive off-road tires, the heat and contact points change.
The best guard recipes start by mapping the likely interference zones. Check passenger heel position, the arc of your right ankle when standing, and the nearest point between the muffler area and any luggage. Then inspect where a crash bar, skid plate wing, or center stand stop may transfer force during a fall. On the Pan America, the answer is rarely “just bolt on a cover.” A guard that sits too close to the muffler can trap heat. One that sticks too far outward can catch on brush or increase strike risk in a rut. Effective protection balances stand-up riding ergonomics with thermal control and impact resistance.
Core Ingredients of a Proven Exhaust Guard Recipe
The most reliable Pan America 1250 exhaust guard recipe combines a formed outer shield, stand-off spacers, high-temperature hardware, and a compatibility check against surrounding accessories. Material choice matters. Stainless steel guards tolerate repeated impacts and resist corrosion from water crossings and winter road salt. Aluminum guards are lighter and easier to shape, but they need sufficient thickness and bracing to avoid fatigue cracking. Composite or carbon-look pieces can reduce radiant heat to the rider, yet they are less forgiving when the bike falls onto rock edges. In workshop practice, stainless is usually the safest recommendation for riders who actually leave pavement.
Mounting design matters as much as material. A proper stand-off creates an insulating air gap, which is one of the simplest and most effective ways to reduce surface temperature transfer. It also keeps the guard from buzzing against the exhaust under engine load. Use locking hardware rated for vibration, ideally with prevailing-torque nuts or threadlocker suited to high heat. Avoid generic rubber well-nuts near the hottest sections because they degrade faster than many riders expect. If a guard relies on hose clamps, check edge finishing carefully; cheap clamp-based kits can dig into coating, loosen after heat cycles, and complicate removal for service.
Coverage should focus on the sections most likely to contact a boot, passenger calf, or luggage panel. More coverage is not always better. On the Pan America, overbuilt guards can interfere with heel movement while seated and can block access to fasteners during muffler removal. A strong recipe protects the vulnerable zone, leaves drainage paths open after mud exposure, and allows a mechanic to inspect welds and mounts without disassembling half the right side of the bike.
Choosing the Right Guard by Riding Style
The correct exhaust guard setup depends on how the Pan America is used, because heat, impact frequency, and luggage needs vary sharply between commuting, touring, and off-road travel. Riders who spend most of their time on pavement usually need a compact heat-focused shield that improves passenger comfort and works cleanly with factory luggage. Riders who mix pavement with fire roads need broader impact resistance, especially if they use soft bags. Riders building a travel bike for rocky trails need the strongest mount strategy and should evaluate the entire right-side protection system as one package.
| Riding profile | Best guard priority | Recommended features | Main tradeoff |
|---|---|---|---|
| Daily street and weekend highway | Heat shielding | Slim stainless or aluminum shield, clean stand-off spacing, passenger-safe coverage | Less impact protection in drops |
| Touring with panniers or rackless bags | Luggage clearance | Extended rearward coverage, smooth outer surface, proven bag compatibility | Can add width and weight |
| Backcountry discovery routes | Impact resistance | Reinforced brackets, stainless construction, hardware that survives repeated vibration | Higher cost and more installation time |
| Technical off-road and frequent tip-overs | System integration | Guard matched to skid plate, crash bars, pegs, and luggage rack geometry | Requires careful fitment testing |
A common mistake is buying a guard based on style photos instead of use case. A sleek compact shield may look right in product shots but fail once a Mosko Moto, Giant Loop, or Kriega bag sits against it on a hot climb. Conversely, a large rally-style guard may be excellent in a rocky wash yet feel intrusive for a rider with size 9 boots commuting in the city. Matching the recipe to riding style prevents these mismatches and leads to fewer expensive accessory replacements.
Heat Management, Ergonomics, and Rider Comfort
Heat management on the Pan America 1250 is not only about avoiding contact burns. It affects fatigue, standing posture, and confidence at low speed. During slow technical sections, limited airflow allows exhaust and catalyst heat to soak surrounding parts. Riders often describe this as “right-side warmth,” but the actual issue is cumulative heat radiating into the boot, shin, and luggage area. A well-spaced guard lowers the intensity of that heat at the contact surface and creates a predictable boundary, so the rider knows where they can grip the bike with their leg without surprise.
Ergonomically, the guard should support both seated and standing movement. The Pan America has a roomy ADV triangle, but footpeg swaps, lowered pegs, and wider adventure boots change how the right heel tracks near the exhaust. I always test fitment in three positions: seated with the ball of the foot on the peg, standing in an attack position, and dabbing with the leg extended. If the guard edge catches a pant cuff or boot buckle in any of those positions, the recipe needs revision. A rounded outer profile and chamfered edges matter more than many catalog descriptions suggest.
Passenger comfort deserves equal attention. On two-up touring builds, the passenger heel often sits close to the muffler area, especially when bulky ADV boots are involved. An added guard can improve comfort substantially, but only if it does not reduce foot placement room. The best touring recipes use a shield that deflects heat outward and backward while maintaining a natural heel pocket on the passenger peg bracket.
Installation Standards and Common Fitment Errors
Installation quality determines whether an exhaust guard becomes invisible protection or an irritating source of rattles and failures. Start with a cold motorcycle and inspect the exhaust for existing dents, loose factory shields, or misalignment caused by prior falls. Dry-fit the guard before applying threadlocker. Confirm that no mounting point forces the shield into tension, because preloaded brackets tend to crack after repeated heat cycles. If the kit includes spacers, verify that each spacer creates a consistent air gap rather than simply compensating for poor bracket geometry.
Torque discipline matters. Follow the guard manufacturer’s specification when provided; otherwise use conservative values appropriate for the fastener size and substrate, especially around exhaust clamps and threaded inserts. After the first full heat cycle, recheck hardware because stainless expands differently than coated steel and many new installations settle slightly. I usually recheck again after 100 to 150 miles, then at every oil change or after any drop on the right side.
The most common errors are overtightening small bolts, allowing the guard to touch the muffler at one point, and ignoring luggage interaction. Another frequent problem is stacking accessories without considering access to service items. A guard may fit by itself but interfere once a pannier rail or auxiliary fuel mount is installed. On the Pan America, where owners often personalize in stages, the right approach is to plan the full protection and luggage system in advance rather than treating each part as independent.
How Exhaust Protection Fits the Larger Pan America Recipe Hub
Exhaust protection is one recipe inside a larger Pan America framework that includes footpeg position, bar rise, seat height, wind management, skid plate coverage, and luggage strategy. These components influence each other. Lowered or wider pegs improve standing control but can bring the heel closer to the exhaust zone. A rackless luggage system may centralize mass better than hard panniers, yet it increases the need for heat shielding on the right side. Crash bars can protect bodywork in a fall, but they may redirect the bike’s resting angle and place more load on the muffler area. That is why model-specific ergonomics and performance recipes work best as connected setups, not isolated purchases.
For riders building a complete Harley-Davidson adventure package, the logical internal next steps are articles focused on footpeg recipes, seat and reach recipes, luggage recipes, and off-road protection recipes. Those subtopics sit naturally under this hub because they answer the same question from different angles: how do you tune the Pan America 1250 for your body, terrain, and travel load without undermining the platform’s strengths? Exhaust guards are often the first heat-management upgrade, but they deliver the most value when coordinated with the rest of the motorcycle.
One final point is performance perception. An exhaust guard does not add horsepower, but it can improve usable performance by letting the rider move freely, carry luggage safely, and continue riding after minor impacts that would otherwise damage the muffler cover or melt a bag panel. On an adventure bike, that is real performance: fewer interruptions, more confidence, and better control when conditions get rough.
The essential 2026 Pan America 1250 exhaust guard recipe is simple in principle and specific in execution: choose a guard built for this motorcycle, prioritize an air-gapped design, match coverage to your riding style, and verify compatibility with luggage, pegs, and other protection parts. That approach solves the real problems Pan America owners face—heat near the right boot, passenger discomfort, bag clearance, and vulnerability during tip-overs—without adding unnecessary bulk or creating service headaches. The strongest setups use durable materials such as stainless steel, vibration-resistant hardware, and mounting geometry that avoids direct contact with the exhaust itself. They are checked after heat cycles, inspected after falls, and treated as part of a complete ergonomic and performance plan rather than a standalone cosmetic accessory.
As the hub for model-specific ergonomics and performance recipes under Harley-Davidson, this page establishes the standard for evaluating every related upgrade: fit the rider, fit the mission, and fit the machine as a system. If you are setting up a Pan America 1250 or Pan America 1250 Special for 2026 travel, start with the exhaust guard because it affects comfort, durability, and luggage safety immediately. Then build outward into pegs, seating, controls, wind protection, and cargo management using the same model-first logic. Review your current setup, identify the right-side heat and impact risks, and choose a proven guard recipe before your next ride.
Frequently Asked Questions
What does “Pan America 1250 exhaust guard recipe” actually mean?
In this article, a recipe is not just a list of aftermarket parts. It is a repeatable protection plan built around how a specific Harley-Davidson Pan America 1250 or Pan America 1250 Special is used in the real world. That plan usually combines the physical guard itself, the correct mounting hardware, spacing and clearance choices, heat-control measures, luggage compatibility checks, and a routine for inspection after travel. The goal is to create a setup that works consistently on one motorcycle rather than assuming one universal solution fits every rider.
That matters because the Pan America 1250’s exhaust area affects more than appearance. It influences nearby bodywork, soft luggage, passenger comfort, and the long-term condition of heat-sensitive components around the right side of the bike. A well-designed exhaust guard recipe accounts for how the exhaust route sits close to parts that can suffer from radiant and contact heat, especially during slow technical riding, loaded touring, or repeated stop-and-go use. It also considers whether the bike is running panniers, tail luggage, passenger pegs, or other accessories that change airflow and spacing.
In practical terms, a strong recipe includes four things: the right guard for the exact model and exhaust configuration, proper fitment with verified clearances, supporting heat management such as shields or thermal barriers where needed, and regular checks to catch loosening hardware or hot spots early. That is why riders refer to it as a blueprint. It is a proven combination of parts and habits that protects the motorcycle better than a one-time bolt-on approach.
Why is an exhaust guard especially important on the 2026 Pan America 1250 platform?
An exhaust guard is especially important on the 2026 Pan America 1250 platform because adventure motorcycles are exposed to a wide mix of operating conditions that make heat management more demanding than on many street-only bikes. The Pan America is often ridden loaded with luggage, used on slow off-road sections, parked with gear close to the exhaust side, and pushed through variable weather and terrain. In those situations, exhaust heat can build up near bags, straps, plastic trim, and any accessory mounted with limited clearance.
For many riders, the real value of the guard is preventing small issues from turning into expensive ones. Without good protection, soft luggage can sag toward hot surfaces, straps can weaken, nearby components can discolor, and long travel days can expose weaknesses in mounting or spacing that were not obvious on short rides. The right guard helps preserve a safe gap around the exhaust, reduces the chance of accidental contact, and gives the bike more tolerance when it is fully loaded or used in slower airflow conditions where heat lingers.
There is also a durability argument. Adventure travel creates vibration, impacts, dust, mud, and repeated heat cycles. Those stresses can loosen hardware, shift bags, and amplify any fitment compromise. A properly selected and installed exhaust guard works as a protective layer in that system. It helps keep the Pan America 1250 reliable by controlling a known stress point on the motorcycle’s right side and by making the luggage and accessory setup more predictable over time.
What parts and fitment choices usually belong in a good Pan America 1250 exhaust guard recipe?
A good Pan America 1250 exhaust guard recipe usually starts with a model-specific heat shield or guard designed for the stock or intended exhaust configuration. That means confirming compatibility with the standard Pan America 1250 or the Pan America 1250 Special, and checking whether the bike is using the original muffler, a slip-on, or a full exhaust system. Small shape differences can affect mounting points, heat spread, and how close a bag or rack sits to the guard. Choosing a guard with strong materials, clean edge finishing, and secure hardware is more important than simply choosing the largest-looking cover.
Next comes spacing and mounting. A quality recipe often uses stand-offs, heat-resistant washers, or bracket geometry that keeps the guard from sitting too close to the exhaust canister or pipe. Guards work best when they create a protective air gap rather than acting like a cosmetic plate pressed directly against a hot surface. Hardware should resist corrosion and vibration loosening, and every fastener should be installed to the correct torque specification. If the bike also wears pannier racks, soft bag supports, or passenger luggage systems, those components need to be checked together rather than individually. The exhaust guard must function within the full luggage layout, not in isolation.
Many riders also add secondary heat management items to complete the recipe. These can include adhesive thermal barriers on the luggage-facing side of nearby panels, heat-resistant sleeves for vulnerable straps, and carefully placed support hoops or spacers that keep bags from drifting inward. The best recipes are conservative about clearance. They assume the motorcycle will bounce, flex, and heat-soak on long rides. A setup that looks acceptable in the garage may not be adequate once luggage shifts or suspension compresses on rough ground, so fitment choices should always be made with motion and load in mind.
How do you install and test an exhaust guard so it actually protects the bike during travel?
Start by fitting the guard on a cool motorcycle and confirming that every mounting surface is clean, stable, and free from interference. Before tightening anything fully, loosely assemble the hardware and check the guard’s position from multiple angles. You want even spacing, no contact with moving or vibrating parts, and enough room around the exhaust for airflow. If the motorcycle has luggage racks, soft bag supports, or passenger accessories, they should be installed during this process so the final guard position reflects real use rather than a stripped-down workshop setup.
Once mounted, tighten hardware in stages and according to the manufacturer’s specifications if provided. The goal is a secure fit without distorting the guard, crushing spacers, or overloading threaded points. After that, inspect clearances with the suspension compressed if possible, especially if the bike is commonly ridden with travel gear. On the Pan America 1250, that matters because load and terrain can change how close luggage sits to the exhaust side. If a strap, bag panel, or rack section appears borderline in the garage, it is usually too close for real travel.
Testing is just as important as installation. Run the bike through a short heat cycle, then inspect for shifting hardware, hot spots, or unexpected contact marks. Follow that with a loaded test ride that reflects actual use: slow-speed riding, brief stops, and enough engine heat to simulate touring or trail conditions. When you return, check the guard, the hardware, the nearest luggage surfaces, and any strap routing. A proper test confirms whether the recipe works when the motorcycle is hot, vibrating, and carrying weight. That is the stage where a good setup proves itself and a weak one reveals gaps.
How should riders maintain and inspect their Pan America 1250 exhaust guard setup over time?
Maintenance should be simple but disciplined. At a minimum, inspect the exhaust guard setup after initial installation, after the first few rides, and then at regular service intervals or before major trips. Pay special attention to fastener tightness, cracked brackets, worn spacers, and any signs that the guard has shifted closer to the exhaust. Adventure bikes experience constant vibration and repeated thermal expansion, so hardware that felt secure on day one can gradually loosen if not checked. A quick inspection routine prevents that from becoming a roadside problem.
Also look beyond the guard itself. Examine the nearby luggage side panel, bag backing, straps, rack tubing, passenger peg area, and any plastic or rubber components exposed to the exhaust side. Discoloration, glazing, warping, or a burnt smell are all early warnings that heat control is no longer adequate. Mud, dust, and road grime should be cleaned off periodically because built-up debris can hold heat and hide small cracks or contact marks. If the motorcycle has been dropped, ridden through deep ruts, or transported with luggage strapped tightly on the right side, inspect immediately rather than waiting for the next service interval.
Finally, treat the setup as adjustable, not permanent. If you change bags, add a rack, switch to a different muffler, or alter how the bike is packed, revisit the full recipe. The Pan America 1250’s exhaust protection strategy works best when it evolves with the motorcycle’s actual use. Riders who maintain that habit usually get the best results: better luggage clearance, fewer heat-related surprises, and a more durable travel-ready machine that stays protected season after season.





