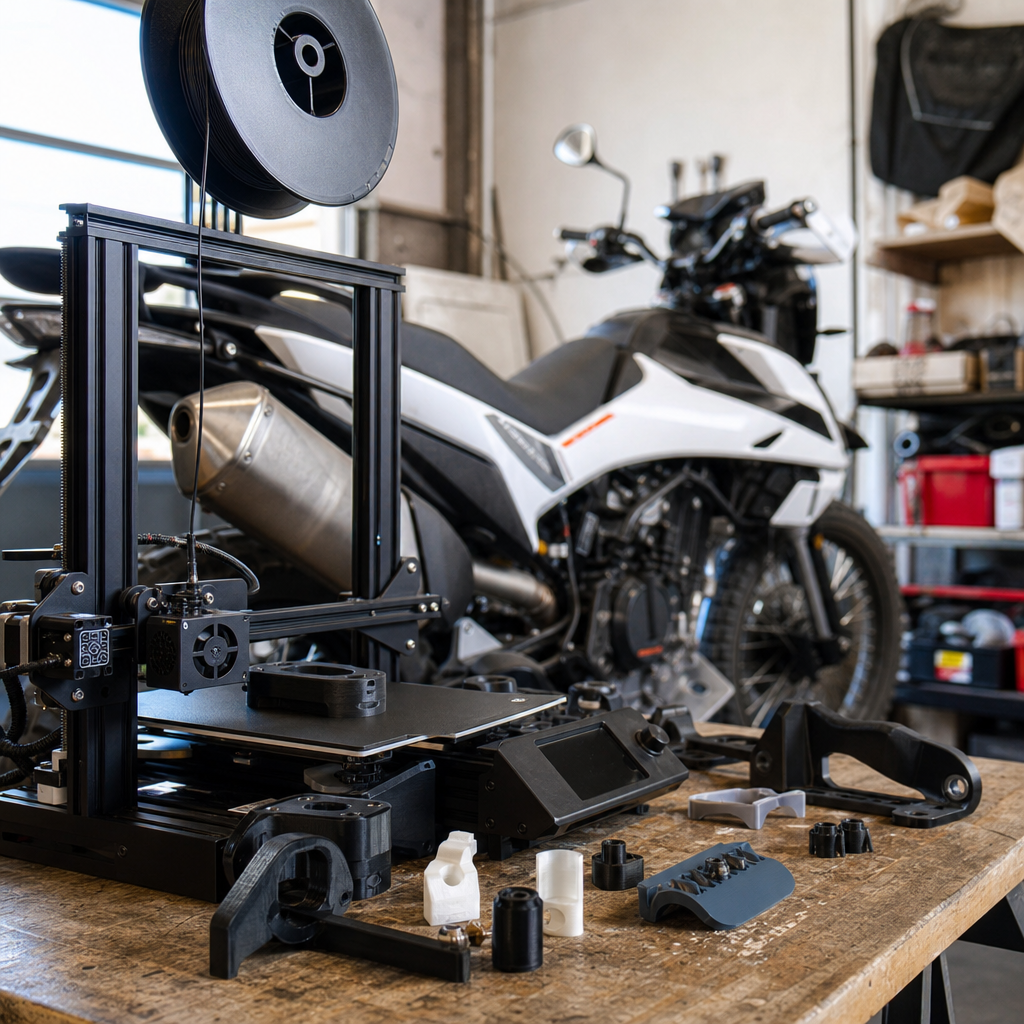
3D printing has become one of the most practical fabrication tools available to motorcyclists who build, repair, and customize their own machines. In a garage context, it means using digital models to produce physical parts layer by layer, often in plastics such as PLA, PETG, ABS, ASA, nylon, TPU, and carbon-fiber-filled blends. For riders and builders, that matters because modern motorcycles mix bodywork, brackets, wiring retainers, sensor mounts, intake pieces, and accessory housings that are expensive, discontinued, or awkward to source. A capable desktop printer can turn an idea, a broken clip, or a rough prototype into a usable component within hours.
I have used 3D printers in motorcycle workshops for exactly these jobs: replacing unavailable fairing tabs, testing dash layouts before cutting aluminum, building wire-routing clips for race bikes, and creating molds and drilling guides that shorten fabrication time. The value is not only low part cost. The real advantage is iteration. You can print a battery tray mockup, discover the chain run interferes at full suspension compression, change the model, and print again the same day. That speed changes how custom motorcycle fabrication happens.
This hub article covers the full fabrication tech picture for motorcyclists, with 3D printing as the core and carbon composites and wiring support as linked disciplines. If you are choosing the best 3D printer for motorcycle parts, selecting filament for heat, fuel, or vibration exposure, or wondering where printed parts fit compared with carbon fiber layups and conventional wiring methods, this guide gives you the framework. It explains what printers work, what materials survive on a bike, what should never be printed, and how smart builders combine additive manufacturing with traditional workshop practice.
Why 3D Printing Belongs in Motorcycle Fabrication
A motorcycle garage is full of low-volume, highly specific parts. That is exactly where additive manufacturing performs best. Injection molding is unbeatable for mass production, but it makes no economic sense for one-off cable guides, gauge pods, ECU brackets, relay boxes, helmet lock spacers, or custom airbox adapters. A desktop printer closes that gap. Instead of reshaping universal parts until they almost fit, a rider can design around the actual frame tube diameter, fork offset, fairing stay geometry, or connector size on the motorcycle in front of them.
Printed parts are also excellent bridge tools between concept and final fabrication. I often print a headlight bracket in cheap PLA first, bolt it on, check steering lock, vibration clearance, and suspension movement, then remake the confirmed version in ASA, nylon, or aluminum. The print saves metal stock, time, and frustration. This is why 3D printing sits at the center of modern custom culture: it supports cafe racers, adventure bikes, supermotos, race builds, and restorations equally well.
For this fabrication tech topic, the key idea is integration. 3D printing does not replace carbon fiber, metal fabrication, or wiring discipline. It supports them. Printed bucks can shape carbon panels. Printed jigs keep wiring looms organized while you pin connectors. Printed templates help drill repeatable holes in brackets and subframes. Used intelligently, the printer becomes another essential shop machine, somewhere between a drill press and a soldering station in practical value.
Best 3D Printers for Motorcyclists
The best 3D printer for motorcycle use is usually a fused filament fabrication machine with strong bed adhesion, enclosed printing capability, reliable temperature control, and easy spare-parts support. Resin printers produce excellent detail, but most riders need durable workshop parts rather than display pieces. For brackets, housings, guides, and prototypes, filament printers remain the sensible choice.
Three printer categories matter. First are beginner-friendly enclosed machines such as the Bambu Lab P1S, which print fast and handle PETG, ABS, and ASA with little tuning. Second are open-frame value machines such as the Creality Ender 3 V3 series or Prusa MK4S, which offer strong ecosystems and large communities but may need enclosures for temperature-sensitive engineering filaments. Third are advanced enclosed platforms such as the Bambu Lab X1 Carbon, Prusa CORE One, QIDI Plus4, or Raise3D-class machines, which are better suited to nylon, carbon-fiber-filled materials, and repeat production.
When I recommend a printer to riders, I look for five criteria: enclosure, hardened nozzle availability, automatic bed leveling, consistent first layers, and serviceable firmware support. An enclosure matters because ABS, ASA, and nylon warp in drafts. A hardened nozzle matters because carbon-fiber-filled filament will wear standard brass quickly. Bed leveling matters because workshop users should spend time fitting parts on motorcycles, not chasing adhesion problems. Reliability is worth paying for.
| Printer Type | Best For | Strengths | Limitations |
|---|---|---|---|
| Entry enclosed FFF | First serious garage printer | Easy setup, handles ASA and ABS, good speed | Less tuning freedom than fully open systems |
| Open-frame FFF | Budget prototyping and PLA/PETG work | Lower cost, huge community, many upgrades | Needs enclosure for technical filaments |
| Advanced enclosed FFF | Functional end-use motorcycle parts | Better nylon performance, hardened components, repeatability | Higher price |
| Resin printer | Small cosmetic or highly detailed pieces | Excellent surface finish and detail | Brittle materials, messy workflow, poor fit for most garage parts |
Build volume matters less than many buyers think. Most motorcycle parts printed in a home shop fit comfortably within 220 x 220 x 250 mm. Reliability, thermal stability, and material support matter more. If you regularly print undertray panels, fairing duct sections, or large molds, then a larger bed helps. Otherwise, choose the machine that prints engineering materials consistently.
Best Filaments for Motorcycle Parts
Not every filament belongs on a motorcycle. Material choice should follow heat, UV exposure, chemical contact, and vibration load. PLA is useful for mockups, fit checks, and display parts, but it softens at relatively low temperatures and should stay away from engine bays, dashboards in direct sun, and structural brackets. In summer conditions, black PLA on a parked bike can deform badly.
PETG is often the first truly useful functional filament for riders. It prints more easily than ABS, has better heat resistance than PLA, and resists water well. I use PETG for switch housings, wire guides, temporary battery hold-down prototypes, GPS mounts not directly over engine heat, and workshop fixtures. Its drawbacks are creep under constant load and less stiffness than some engineering materials.
ASA is one of the best all-around motorcycle filaments because it combines weather resistance, UV stability, and respectable heat performance. For parts exposed to sun and outdoor use, ASA is usually better than ABS. It is my default for license-plate brackets, dash trims, number-board supports, fuse box covers, and external accessory housings. ABS still has a place, especially for indoor or shielded parts, but ASA is generally the more durable choice on a parked motorcycle.
Nylon, including PA12 and PA6 blends, is excellent for tough functional parts subject to impact and vibration. It works well for clips, cable retainers, chain guard spacers, and some intake-related prototypes. However, nylon absorbs moisture from air, which affects print quality and final dimensions. It should be dried before printing and stored properly. Carbon-fiber-filled nylon improves stiffness and printability, making it one of the best filaments for motorcycle brackets and technical components, provided the design accounts for layer orientation and notched stress points.
TPU is the solution for flexible components. It is useful for grommets, anti-rattle pads, vibration isolators, protective sleeves, and soft mounts. Carbon-fiber-filled materials are not automatically stronger in every direction; they are usually stiffer, sometimes easier to print, and often more dimensionally stable. That distinction matters. If a part needs impact toughness more than stiffness, plain nylon may outperform carbon-filled nylon. Choosing the best filament means matching the polymer to the job, not chasing the most expensive spool.
Where Printed Parts Work, and Where They Do Not
Motorcyclists should treat printed parts as engineered components with clear limits. Good candidates include fairing brackets, dash panels, indicator mounts, camera mounts, switchgear housings, chain guide blocks, wiring clips, battery box prototypes, intake mockups, seat pan test pieces, and molds for fiberglass or carbon work. These jobs benefit from customization, low production volume, and rapid revision.
Bad candidates include brake components, handlebars, footpeg mounts, helmet hardware, wheel-related parts, load-critical suspension pieces, and anything whose failure could immediately cause a crash. Fuel-exposed parts also deserve caution. Some filaments resist splash contact, but long-term exposure to gasoline, ethanol blends, oils, and cleaning chemicals can weaken or swell printed plastics. Heat near cylinder heads, exhaust routing, and radiators also rules out many common materials.
The right way to use printed motorcycle parts is conservative and test-based. Start with noncritical applications. Verify fit at full steering lock and full suspension travel. Check for heat soak after a real ride. Inspect layers around bolt holes after vibration exposure. If a part works as a prototype, then decide whether the printed version is sufficient or whether it should become aluminum, steel, or laminated composite. In practice, the best builders use printing to validate geometry first and commit to final material second.
How 3D Printing Supports Carbon Fiber Work
Carbon fabrication and 3D printing complement each other extremely well. A printer lets you create plugs, bucks, trim templates, mold flanges, vacuum line organizers, resin mixing fixtures, and drilling guides that improve composite accuracy. In my own builds, a printed buck has often replaced hours of foam shaping when making a custom seat cowl or intake cover. The shape comes off the printer close to final dimensions, then gets skimmed, filled, sanded, and sealed before composite layup.
For small shops, this is a major advantage because carbon work is sensitive to symmetry and repeatability. A left and right side cover can be mirrored digitally, printed, and refined with much tighter consistency than hand-carved forms. Printed mold tools also speed prototyping for fairing ducts and electrical covers where conventional metal tooling would be excessive.
Material selection still matters. PLA can be acceptable for room-temperature pattern work, but elevated post-cure temperatures may distort it. PETG and ASA perform better for many layup tools, and high-temperature tooling materials are better still when epoxy systems require heat. Surface prep matters as much as print material: seams must be filled, the surface must be primed and sanded, and release compatibility must be confirmed. A rough print turned into a clean mold pattern is a process, not a shortcut.
How 3D Printing Improves Motorcycle Wiring
Wiring is where many custom builds either become reliable machines or recurring electrical problems. 3D printing helps by creating organization and strain relief, not by replacing sound electrical practice. Useful printed wiring parts include relay mounts, fuse holders, Deutsch connector brackets, ECU trays, loom separators, pass-through grommet housings, LED driver boxes, and clip systems that keep harnesses away from heat and steering movement.
Good motorcycle wiring still follows established standards. Use proper automotive-grade wire such as TXL, GXL, or cross-linked insulation types where appropriate. Size circuits by current and voltage drop, not guesswork. Crimp with the correct die for open-barrel or sealed terminals. Use adhesive-lined heat shrink where environmental sealing is required. Printed brackets make these systems cleaner and easier to service, but they cannot compensate for poor routing, undersized conductors, or weak grounds.
A practical example is a custom subframe build with a relocated battery and compact electronics tray. Instead of zip-tying everything to frame tubes, you can print a staged panel that holds the regulator, starter relay, fuse block, and connectors with defined bend radii and service loops. That reduces chafing, speeds troubleshooting, and makes the bike easier to maintain. Fabrication tech is at its best when it improves durability as much as appearance.
Design, Testing, and Workshop Best Practices
Successful printed motorcycle parts start in design. Filament parts are anisotropic, meaning they are weaker between layers than along them. Orient the model so major loads work through continuous strands where possible. Add fillets to reduce stress concentration. Avoid sharp internal corners around bolt bosses. Use metal inserts or washers to spread clamping force. Leave realistic clearances for thermal expansion, paint, rubber isolators, and assembly access.
Testing should be deliberate. I treat the first installed part as a prototype even when the model looks final. Ride with inspection intervals. Mark fasteners. Look for whitening, cracking, elongation at holes, and heat distortion. If the part sits near the engine, use an infrared thermometer after shutdown. If it supports electronics, test vibration over rough pavement. For more demanding parts, print coupons in the same orientation and break them in a vise to understand failure mode before trusting the final component.
The core lesson across 3D printing, carbon work, and wiring is simple: modern fabrication tech lets motorcyclists build smarter, faster, and with far more control than a decade ago. Choose an enclosed filament printer before chasing novelty. Use PETG for easier functional parts, ASA for exterior durability, nylon or carbon-filled nylon for tougher technical jobs, and TPU where flexibility matters. Use printing to prototype metal parts, support carbon layups, and organize wiring professionally. If you are building or restoring motorcycles, add these tools to your process, start with noncritical components, and develop a repeatable workflow that makes every project cleaner, safer, and easier to finish.
Frequently Asked Questions
What kinds of motorcycle parts can you realistically 3D print at home, and which parts should you avoid?
For most garage builders, 3D printing is best viewed as a tool for making non-critical motorcycle parts, prototypes, workshop aids, and custom accessories rather than highly stressed structural components. It works especially well for fairing clips, dash mounts, GPS brackets, switch housings, wiring guides, fuse box covers, sensor mounts, cable retainers, chain guard details, intake mockups, spacer tools, and custom enclosures for lighting or electronics. It is also extremely useful for replacing discontinued trim pieces or for making test-fit parts before machining or ordering a final version in metal.
Where riders get into trouble is treating a printed plastic part like a forged or machined mechanical component. Parts tied directly to braking, steering, suspension, wheel retention, foot controls, or other safety-critical systems should generally not be trusted to a home-printed plastic solution unless the part has been engineered, tested, and validated to a very high standard. The same caution applies to pieces exposed to continuous engine heat, fuel immersion, repeated impact loads, or severe vibration unless the filament and design are specifically suited for that environment.
A practical rule is simple: print parts that locate, route, protect, cover, prototype, or lightly support; avoid parts that must carry life-safety loads. For example, a printed bracket for routing auxiliary light wires is a smart use of the technology. A printed brake lever pivot or handlebar clamp is not. Motorcyclists get the best results when they use 3D printing where it offers a real advantage: quick customization, low-cost iteration, and the ability to make exactly the little garage-specific parts that are hard to find or no longer available.
What is the best 3D printer type for motorcyclists: beginner-friendly FDM models or more advanced enclosed machines?
For most motorcyclists, an FDM printer is the best starting point because it is affordable, versatile, and capable of producing useful garage parts in a wide range of materials. FDM, or fused deposition modeling, is the style of printer that builds parts by melting filament and laying it down layer by layer. It is the most practical format for brackets, mounts, covers, templates, and shop tools, and it gives riders access to materials like PLA, PETG, ABS, ASA, TPU, nylon, and carbon-fiber-filled blends. That material flexibility is a major reason FDM dominates in garage fabrication.
If you are just getting started, a reliable open-frame printer can be enough for PLA and PETG, which are common entry-point materials. However, many motorcycle applications push parts into hotter, dirtier, and more vibration-prone environments, which means materials like ASA, ABS, nylon, and reinforced engineering filaments become more relevant. Those materials print much better on an enclosed machine because enclosure heat helps control warping, improves layer bonding, and makes prints more consistent. An enclosure also becomes much more important if you are printing larger parts such as side covers, electronics housings, or airbox-related prototypes.
So the real answer depends on your goals. If you want to print basic organizers, templates, mockups, and low-stress accessories, a quality beginner-friendly FDM printer is a very sensible choice. If you want to make more durable under-seat components, weather-resistant exterior parts, or stronger nylon-based parts, stepping up to an enclosed printer is usually worth it. Motorcyclists who print regularly often discover that machine reliability, bed adhesion, temperature stability, and material support matter more than chasing raw print speed. A dependable printer that handles engineering filaments well is generally a better garage investment than a faster machine that struggles with consistency.
Which filaments are best for motorcycle use, and how do PLA, PETG, ABS, ASA, nylon, TPU, and carbon-fiber-filled materials compare?
Each filament has strengths and weaknesses, and choosing the right one matters as much as choosing the printer itself. PLA is the easiest material to print and is excellent for mockups, fitment checks, shop organizers, and indoor-use accessories. It gives sharp detail and low warping, but it softens under heat and does not hold up especially well in harsh outdoor or engine-adjacent conditions. That means PLA is great for prototyping but usually a poor choice for permanent motorcycle parts exposed to sun, vibration, or elevated temperatures.
PETG is often the best middle-ground material for riders because it prints fairly easily while offering better toughness, heat resistance, and moisture resistance than PLA. It is a strong option for brackets, splash-exposed parts, and many general-purpose accessories. ABS has long been popular because it is tougher and more heat-resistant than PLA, but it can warp badly and prefers an enclosure. ASA is often considered the more motorcycle-friendly cousin to ABS because it provides similar strength and heat performance while also offering better UV and weather resistance. For outdoor bodywork-related accessories, under-tail pieces, and sun-exposed mounts, ASA is frequently one of the smartest choices.
Nylon is a more advanced option valued for toughness, impact resistance, and fatigue performance. It can be excellent for functional parts, especially those that need some resilience rather than brittleness. The downside is that nylon can be more difficult to print, tends to absorb moisture, and often demands careful storage and drying. TPU is the flexible material in the group, making it useful for vibration-damping parts, grommets, protective covers, or custom sleeves. Carbon-fiber-filled filaments, including carbon-fiber PETG, nylon, or other engineering blends, can add stiffness and improve dimensional stability, but they are not magic. They often reduce flexibility, require hardened nozzles, and still inherit the base polymer’s environmental limitations. In short, for many riders: use PLA for prototypes, PETG for general utility, ASA for outdoor durability, nylon for demanding functional parts, TPU for flexibility, and carbon-fiber-filled blends when you need stiffer, more premium-feeling parts and have the hardware to print them properly.
How do you make 3D-printed motorcycle parts strong enough to survive vibration, weather, and garage abuse?
Strength in a printed motorcycle part comes from a combination of material choice, part design, print settings, and placement on the bike. Many failures that riders blame on filament are actually design failures. Sharp inside corners, thin unsupported tabs, poor layer orientation, and weak mounting geometry can doom a part even if the material itself is capable. A well-designed PETG or ASA bracket can outperform a badly designed nylon one. Start by designing with generous fillets, thicker load paths, reinforced bolt zones, and shapes that spread force instead of concentrating it. If a part bolts to the bike, washers, metal inserts, and compression sleeves can dramatically improve long-term durability.
Layer orientation is especially important because printed parts are weaker between layers than along them. If a part will be pulled, flexed, or vibrated in one direction, orient it so the layers resist that force as effectively as possible. Perimeters usually matter more than simply raising infill, so adding more walls often improves functional strength more than pushing infill to extreme percentages. Riders also benefit from using heat-set inserts where appropriate, avoiding overtightening fasteners, and leaving room for real-world tolerances since motorcycles move, heat-cycle, and vibrate in ways that static bench tests do not always reveal.
Environmental durability is another major factor. A part near the engine, radiator, exhaust routing, or direct summer sunlight needs a filament that can tolerate heat and UV exposure. A part under the seat but close to electronics may need chemical resistance and dimensional stability. A mudguard-adjacent piece may need toughness and impact resistance. Smart builders test their parts in stages: first for fit, then for static use, then for real riding conditions. It is also wise to inspect printed parts regularly during service intervals, especially early in a design’s life. In practice, the strongest motorcycle prints are not just “printed thicker”; they are designed for the exact combination of heat, vibration, load, and weather they will actually face.
What should motorcyclists look for when buying a 3D printer specifically for garage projects and custom bike parts?
Motorcyclists should prioritize reliability, material capability, and dimensional consistency over flashy marketing. The best garage printer is the one that produces accurate parts repeatedly without constant troubleshooting. Start with print volume large enough for the kinds of parts you want to make. If you plan to print fairing brackets, electronics trays, tool holders, or accessory housings, a modest bed may be enough. If you want larger bodywork pieces, pannier accessories, or full under-tail panels, a bigger build area becomes much more useful. But size alone is not the deciding factor.
Look closely at whether the printer can reach the nozzle and bed temperatures needed for your target materials. A machine limited to beginner filaments may be fine at first, but many riders eventually want ASA, ABS, nylon, or reinforced composites. An enclosed build chamber is a major advantage for those materials. A direct-drive extruder helps with TPU and can improve control over filament feeding. Automatic bed leveling, a stable frame, quality motion components, and a good build surface all contribute to first-layer success and repeatability, which matters a lot when you are printing functional parts instead of decorative models.
You should also think about maintenance