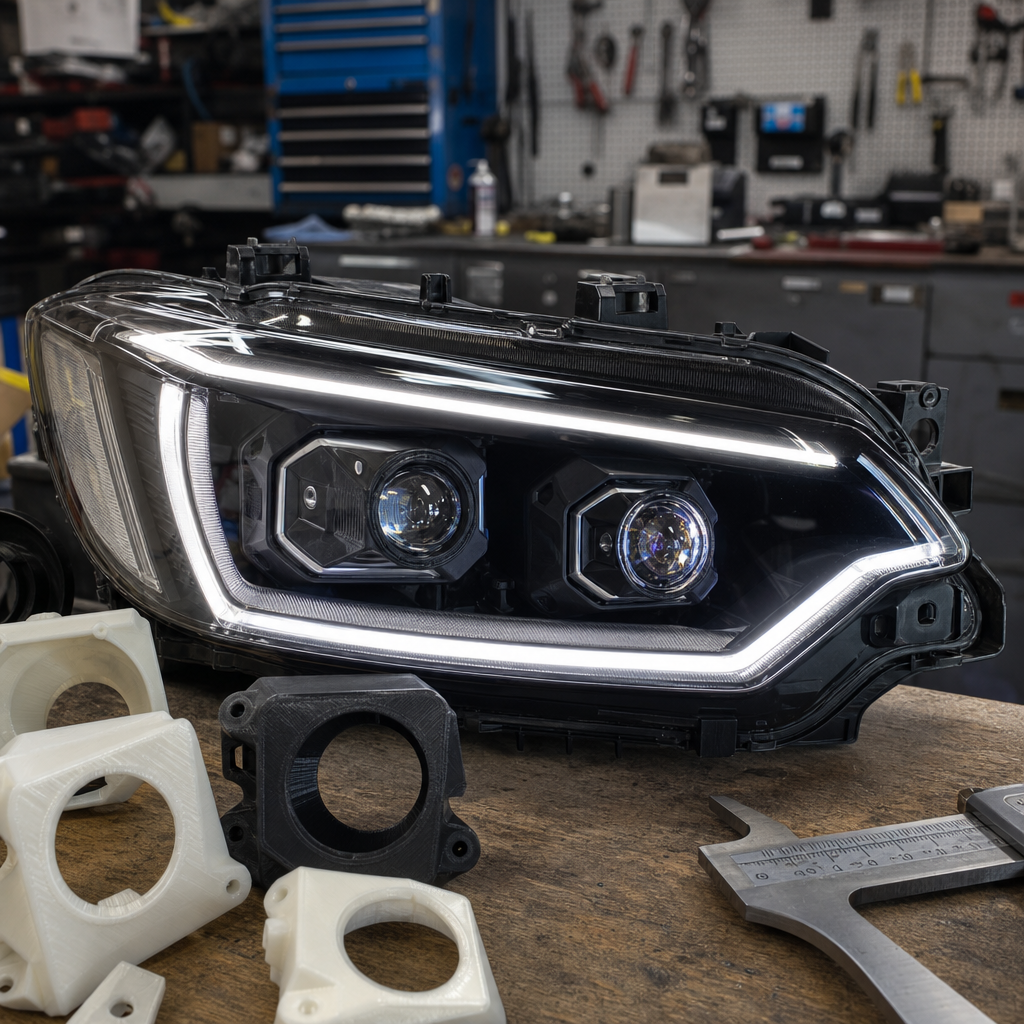
Custom LED projection has become one of the defining upgrades in modern headlight mods, and 3D-printed housings are now the fabrication link that makes ambitious 2026 builds practical. In this context, custom LED projection means replacing or redesigning factory reflector or projector assemblies with tailored optical components, driver electronics, shrouds, mounts, and ducts that shape beam output and visual identity. A 3D-printed housing is the structural shell or bracketry made with additive manufacturing, usually from PETG, ASA, nylon, polycarbonate blends, or fiber-reinforced filament, to position projectors, heat sinks, lenses, seals, and wiring inside a headlamp. This matters because builders want OEM-level beam control, cleaner packaging, lighter prototype cycles, and faster one-off fabrication without machining every bracket by hand.
I have worked on retrofit headlight builds where the old method meant cardboard templates, ABS sheet, fiberglass filler, and repeated trial fitting that consumed entire weekends. With a decent printer, a caliper, and CAD, the same alignment problem becomes measurable and repeatable. You can scan or model the lamp cavity, define projector centerline, establish aiming offsets, and print test brackets in hours instead of fabricating from scratch each time. That speed changes the economics of custom culture. It lets independent builders produce low-volume parts for rare chassis, integrate halos or daytime running light channels cleanly, and solve heat management and serviceability before final assembly. It also creates a bridge to related fabrication disciplines, especially composite trim, lens finishing, harness building, and electronic control packaging.
As a hub topic under fabrication tech, this subject goes beyond a single printed bracket. It connects 3D printing, carbon-composite techniques, and automotive wiring into one workflow for reliable custom lighting. If the optics are excellent but the material softens at temperature, the build fails. If the printed shell is rigid but the wiring lacks proper current control, venting, and sealing, the build fails. If the electronics are safe but the finish looks unfinished, the build misses the standard expected in the new generation of show-quality street cars and track builds. The most successful headlight mods in 2026 are systems, not isolated parts, and the builders getting consistent results are the ones treating optics, structure, heat, finish, and electrical integrity as a single design problem.
Why 3D-Printed Housings Changed Headlight Modding
3D printing changed headlight modding because it introduced accuracy, iteration speed, and modularity to a part of the car that is cramped, heat exposed, and visually unforgiving. Traditional retrofits often depended on universal projector brackets, epoxy, and improvised tabs. Those methods still work for some builds, but they make precise projector depth, rotational clocking, and lens spacing harder to control. A printed housing allows exact mounting geometry. In practice, that means a builder can lock in cutoff sharpness, foreground distribution, and shroud centering with less guesswork. On bi-LED and bi-LED laser-assisted units, where millimeter-level alignment affects performance and glare, that precision matters immediately on the road.
The best use case is custom integration into uncommon or aging platforms. Many 1990s and 2000s headlights were never designed for modern high-output optics. Builders retrofitting units from Koito, Hella, Morimoto, or OEM adaptive assemblies into older housings frequently encounter interference with buckets, adjusters, rear caps, or inner lens ribs. A printed mount can relocate fasteners, clear obstructions, and preserve factory aiming adjusters. It can also include cable channels, fan ducts, desiccant pockets, and gasket lands in one part. That level of integration reduces assembly stack-up, which is the cumulative dimensional error created when many small brackets, spacers, and adhesive layers are combined.
Another major advantage is repeatability for small-batch production. If you are building a run of ten retrofit kits for a specific chassis, machining tools and fixtures may not pencil out. A validated print file and documented post-processing workflow often do. Builders now maintain digital inventories: versioned CAD files, slicer profiles, and fitment notes by model year. That is a serious shift from one-off craft to low-volume manufacturing. It also supports better support content across related fabrication tech topics, including printed switch panels, carbon trim backers, relay boxes, and sensor brackets.
Material Selection, Heat Management, and Optical Tolerances
Choosing material for a 3D-printed headlight housing is not a cosmetic decision; it is a thermal and dimensional stability decision. PLA is useful for test fitting, but it should not be considered a final material in a hot lamp environment because its heat deflection temperature is too low. PETG is easy to print and tougher than PLA, yet prolonged heat can still creep critical mounts. ASA improves UV resistance and handles automotive exposure better than standard ABS while remaining post-process friendly. Nylon and glass- or carbon-filled nylon are excellent when rigidity and temperature resistance are needed, but they absorb moisture and demand tighter print control. Polycarbonate blends offer strong heat performance, though they can warp and require enclosed printers, dried filament, and tuned chamber temperatures.
Heat management is the issue that separates a durable mod from a short-lived one. LED projectors run cooler at the lens than old HID setups in some configurations, but the heat at the emitter, driver, and sink is still substantial. Builders need to understand conduction, convection, and thermal isolation. The housing should support the projector without becoming the primary heat reservoir unless the design intentionally uses metallic inserts or heat spreaders. I usually leave air volume around driver boards, avoid trapping heat behind sealed cosmetic covers, and include vent paths that do not become direct water channels. In compact lamps, a ducted rear cap with a membrane vent can lower condensation risk while still allowing pressure equalization.
Optical tolerances must be treated as engineering values, not approximate fitment. Projector yaw, pitch, and roll affect beam pattern quality. Even a slight rotational error can tilt the cutoff and create a visibly amateur result. Lens-to-shroud spacing changes perceived depth and can interfere with adaptive mechanisms. Mounting surfaces should be flat, reinforced, and, where possible, tied into the lamp’s original adjuster points. Inserts made from brass or stainless heat-set hardware improve serviceability and reduce thread wear compared with self-tapped screws into plastic.
| Material | Best Use in Headlight Mods | Main Strength | Key Limitation |
|---|---|---|---|
| PLA | Prototype brackets and fit checks | Fast, inexpensive iteration | Poor heat resistance for final use |
| PETG | Light-duty internal mounts | Tough and easy to print | Can creep under sustained heat |
| ASA | Visible trim and exterior-adjacent parts | Good UV and weather resistance | Needs controlled printing conditions |
| Nylon CF/GF | Structural projector housings | High strength and heat performance | Moisture sensitivity and print complexity |
| PC blends | High-temperature precision mounts | Excellent thermal stability | Warping risk and demanding setup |
Design Workflow: Scanning, CAD, and Print Validation
A strong design workflow starts with measurement discipline. Some builders use handheld scanners, structured-light scanners, or photogrammetry to capture the lamp interior, but calipers, radius gauges, and a reference jig still matter because scan meshes often need cleanup. The practical goal is not creating a museum-grade digital twin; it is establishing reliable datums. I usually identify the factory bulb centerline, lens center, adjuster plane, and rear cap envelope first. From there, the projector’s mounting face, lens protrusion, and heat sink depth are modeled around actual dimensions from the chosen hardware, not catalog assumptions. This avoids a common mistake where the printed housing fits the lamp but not the exact projector revision on the bench.
In CAD, the best printed housings are designed for assembly, not just shape. That means split lines where support removal is easy, access windows for fasteners, wire passages with strain relief, and surfaces that can be sanded or flocked after printing. Wall thickness should reflect load and temperature. Thin cosmetic shells may be fine at 2 to 3 millimeters, but projector mounts often need thicker ribs, gussets, and generous fillets to resist vibration. If the build includes threaded inserts, allow enough boss diameter and insertion depth. If the lamp will be opened for service, avoid geometries that require destructive disassembly.
Validation should happen in stages. First, print a draft fitment model at lower quality to verify envelope and mounting locations. Second, print a geometry-accurate test in the final material if the thermal load is meaningful. Third, bench-assemble the lamp with the actual drivers, gaskets, and rear covers installed, then power it for heat soak. Finally, aim the beam against a wall at measured distance before sealing the lens permanently. Professional retrofitters often document this process with photos, torque notes, and version tags because tiny adjustments between V1 and V3 can transform both output and ease of assembly.
Carbon and Composite Finishing for Lightweight, Premium Results
Carbon and composite work enters the picture when builders want lighter cosmetic structures, stiffer mounting panels, or a motorsport-grade finish around the printed core. In many advanced headlight mods, the printed housing is the hidden skeleton, while a carbon overlay or composite shroud delivers the final appearance. This is especially useful when the front face needs a thin, crisp shape that would show print lines or require excessive filler if left as raw additive material. A common method is printing a buck, sealing it, surfacing it with primer, then using it as the mold base for fiberglass or carbon skin sections. For one-off projects, vacuum bagging can improve fiber consolidation, though even hand-layup can produce excellent trim pieces when geometry is simple.
The benefit is not only aesthetics. Composites can add stiffness where a large trim ring would otherwise flutter or crack. They also tolerate paint and clearcoat workflows familiar to body shops. Builders often combine a printed nylon bracket with a thin carbon face panel bonded using structural epoxy, then isolate that assembly from direct projector heat with air gaps and reflective tape. If the look calls for forged carbon, twill weave, or satin black composite, that surface treatment can align the headlights with splitter, mirror cap, or engine bay themes across the vehicle.
There are tradeoffs. True carbon fiber can be electrically conductive, so exposed edges should not be allowed to chafe wiring. Resin systems vary in heat resistance, and cosmetic epoxy laminates may yellow if they are not UV-protected. Composite dust from trimming is hazardous and requires proper respiratory protection and containment. For most street builds, fiberglass-reinforced plastic remains a highly practical option for nonstructural shrouds, while carbon is best reserved for visible premium accents or stiffness-critical pieces where its cost is justified.
Wiring, Drivers, Sealing, and Roadworthy Reliability
The electrical side of custom LED projection deserves the same attention as the printed housing. Modern projectors rely on stable current delivery, surge protection, and clean switching logic. A tidy headlight mod typically includes dedicated relays or solid-state control, proper fuse sizing, weather-sealed connectors, and driver placement away from standing moisture and direct heat. Many failures blamed on LEDs are actually wiring issues: undersized conductors, poor grounds, cheap crimp terminals, or CAN bus incompatibility. On vehicles with bulb monitoring, load simulation or coding may be required to prevent warnings, flicker, or pulse-width modulation behavior that upsets aftermarket drivers.
Sealing strategy is equally important. Opening a headlight usually means cutting or reheating an OEM butyl or permaseal bond. Once the lamp is modified, every new cable pass-through, vent, and fastener interface becomes a possible leak point. The standard approach is using butyl sealant for serviceable lens joints, silicone only where manufacturer compatibility is confirmed, and closed-cell foam or molded gaskets for removable rear caps. Pressure equalization vents with hydrophobic membranes help reduce condensation while keeping water out. I also prefer drip loops on external harness runs and abrasion sleeves where wires pass printed edges.
Reliability comes from system thinking. Drivers should be mounted where they can shed heat and be replaced without destroying the housing. Connectors should have positive locks. Grounding should return to known chassis points, not questionable painted studs. Beam aim must be checked after final assembly, and any modification must respect legal glare limits and local lighting regulations. The most convincing builds are the ones that look custom but function like factory equipment through rain, vibration, and summer heat.
Build Standards for 2026 and How to Use This Hub
By 2026, the standard for a serious headlight mod is no longer simply brighter output. The benchmark is integrated fabrication: a printed housing designed around heat and serviceability, composite finishing that matches the vehicle’s visual language, and wiring that performs reliably in real use. Builders working at a high level now document filament type, nozzle size, layer orientation, insert spec, adhesive family, connector part number, and beam test results. That documentation is what turns custom work into repeatable work. It also makes future updates easier when a projector model changes, a driver is discontinued, or a customer wants a second set for another chassis.
This hub should be used as the starting map for the broader fabrication tech category. From here, the logical next reads are detailed guides on filament selection for automotive interiors and exteriors, carbon layup methods for trim and ducts, and professional-grade automotive wiring practices for low-volume custom builds. Headlights are the ideal case study because they force precision across every discipline at once. If you can design, print, finish, wire, seal, and validate a custom LED projector assembly correctly, you have most of the core methods needed for the rest of modern vehicle fabrication.
The key takeaway is simple: 3D-printed housings have made custom LED projection faster, more precise, and more repeatable, but the best results come only when printing, composites, and wiring are engineered together. Treat the headlight as a complete system, choose materials by temperature and tolerance rather than convenience, and validate every step before final seal-up. If you are building out this fabrication tech path, start with one lamp, document everything, and use that process to level up the rest of your custom work.
Frequently Asked Questions
1. What is custom LED projection, and why are 3D-printed housings so important for 2026 headlight mods?
Custom LED projection is the process of redesigning a headlight’s internal optical system so it performs and looks different from the factory setup. Instead of relying only on the original reflector bowl, projector body, mounting points, and cosmetic trim, builders create a tailored assembly that may include upgraded LED emitters, projector lenses, heat sinks, shrouds, beam shields, ducts, and electronic drivers. The goal is usually a sharper cutoff, wider beam pattern, improved foreground control, better high-beam reach, or a distinctive visual signature that matches the build. In 2026, this matters more than ever because modern vehicles have tighter packaging, more complex styling, and more integrated lighting systems, which makes off-the-shelf retrofit parts less likely to fit cleanly without custom fabrication.
That is where 3D-printed housings become essential. A 3D-printed housing acts as the structural bridge between the desired projector setup and the physical constraints of the headlamp. It can hold the projector at the correct depth, align the lens on the proper optical axis, provide mounting tabs that match factory hardware, create channels for wiring, and support ducts or venting paths for thermal management. It also allows builders to design around curved lenses, shallow housings, unusual bezel geometry, and tight internal clearances that would be difficult or time-consuming to solve with metal fabrication alone. In practical terms, 3D printing shortens development time, improves repeatability, and makes one-off or small-batch builds far more realistic. For ambitious 2026 headlight mods, it is often the difference between an idea that stays on a workbench and a retrofit that installs, aligns, and performs like a refined product.
2. Are 3D-printed headlight housings durable enough for real-world use, including heat, vibration, and weather exposure?
Yes, they can be, but durability depends heavily on material choice, design quality, print orientation, and post-processing. A headlight environment is demanding. Internal components are exposed to elevated temperatures, repeated thermal cycling, vibration from the road, moisture intrusion risk, UV exposure near the lens area, and long-term stress from mounting loads. A poorly chosen material or a weak print design can warp, crack, or lose alignment over time, which is why successful 3D-printed housings are engineered parts, not just cosmetic prototypes. Builders who treat them as production components typically select materials with higher heat resistance and better mechanical stability than standard hobby-grade filament.
For functional headlight applications, materials such as nylon blends, carbon-fiber-reinforced nylon, polycarbonate, ASA, or high-temperature engineering resins are usually better choices than basic PLA. The housing should be designed with adequate wall thickness, ribbing, gussets, and reinforced mounting points so it can resist flex and maintain projector aim. Heat management also matters: if the LED module, driver, or projector generates significant heat, the housing should incorporate airflow paths, isolation spacing, or attachment points for metal inserts and heat-dissipating hardware. In addition, sealed surfaces may need sanding, coating, or chemical smoothing depending on the print process, especially if the part contributes to airflow control or moisture resistance. When properly engineered and matched to the thermal and mechanical demands of the build, a 3D-printed housing can be extremely reliable in daily-driven vehicles. The key is understanding that real durability comes from material science and design discipline, not just the fact that the part can be printed.
3. How do you make sure a custom LED projector and 3D-printed housing produce a safe, usable beam pattern instead of glare?
The most important principle is that headlight performance starts with optics and alignment, not styling. A custom LED projection setup must control light precisely so the beam reaches the road effectively without scattering upward into oncoming traffic. That means the projector, lens, shield design, emitter position, and mounting geometry all need to work together. A 3D-printed housing is critical because it sets the projector’s angle, depth, rotation, and centering inside the headlamp. Even a high-quality projector can produce a poor beam if the mount is slightly twisted, offset, or placed at the wrong focal position. In other words, the housing is not just a bracket; it is an optical alignment tool.
To achieve a safe beam, builders typically begin with a projector known to have a controlled cutoff and proven output characteristics. From there, the housing is modeled to hold that projector rigidly on-axis and maintain consistent spacing relative to the outer lens and any decorative shrouds. Test fitting is followed by bench aiming against a flat wall to verify cutoff sharpness, step location, hotspot position, and beam symmetry. Fine adjustments may be built into the mounting system, or shims may be used during prototyping before the final geometry is locked in. It is also important to account for vehicle ride height, suspension stance, and the factory headlight adjustment system so the finished assembly can be aimed correctly on the car. The safest builds are the ones that prioritize beam discipline over raw brightness. More light is not automatically better if the optics are uncontrolled. A well-executed custom projector with a properly designed 3D-printed housing should provide a clean, road-focused pattern that improves nighttime visibility while remaining respectful to other drivers.
4. What should builders consider when designing a 3D-printed housing for custom LED headlight retrofits?
A strong design starts with accurate measurement and a clear understanding of the space inside the factory headlamp. Builders need to map available depth, lens curvature, bezel clearance, factory mounting points, service access, wire routing, and any interference from adjusters, covers, or OEM electronics. They also need to know the exact dimensions of the projector, LED driver, cooling components, and decorative elements that will be integrated. Once the packaging is understood, the housing can be designed to do several jobs at once: support the optical assembly, maintain aim under vibration, provide attachment features, preserve clearance for heat dissipation, and create a clean visual presentation when viewed through the outer lens. In advanced builds, the housing may also incorporate ducting, baffles, modular inserts, alignment features, and provisions for threaded inserts or fasteners.
From an engineering standpoint, the most common mistakes are underestimating heat, relying on thin unsupported geometry, and ignoring print direction. Loads should travel through reinforced ribs and broad mounting bases rather than fragile tabs. Screw locations should be designed to avoid splitting, ideally with heat-set inserts or metal reinforcement where repeated service is expected. Surfaces that define optical positioning should be dimensionally stable and easy to verify during assembly. It is also smart to design for manufacturability: avoid geometry that requires excessive supports if those support scars would affect fit, and allow enough tolerance for real-world variation in print shrinkage and vehicle housing dimensions. Finally, a good housing should make assembly easier, not harder. Serviceability matters. If a driver fails, a seal needs inspection, or a projector requires re-aiming, the builder should not have to destroy the entire retrofit to reach one component. The best 3D-printed headlight housings combine structural integrity, thermal awareness, optical precision, and practical assembly logic.
5. Are custom LED projection systems with 3D-printed housings legal for street use, and how can enthusiasts stay on the right side of regulations?
Legality depends on where the vehicle is registered, how the headlight is modified, and whether the finished system complies with applicable lighting regulations. This is one of the most misunderstood areas in the retrofit world. In many places, factory headlights are certified as complete assemblies, not as a collection of interchangeable internal parts. That means replacing reflectors, projectors, light sources, or internal structures with custom components may move the headlamp outside its original approval status, even if the finished beam looks better than stock. In addition, color temperature, brightness, beam shape, marker light behavior, DRL function, and adaptive lighting features may all be regulated. For 2026 vehicles especially, headlights are often tied into advanced electronics, diagnostics, and safety systems, which adds another layer of complexity beyond basic optical performance.
Enthusiasts who want to stay as compliant as possible should begin by researching local and national lighting laws before cutting into a headlamp. It is wise to use proven projector hardware, maintain proper low-beam cutoff control, preserve aiming adjustment capability, and avoid cosmetic choices that compromise function, such as excessive tinting or uncontrolled accent lighting. Keeping the beam pattern clean and professionally aimed is not only good practice but also one of the strongest indicators that the build was done responsibly. For show cars or off-road-focused vehicles, custom systems may be more acceptable in practice, but that does not automatically make them legal for public roads. The safest approach is to treat legality, safety, and performance as linked goals. If a retrofit has disciplined optics, secure construction, proper thermal management, and correct aiming, it is far more likely to perform responsibly in real traffic. Even so, builders should remember that street legality is ultimately a regulatory question, not just a craftsmanship question.