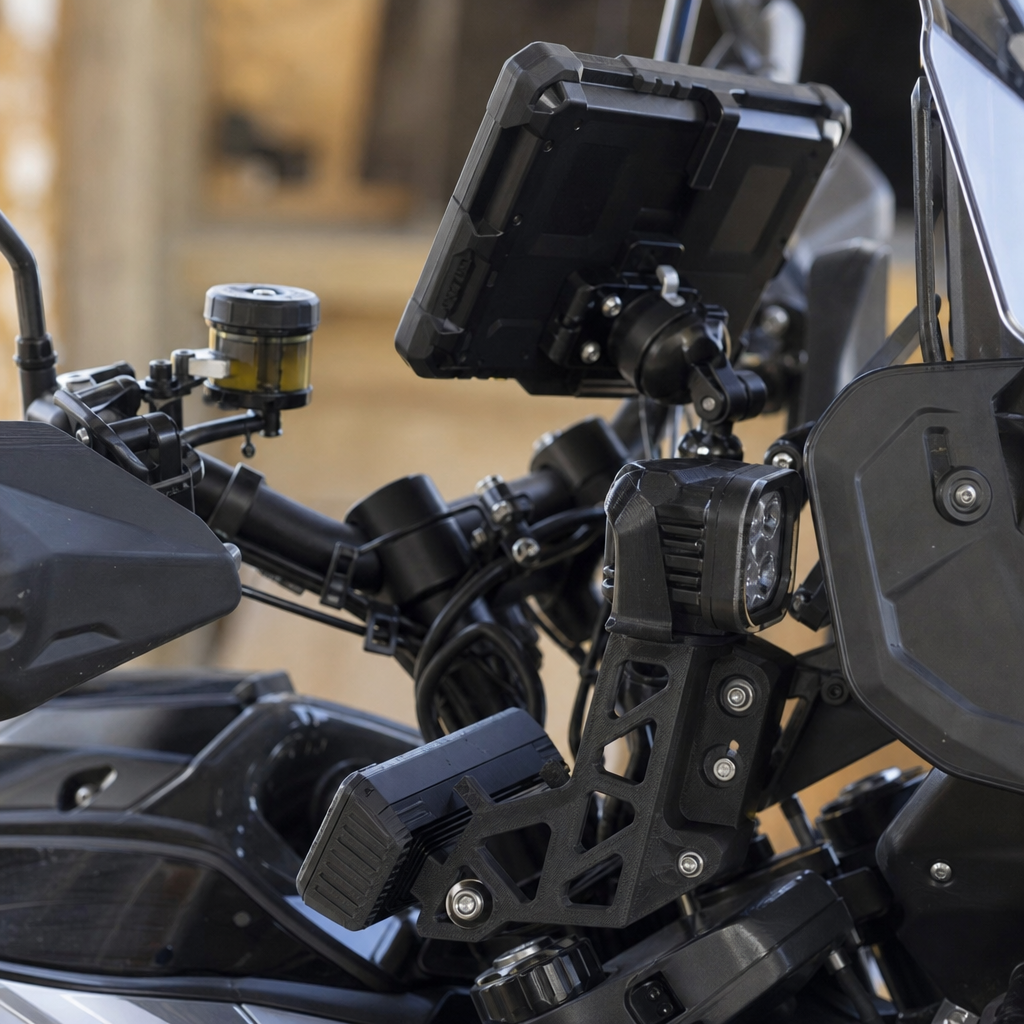
3D-printed brackets have become one of the smartest ways to customize a 2027 Pan America’s electronics because they solve a problem every modern adventure-bike builder runs into: there is never quite enough mounting space in exactly the right place. On this motorcycle, “electronics” means far more than a GPS cradle. It includes auxiliary light controllers, USB-C power modules, action-camera interfaces, tire-pressure display add-ons, comms hubs, radar detector mounts, switched fuse blocks, antenna bases, and the cable management that keeps all of it serviceable off-road. A bracket is the mechanical link between those devices and the bike. When that link is poorly designed, electronics vibrate, connectors loosen, harnesses chafe, and expensive gear fails at the worst moment.
What makes 3D printing different from traditional fabrication is speed, repeatability, and geometric freedom. Instead of cutting aluminum by hand for every iteration, you can model a bracket around the Pan America’s fairing stays, windscreen support, crash bar clamp geometry, or dash cavity, print a prototype in hours, test fit it, then revise clearances and wire exits with precision. I have used this workflow on CAN-integrated accessory installs and on simpler fused-power add-ons, and the practical advantage is always the same: the bracket can be designed around the electronics, the rider’s line of sight, and the bike’s maintenance requirements all at once.
For builders working inside the broader fabrication-tech world, this topic sits at the intersection of additive manufacturing, carbon-composite finishing, and wiring discipline. A printed bracket rarely succeeds by material choice alone. It needs the right load path, heat tolerance, insert strategy, strain relief, and environmental protection. On an adventure motorcycle expected to see washboard roads, weather, mud, and engine heat, customization has to be durable, not just clever. That is why this hub matters. It explains how to use 3D printing effectively, where carbon parts complement printed structures, and how proper wiring turns a custom electronics mount into a reliable system rather than a collection of accessories.
Why 3D-Printed Brackets Work So Well on the 2027 Pan America
The 2027 Pan America gives builders an unusually rich platform for electronics customization because it combines ADV ergonomics with dense packaging. Riders often want navigation high in the sightline, charging near the bars, and controllers protected from impact and weather. Factory mounting points exist, but they are designed for mass-market accessories, not every custom combination. A printed bracket fills those gaps by matching exact bolt spacing, dash curvature, and desired device angle. If you need a mount that clears the windscreen through full travel, misses the TFT at full steering lock, and leaves room for gloved button access, additive design is the fastest route.
The most useful applications fall into three categories. First are cockpit brackets: GPS shelves, phone mounts, TPMS display plates, camera tabs, and comms switch pods. Second are protected internal mounts behind side panels or under the seat for power distribution, relay carriers, data modules, and tracker housings. Third are transition parts, such as wire guides, grommeted pass-throughs, connector retainers, and adapter plates joining aftermarket electronics to factory fastener locations. These are small components, but they solve the practical headaches that consume most install time.
Real-world success comes from understanding load and vibration. Motorcycle brackets fail less often from static weight than from cyclical stress. A 300-gram display bouncing at a resonant frequency on corrugated roads can crack a thin arm surprisingly fast. Good printed designs keep cantilevers short, add ribs instead of bulk, orient layers so tensile loads do not pull across weak interfaces, and use broad mounting footprints. On my own builds, the strongest improvement usually comes from redesigning geometry rather than simply switching to a stronger filament.
Choosing Materials: PLA Is a Prototype, Not a Final Answer
Material selection is where many first-time builders make costly mistakes. PLA is excellent for checking fit, hole placement, and visual line, but it softens too easily for real motorcycle service. Near a windscreen in summer sun or beside a warm fairing cavity, it can creep enough to alter device angle. For functional parts, PETG is a modest step up, but I generally treat it as light-duty. Better choices include ASA, ABS, nylon, carbon-fiber-filled nylon, polycarbonate blends, and in some cases high-temperature resins from industrial machines. Each has tradeoffs involving heat resistance, UV stability, moisture absorption, impact toughness, and print difficulty.
ASA is often the best all-around outdoor filament for brackets exposed to sunlight because it resists UV better than ABS and maintains decent toughness. Nylon is tougher and more fatigue resistant, making it useful for clamps, cable guides, and parts that need flex without cracking. Carbon-fiber-filled nylon improves stiffness and dimensional stability, which is valuable when a bracket must hold a navigation device steady, but stiffness is not the same as toughness. It can be more notch sensitive, so edge radii and washer support still matter. Polycarbonate blends can deliver excellent heat resistance, though they demand enclosed printing and careful drying.
For builders evaluating options, the table below captures the practical decision logic I use most often.
| Material | Best Use on a Pan America | Main Strength | Main Limitation |
|---|---|---|---|
| PLA | Fit-check prototypes only | Easy, accurate printing | Poor heat resistance for final parts |
| PETG | Light-duty internal guides | Simple printing, decent chemical resistance | Can creep under load and heat |
| ASA | Exterior cockpit mounts | UV stability and balanced durability | Warping without enclosure |
| Nylon | Clamps, wire retainers, impact-prone parts | Toughness and fatigue resistance | Moisture sensitive, harder to print |
| CF Nylon | Stiff electronics brackets | High stiffness, good dimensional control | Abrasive, needs hardened nozzle |
| PC Blend | High-heat structural mounts | Excellent heat performance | Demanding print setup |
No material eliminates the need for sound engineering. If a bracket sits near the radiator exhaust path, above the front cylinder head area, or behind dark bodywork trapping heat, verify temperatures with an infrared thermometer after riding. Adventure bikes create harsh thermal cycles, and actual measurements beat assumptions every time.
Design Rules That Keep Printed Brackets Alive
The best 3D-printed motorcycle brackets look simple because the complexity is solved in the CAD stage. Start by locating hard points already on the bike: M5 or M6 fasteners on instrument supports, accessory bar diameters, panel screws with metal backers, or structural tabs attached to the subframe. Avoid asking thin cosmetic plastics to carry meaningful load. Then define the forces involved. A GPS unit mounted high above the dash imposes bending moments; a fuse block under the seat mainly needs vibration isolation and access. Designing these jobs as if they are the same is how brackets become overbuilt in the wrong places and weak where it matters.
Use fillets generously at arm transitions, add gussets under horizontal shelves, and place holes far enough from edges to prevent splitting. Threaded brass heat-set inserts are usually superior to cutting threads directly into plastic, especially where accessories may be removed repeatedly. For through-bolts, use washers with enough diameter to spread clamp force. If the bracket interfaces with metal tubing, design conforming saddles and consider thin rubber isolation strips to improve grip and reduce fretting. Wall thickness should follow the load path, not arbitrary slicer habits. Four to six perimeters, high infill in fastener zones, and extra top-bottom layers generally outperform a bulky shape with random 100 percent infill.
Layer orientation deserves special attention. FDM parts are anisotropic, meaning strength varies by direction. If a cantilevered arm will be bending downward in use, orient the print so filament lines support that stress rather than peeling apart between layers. Sometimes that means printing with support material to gain a far stronger final part. When a geometry cannot be oriented ideally, split the design into two pieces and bolt them together. That often creates a more durable component and makes post-install wiring easier.
Where Carbon Fiber Fits In: Stiffness, Finish, and Hybrid Parts
Carbon belongs in this conversation not as decoration but as a strategic companion to printed parts. On the Pan America, carbon sheet or laminated panels can provide a thin, stiff face where a printed bracket would otherwise need too much depth. For example, a 3-millimeter carbon plate can serve as the instrument shelf surface, while printed side brackets handle the complex interface to the bike’s mounting points. This hybrid approach reduces weight, increases stiffness, and gives the install a cleaner finish than a fully printed shelf with thick ribs.
Forged carbon cosmetic covers and twill laminates also help protect electronics when integrated as shrouds, but they are less forgiving than printed polymers. Drilling carbon without proper support can cause delamination, and poorly sealed edges wick moisture. If you use carbon in a mount assembly, isolate it from abrasion points, deburr every hole, and avoid crushing the laminate with overtightened fasteners. Bonded inserts or aluminum backing plates are often worth the effort for repeated service access.
The practical rule is straightforward: use 3D printing for geometry, carbon for span and stiffness, and metal where concentrated fastener loads demand it. This mix mirrors what high-level builders already do in race and expedition applications. It is not about chasing exotic materials. It is about assigning each material the job it performs best.
Wiring Makes or Breaks the Bracket
A custom mount is only successful if the wiring is equally deliberate. Most accessory failures blamed on vibration are actually wiring failures: unsupported connectors, insufficient drip loops, cheap crimp tools, undersized wire, or routing that ignores steering movement. On the 2027 Pan America, expect electronics installs to interact with switched and unswitched circuits, CAN-aware accessories, and areas with tight service clearances. That means every bracket should include cable exits, tie-down points, connector retention, and room for future troubleshooting.
Use marine-grade heat-shrink terminals or sealed connectors from established families such as Deutsch DT, TE Connectivity Superseal, or Sumitomo where water exposure is likely. Size wire by current draw and run length, not guesswork. Fuse each accessory according to the wire and device requirements, and place the fuse where it can be inspected without removing half the motorcycle. For switched distribution, quality modules from Denali, PDM60, Hex ezCAN where compatible, or a relay-fed fuse block simplify control and reduce hacked splices into factory wiring. Service loops should be intentional and modest, not stuffed randomly behind panels.
I strongly recommend labeling every branch during the build, even on a one-bike project. Six months later, when adding heated gear ports or replacing a camera harness after a drop, labels save hours. Braided sleeving, fabric harness tape such as Tesa, and rubber-lined P-clamps elevate reliability far more than flashy accessories. Build the harness as if someone else will have to diagnose it in the rain.
Testing, Safety, and the Builder Mindset
Before trusting any printed bracket on a travel motorcycle, test in stages. First confirm static fit with the suspension loaded and bars at both locks. Then check windscreen travel, key access, TFT visibility, and glove usability. Next ride on pavement and inspect for witness marks, loosening fasteners, or cable rub. Only after that should the part see washboard, potholes, or extended off-road vibration. A smartphone accelerometer app will not replace lab testing, but it can reveal whether one mounting location is obviously calmer than another.
Safety margins matter most when the bracket sits near steering, braking, or rider airspace. Nothing mounted above the dash should become a projectile in a crash because the design relied on two tiny screws into thin plastic. Use threadlocker where appropriate, locknuts where heat allows, and secondary retention for expensive devices. If a mount blocks warning lights, key information on the display, or the rider’s view over technical terrain, redesign it. Convenience never outranks control.
The broader lesson for builders in the new fabrication culture is that digital tools reward discipline. CAD, slicers, carbon templates, and modern wiring components let a solo garage builder achieve a level of integration that was once shop-only work. But precision tools also make it easy to produce polished-looking mistakes. Measure twice, print prototypes, document revisions, and keep a parts file of what worked. If you are building out your Pan America’s electronics, start with one bracket and one clean harness section, validate the process, then expand the system with the same standards.
3D-printed brackets are not a gimmick for the 2027 Pan America; they are a practical fabrication method for placing electronics exactly where they work best and supporting them with professional-grade wiring. The most durable results come from treating the project as a system. Choose heat- and UV-appropriate materials, design around real loads and vibration, use carbon strategically when stiffness or finish matters, and route wiring with serviceability in mind. When those elements align, custom electronics look factory-integrated, survive hard use, and remain easy to maintain.
As the hub for fabrication tech in this custom-building category, the key takeaway is simple: additive manufacturing, composites, and wiring should be planned together, not as separate upgrades. A mount influences cable routing; cable routing influences bracket shape; bracket stiffness may determine whether carbon reinforcement is needed. Thinking in that sequence prevents rework and produces cleaner, safer installs.
If you are preparing your own Pan America build, begin by mapping the electronics you actually need, identify the factory hard points available, and prototype the first bracket before buying a pile of accessories. That single disciplined step will improve every part that follows.
Frequently Asked Questions
Why are 3D-printed brackets such a good solution for adding electronics to a 2027 Pan America?
3D-printed brackets work so well on a 2027 Pan America because they solve the biggest packaging problem on a modern adventure bike: the available mounting points rarely match the ideal location for the electronics you actually want to use. Once you start adding a GPS, USB-C charging ports, auxiliary light controllers, switched fuse blocks, comms hubs, TPMS display modules, action-camera interfaces, or radar detector mounts, you quickly discover that factory space is limited, irregularly shaped, and often already occupied. A custom printed bracket lets you use the exact dimensions, angles, offsets, and hole spacing needed for your specific setup instead of trying to force a universal metal tab to fit.
That flexibility matters even more on an adventure platform because cockpit layout affects safety as much as convenience. A bracket can position a screen in your sightline without blocking the TFT, keep a power module accessible with gloves on, route cables away from steering sweep, and place sensitive electronics in a more protected area behind the fairing or near existing structure. Good design also helps reduce clutter by consolidating multiple accessories onto one organized mounting surface rather than scattering separate clamps and adhesive mounts all over the bike.
Another major advantage is iteration. If your first version needs a different viewing angle, more clearance for hand guards, a stronger gusset, or a revised wire pass-through, you can update the design and print a better version without fabricating an entirely new part from scratch. For Pan America owners who are building a truly personalized electronics package, that ability to refine fitment is one of the biggest reasons 3D-printed brackets have become such a smart customization choice.
What materials are best for 3D-printing motorcycle electronics brackets, and which ones should be avoided?
For a real-world motorcycle application, material choice is critical. Electronics brackets on a Pan America have to deal with vibration, UV exposure, changing temperatures, occasional impact, and in many cases engine heat or radiant heat from nearby components. The best choices are usually engineering-grade filaments with strong heat resistance and good toughness, such as nylon, carbon-fiber-reinforced nylon, ASA, polycarbonate blends, or PETG in lower-stress applications. Of those, nylon and carbon-fiber nylon are often top-tier options because they balance strength, impact resistance, and durability well, especially for brackets that support multiple devices or sit in areas exposed to vibration.
ASA is another strong candidate when UV stability matters, particularly for parts mounted in open view near the cockpit. PETG can work for lighter-duty uses such as wire guides, small sensor holders, or lightly loaded housings, but it is usually not the first choice for heavily loaded structural brackets in hotter zones. Polycarbonate and some advanced blends offer excellent strength and heat resistance, though they can be more demanding to print correctly and may require an enclosed printer and careful tuning.
The material most riders should avoid for this kind of job is standard PLA. It is easy to print and looks good initially, but it softens under heat too easily and can become brittle over time, especially in an outdoor powersports environment. A PLA bracket that seems solid in the garage may deform in summer sun, crack under vibration, or fail when subjected to repeated shock loads off-road. Also avoid treating infill-heavy decorative prints as structural parts; the design, layer orientation, wall thickness, hardware reinforcement, and print quality matter just as much as the filament itself. On a bike as capable and demanding as the Pan America, the safest approach is to use materials and print settings intended for functional mechanical parts, not display pieces.
How do you design a 3D-printed bracket that can actually survive vibration, weather, and off-road use?
A durable bracket starts with smart design, not just strong material. The first rule is to build around the motorcycle’s real loads. Adventure bikes generate continuous vibration, sudden impacts, and torsional stress from rough terrain, so the bracket should not rely on thin arms, sharp corners, or long unsupported spans. Instead, it should use generous fillets, gussets, wider mounting bases, and reinforced transitions where the part changes direction. Those are the places where cracks typically begin. If the bracket supports a heavier item like a phone, GPS, camera, or multi-module electronics plate, it should spread the load across multiple mounting points whenever possible rather than hanging everything from a single bolt.
Fastener strategy matters too. Metal threaded inserts, captive nuts, or through-bolts with washers are usually better than repeatedly driving screws directly into plastic. Compression limiters or metal sleeves can also help prevent over-tightening and reduce long-term creep in the printed part. For high-vibration areas, adding rubber isolation washers or vibration-damping interfaces can improve both bracket longevity and electronics reliability, especially for displays and camera equipment. Cable management should be integrated into the design from the beginning so the wires are strain-relieved, protected from chafing, and kept clear of steering movement, hot components, and suspension travel.
Print orientation is another often-overlooked factor. Layer lines create directional weakness, so the part should be oriented so the strongest axis of the print aligns with the primary loads. In practice, that may mean redesigning a bracket so the layers are not being peeled apart by vibration or impact. Weather resistance also needs attention. Outdoor-exposed parts should use UV-stable materials when possible, and any mounting position should be evaluated for direct spray, mud accumulation, and cleaning chemicals. Before trusting the bracket on a trip, it is wise to test fit it on the bike, cycle the bars lock to lock, confirm full clearance, and then do a staged shakedown: pavement first, then rougher terrain, then full travel loads. That process turns a clever printed part into a genuinely reliable motorcycle component.
What kinds of electronics can be mounted with custom 3D-printed brackets on a 2027 Pan America?
The list is much broader than most riders expect. On a modern Pan America, “electronics” goes well beyond a single GPS mount. Custom 3D-printed brackets are commonly used for GPS cradles, rugged phone mounts, USB-C and USB-A power modules, auxiliary light switches or controllers, tire-pressure monitoring display add-ons, comms hubs, action-camera mounts, radar detector platforms, switched fuse blocks, relay housings, antenna supports, and compact storage trays for power converters or interface modules. They can also be designed to combine several functions into one tidy assembly, such as a cockpit bridge that carries a navigation screen, a charging outlet, and a small accessory switch panel in a single footprint.
That ability to combine components is where custom brackets really shine. Instead of stacking clamp-on accessories that compete for handlebar real estate, a purpose-built bracket can use unused factory fastener locations, windscreen support points, inner fairing areas, dash-adjacent structure, or crossbar zones to create a cleaner and more stable mounting solution. This is especially valuable when you want your cockpit to remain readable and glove-friendly during long-distance travel or technical off-road riding. A well-designed bracket can place each component exactly where it is easiest to see and operate while keeping the overall setup compact.
There are limits, of course. High-mass items, devices exposed to excessive heat, or safety-critical equipment should be treated with extra caution and may require hybrid designs that combine printed geometry with aluminum backing plates or steel hardware. But for a huge range of electronics-related accessories, custom 3D-printed brackets offer a level of fit, organization, and personalization that off-the-shelf mounts usually cannot match. When done correctly, they can make the bike look more integrated and function more like a purpose-built expedition machine rather than a collection of add-ons.
Are 3D-printed brackets safe and reliable enough for long-distance adventure riding, or should they only be used for light-duty applications?
They can absolutely be safe and reliable enough for long-distance adventure use, but only when they are designed, printed, installed, and tested like true functional parts. The biggest mistake is assuming that because a bracket looks strong, it is strong. Reliability comes from the complete system: proper material selection, realistic load analysis, good print orientation, sufficient wall thickness, quality hardware, secure attachment points, and smart placement on the bike. A carefully engineered nylon or carbon-fiber-nylon bracket with metal inserts and well-distributed loads can be very trustworthy for supporting navigation gear, switch modules, compact controllers, and other common electronics on a Pan America.
Where riders get into trouble is using hobby-grade materials, underbuilt designs, or untested mounts in harsh conditions. If a part is thin, poorly layered, heat-sensitive, or mounted where it experiences leverage and repeated shock, it may fail far earlier than expected. That is why the intended use matters. A small bracket holding a lightweight USB-C charger in a protected inner-fairing area has a very different risk profile than a tall, cantilevered mount carrying a heavy phone and camera above the dash on washboard roads. The more severe the environment and the more critical the device, the more conservative the design should be.
The best practice is to treat printed brackets as engineered components. Use high-quality filament, verify fitment, inspect for cracks after early test rides, retorque hardware, and keep a close eye on any part